Na dzisiejszym rynku, na którym każdego dnia generowana jest ogromna ilość danych, bardzo ważne jest zrozumienie, jak obchodzić się z nimi. SQL Server to zintegrowane środowisko opracowane przez firmę Microsoft do obsługi danych. W tym artykule w samouczku dotyczącym SQL Server nauczysz się wszystkich operacji i poleceń potrzebnych do eksploracji baz danych.
Dla lepszego zrozumienia podzieliłem bloga na następujące kategorie:
| Polecenia | Opis |
Polecenia języka definicji danych (DDL) | Ten zestaw poleceń służy do definiowania bazy danych. |
Polecenia języka manipulacji danymi (DML) | Polecenia manipulacji służą do manipulowania danymi obecnymi w bazie danych. |
Polecenia języka kontroli danych (DCL) | Ten zestaw poleceń dotyczy uprawnień, praw i innych kontroli systemów baz danych. |
Polecenia języka kontroli transakcji (TCL) | Te polecenia są używane do obsługi transakcji w bazie danych. |
Oprócz poleceń w tym artykule omówiono następujące tematy:

- Co to jest SQL Server?
- Zainstaluj serwer SQL
- Połącz się z SQL Server za pomocą SSMS
- Aparat bazy danych dostępu
- Architektura serwera SQL
- Komentarze w SQL
- Typy danych serwera SQL
- Klucze w bazie danych
- Ograniczenia w bazie danych
- Operatorzy
- Funkcje agregujące
- Funkcje zdefiniowane przez użytkownika
- Zagnieżdżone zapytania
- Połączenia
- Pętle
- Procedury przechowywane
- Obsługa wyjątków
***UWAGA*** W tym samouczku dotyczącym SQL Server rozważę poniższą bazę danych jako przykład, aby pokazać, jak uczyć się i pisać polecenia.
| Identyfikator ucznia | Nazwa ucznia | Nazwa rodzica | Numer telefonu | Adres | Miasto | Kraj |
| 1 | Vihaan | Akriti Mehra | 9955339966 | Brygada Blok Drogowy 9 | Hyderabad | Indie |
| 2 | Manasa | Shourya Sharma | 9234568762 | Mayo Road 15 | Kalkuta | Indie |
| 3 | Tak | Soumya Mishra | 9876914261 | Dom Marathalli nr 101 | Bengaluru | Indie |
| 4 | Preeti | Rohan Sinha | 9765432234 | Droga Królowej 40 | Delhi | Indie |
| 5 | Shanaya | Abhinay Agarwal | 9878969068 | Ulica Oberoi 21 | Bombaj | Indie |
Zanim zaczniemy rozumieć różne polecenia używane w SQL Server, zrozummy, czym jest SQL Server, jego architekturą i jak go zainstalować.
Co to jest SQL Server?
Microsoft SQL Server to system zarządzania relacyjnymi bazami danych. Obsługuje język zapytań strukturalnych i zawiera własną implementację języka SQL, którym jest Transact-SQL(T-SQL) . Posiada zintegrowane środowisko do obsługi baz danych SQL, czyli SQL Server Management Studio.
Kluczowe składniki SQL Server to:
- Silnik bazy danych: Ten komponent obsługuje przechowywanie, szybkie przetwarzanie transakcji i zabezpieczanie danych.
- SQL Server – Ta usługa służy do uruchamiania, zatrzymywania, wstrzymywania i kontynuowania instancji MS SQL Server.
- Agent serwera SQL – Usługa agenta serwera pełni rolę harmonogramu zadań i jest wyzwalana przez dowolne zdarzenie lub zgodnie z wymaganiami.
- Przeglądarka SQL Server – Ta usługa służy do łączenia przychodzącego żądania z żądaną instancją SQL Server.
- Wyszukiwanie pełnotekstowe programu SQL Server – Służy do umożliwienia użytkownikowi uruchamiania zapytań pełnotekstowych na danych znakowych w tabelach SQL.
- Zapisujący VSS SQL Server – Umożliwia tworzenie kopii zapasowych i przywracanie plików danych, gdy serwer SQL nie działa.
- Usługi analizy serwera SQL (SSAS) – Usługa ta służy do zapewniania możliwości analizy danych, eksploracji danych i uczenia maszynowego. SQL Server jest również zintegrowany z Pythonem i R w celu zaawansowanej analizy danych.
- Usługi raportowania SQL Server (SSRS) – Jak sama nazwa wskazuje, ta usługa służy do zapewniania funkcji i możliwości podejmowania decyzji, w tym integracji z Hadoop.
- Usługi integracji serwera SQL (SSIS) – Ta usługa służy do wykonywania operacji ETL dla różnych typów danych z wielu źródeł danych.
Teraz, gdy już wiesz, czym jest MS SQL Server, przejdźmy dalej w tym artykule na temat samouczka dotyczącego SQL Server i zrozumiemy, jak zainstalować i skonfigurować SQL Server.
Zainstaluj serwer SQL
Wykonaj poniższe czynności, aby zainstalować SQL Server:
Krok 1: Przejdź do oficjalnej strony pobrania Microsoft SQL Server , gdzie znajdziesz opcję instalacji SQL Server lokalnie lub w chmurze.
Krok 2: Teraz przewiń w dół, a zobaczysz dwie opcje: Wersja dla programistów i przedsiębiorstw . Tutaj będę pobierać edycję dla programistów . Aby pobrać, wystarczy kliknąć Pobierz teraz opcja. Patrz poniżej.
Krok 3: Po pobraniu aplikacji kliknij dwukrotnie plik, a zobaczysz następujące okno.
Krok 4: Teraz możesz wybrać jedną z 3 opcji konfiguracji SQL Server. Tutaj wybiorę po prostu opcję podstawową . Po wybraniu opcji typu instalacji następnym ekranem będzie akceptacja umowy licencyjnej. Aby to zrobić, kliknij Akceptuj w następnym oknie.
Krok 5: Następnie musisz określić lokalizację instalacji SQL Server. Następnie musisz kliknąć Zainstaluj.
Po kliknięciu Zainstaluj , zobaczysz, że pobierane są wymagane pakiety. Teraz, po zakończeniu instalacji, zobaczysz następujący ekran:
Tutaj możesz przejść dalej i kliknąć Połącz teraz lub dostosować instalację. Dla lepszego zrozumienia pójdę dalej i wybiorę Dostosuj.
Krok 6: Po kliknięciu Dostosuj w powyższym oknie pojawi się następujący kreator. w następnym oknie kliknij Dalej
Krok 7: Po automatycznym zainstalowaniu reguł kliknij Dalej . Patrz poniżej.
Krok 8: Następnie musisz wybrać typ instalacji. Wybierz więc Wykonaj nowa instalacja SQL Server 2017 opcję, a następnie kliknij Dalej.
Krok 9: W kreatorze, który się otworzy, wybierz wersję:Deweloper. Następnie kliknij Dalej . Patrz poniżej.
Krok 10: Teraz przeczytaj i zaakceptuj umowy licencyjne, zaznaczając przycisk opcji, a następnie kliknij Dalej . Patrz poniżej.
Krok 11: W poniższym kreatorze możesz wybrać funkcje, które chcesz zainstalować. Możesz także wybrać katalog główny instancji, a następnie kliknąć Dalej . Tutaj wybiorę Usługi silnika bazy danych .
Krok 12: Następnie musisz nazwać instancję, a automatycznie zostanie utworzony identyfikator instancji. Tutaj nazwę instancję „edureka”. Następnie kliknij Dalej
Krok 13: W kreatorze konfiguracji serwera kliknij Dalej .
Krok 14: Teraz musisz włączyć tryby uwierzytelniania. Tutaj zobaczysz tryb uwierzytelniania Windows i Tryb mieszany . Wybiorę tryb mieszany. Następnie podaj hasło, a następnie dodam bieżącego użytkownika jako Administrator wybierając Dodaj bieżącego użytkownika opcja.
Krok 15: Następnie wybierz ścieżkę pliku konfiguracyjnego i kliknij Zainstaluj .
Po zakończeniu instalacji zobaczysz następujący ekran:
Połącz się z serwerem SQL za pomocą programu SSMS
Po zainstalowaniu SQL Server następnym krokiem jest połączenie SQL Server z SQL Server Management Studio. Aby to zrobić, wykonaj poniższe czynności:
Krok 1: Wróć do następującego okna i kliknij zainstaluj SSMS opcja.
Krok 2: Po kliknięciu tej opcji zostaniesz przekierowany na następną stronę, gdzie musisz wybrać Pobierz SSMS.
Krok 3: Po pobraniu konfiguracji kliknij dwukrotnie aplikację, a otworzy się następujący kreator.
Krok 4: Kliknij Opcja instalacji , w powyższym oknie i zobaczysz, że ta instalacja się rozpocznie.
Krok 5: Po zakończeniu instalacji pojawi się okno dialogowe, jak pokazano poniżej.
Po zainstalowaniu SSMS następnym krokiem jest uzyskanie dostępu do Database Engine .
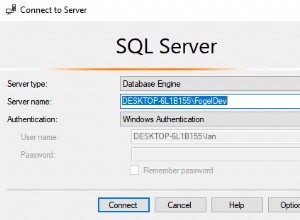
Dostęp do silnika bazy danych
Po otwarciu Studio zarządzania serwerem SQL z menu startowego , otworzy się okno podobne do okna pokazanego na poniższym obrazku.
W tym miejscu podaj nazwę serwera, tryb uwierzytelniania i kliknij Połącz.
Po kliknięciu Połącz , zobaczysz następujący ekran.
Cóż, tak się instaluje i ustawia SQL Server. Teraz, idąc dalej w tym samouczku dotyczącym SQL Server, pozwól nam zrozumieć różne komponenty architektury SQL Server.
Architektura serwera SQL
Architektura SQL Server jest następująca:
- Serwer − Tutaj instalowane są usługi SQL i znajduje się baza danych
- Silnik relacyjny − Zawiera parser zapytania, optymalizator i executor; a wykonanie odbywa się w silniku relacyjnym.
- Parser poleceń − Sprawdza składnię zapytania i konwertuje zapytanie na język maszynowy.
- Optymalizator − Przygotowuje plan wykonania jako wynik, pobierając statystyki, zapytania i drzewo Algebratora jako dane wejściowe.
- Wykonawca zapytania − To jest miejsce, w którym zapytania są wykonywane krok po kroku
- Silnik pamięci − Odpowiada za przechowywanie i pobieranie danych w systemie przechowywania, manipulację danymi, zarządzanie i blokowanie transakcji.
Teraz, gdy już wiesz, jak skonfigurować i zainstalować SQL Server i jego różne komponenty, zacznijmy od pisania poleceń w SQL Server. Ale zanim to zrobię, omówię, jak pisać komentarze w SQL Server.
Komentarze w SQL Server
Są dwa sposoby komentowania w SQL, tj. użyj s komentarze jednowierszowe lub m Komentarze końcowe .
Komentarze jednowierszowe
Komentarze jednowierszowe zaczynają się od dwóch myślników (–). W związku z tym tekst wymieniony po (–) do końca pojedynczej linii zostanie zignorowany przez kompilator.
Przykład:
--Example of single line comments
Komentarze wielowierszowe
Komentarze wielowierszowe zaczynają się od /* i kończą na */ . Stąd tekst wymieniony pomiędzy /* i */ zostaną zignorowane przez kompilator.
Przykład:
/* Example for
multi-line comments */
Teraz w tym artykule samouczka dotyczącego SQL Server zacznijmy od pierwszego zestawu poleceń, tj. poleceń języka definicji danych.
Polecenia języka definicji danych
W tej części artykułu znajdziesz wyobrażenie o poleceniach, za pomocą których możesz zdefiniować swoją bazę danych. Polecenia są następujące:
- UTWÓRZ
- UPUŚĆ
- ZMIANA
- OBCIĘĆ
- ZMIEŃ NAZWĘ
UTWÓRZ
Ta instrukcja służy do tworzenia tabeli, bazy danych lub widoku.
Oświadczenie „CREATE DATABASE”
To stwierdzenie służy do tworzenia bazy danych.
Składnia
CREATE DATABASE DatabaseName;
Przykład
CREATE DATABASE Students;
Oświadczenie „CREATE TABLE”
Jak sama nazwa wskazuje, to stwierdzenie służy do tworzenia tabeli.
Składnia
CREATE TABLE TableName (
Column1 datatype,
Column2 datatype,
Column3 datatype,
....

ColumnN datatype
);
Przykład
CREATE TABLE StudentInfo
(
StudentID int,
StudentName varchar(8000),
ParentName varchar(8000),
PhoneNumber int,
AddressofStudent varchar(8000),
City varchar(8000),
Country varchar(8000)
);
UPUŚĆ
Ta instrukcja służy do usuwania istniejącej tabeli, bazy danych lub widoku.
Oświadczenie „DROP DATABASE”
Ta instrukcja służy do usuwania istniejącej bazy danych. Pełne informacje znajdujące się w bazie danych zostaną utracone, gdy tylko wykonasz poniższe polecenie.
Składnia
DROP DATABASE DatabaseName;
Przykład
DROP DATABASE Students;
Oświadczenie „DROP TABLE”
Ta instrukcja służy do usuwania istniejącej tabeli. Pełne informacje zawarte w tabeli zostaną utracone, gdy tylko wykonasz poniższe polecenie.
Składnia
DROP TABLE TableName;
Przykład
DROP TABLE StudentInfo;
ZMIANA
Polecenie ALTER służy do dodawania, usuwania lub modyfikowania kolumn lub ograniczeń w istniejącej tabeli.
Oświadczenie „ALTER TABLE”
Ta instrukcja służy do dodawania, usuwania, modyfikowania kolumn w istniejącej tabeli.
Oświadczenie „ALTER TABLE” z ADD/DROP COLUMN
Instrukcja ALTER TABLE jest używana z poleceniem ADD/DROP Column do dodawania i usuwania kolumny.
Składnia
ALTER TABLE TableName
ADD ColumnName Datatype;

ALTER TABLE TableName
DROP COLUMN ColumnName;
Przykład
--ADD Column BloodGroup:
ALTER TABLE StudentInfo
ADD BloodGroup varchar(8000);

--DROP Column BloodGroup:
ALTER TABLE StudentInfo
DROP COLUMN BloodGroup ;
Oświadczenie „ALTER TABLE” z ALTER COLUMN
Instrukcji ALTER TABLE można używać z kolumną ALTER do zmiany typu danych istniejącej kolumny w tabeli.
Składnia
ALTER TABLE TableName
ALTER COLUMN ColumnName Datatype;
Przykład
--Add a column DOB and change the data type from date to datetime.
ALTER TABLE StudentInfo
ADD DOB date;
ALTER TABLE StudentInfo
ALTER COLUMN DOB datetime;
OBCIĄGNIJ
To polecenie SQL służy do usuwania informacji zawartych w tabeli, ale nie usuwa samej tabeli. Jeśli więc chcesz usunąć informacje zawarte w tabeli, a nie samą tabelę, musisz użyć polecenia TRUNCATE. W przeciwnym razie użyj polecenia DROP.
Składnia
TRUNCATE TABLE TableName;
Przykład
TRUNCATE TABLE StudentInfo;
ZMIEŃ NAZWĘ
To stwierdzenie służy do zmiany nazwy jednej lub więcej tabel.
Składnia
sp_rename 'OldTableName', 'NewTableName';
Przykład
sp_rename 'StudentInfo', 'Infostudents';
Przechodząc dalej w tym artykule na temat samouczka SQL Server, pozwól nam zrozumieć różne typy danych obsługiwane przez SQL Server.
Typy danych serwera SQL
| Kategoria typu danych | Nazwa typu danych | Opis | Zakres/Składnia |
| Dokładne wartości liczbowe | liczba | Służy do przechowywania wartości numerycznych i ma stałą precyzję i liczby skali | – 10^38 +1 do 10^38 – 1. |
| tinyint | Służy do przechowywania wartości całkowitych | 0 do 255 | |
| mały | Służy do przechowywania wartości całkowitych | -2^15 (-32768) do 2^15-1 (32767) | |
| duży | Służy do przechowywania wartości całkowitych | -2^63 (-9,223,372,036,854,775,808) do 2^63-1 (9,223,372,036,854,775,807) | |
| int | Służy do przechowywania wartości całkowitych | -2^31 (-2147483648) do 2^31-1 (2147483647) | |
| bit | Przechowuje typ danych całkowitych, który ma wartość 0, 1 lub NULL | 0, 1 lub NULL | |
| dziesiętny | Służy do przechowywania wartości numerycznych i ma stałą precyzję i liczby skali | – 10^38 +1 do 10^38 – 1. | |
| małe pieniądze | Służy do przechowywania wartości pieniężnych lub walutowych. | – od 214 748,3648 do 214 748,3647 | |
| pieniądze | Służy do przechowywania wartości pieniężnych lub walutowych. | -922 337 203 685 477 5808 do 922 337 203 685 477,5807 (-922 337 203 685 477,58 do 922 337 203 685 477,58 dla Informatica. | |
| Przybliżone wartości liczbowe | float | Służy do przechowywania zmiennoprzecinkowych danych liczbowych | – 1,79E+308 do -2,23E-308, 0 i 2,23E-308 do 1,79E+308 |
| real | Służy do przechowywania zmiennoprzecinkowych danych liczbowych | – 3,40E + 38 do -1,18E – 38, 0 i 1,18E – 38 do 3,40E + 38 | |
| Data i godzina | data | Służy do definiowania daty w SQL Server. | Składnia:data |
| smalldatetime | Służy do definiowania daty połączonej z porą dnia; gdzie czas jest oparty na dobie 24-godzinnej, z sekundami zawsze zero (:00) i bez ułamków sekund. | Składnia:smalldatetime | |
| data i godzina | Służy do definiowania daty połączonej z porą dnia z ułamkami sekund w oparciu o zegar 24-godzinny. | Składnia:data/godzina | |
| datetime2 | datetime2 jest rozszerzeniem istniejącego datetime typ, który ma większą domyślną precyzję ułamkową, największy zakres dat. | Składnia:datetime2 | |
| przesunięcie daty i godziny | Służy do definiowania daty połączonej z porą dnia ze świadomością strefy czasowej. Opiera się na zegarze 24-godzinnym. | Składnia:datetimeoffset | |
| czas | Służy do definiowania pory dnia. | Składnia:czas | |
| Ciągi znaków | znak | Służy do przechowywania znaków o stałym rozmiarze. | char [ ( n ) ] gdzie wartość n waha się od 1 – 8000 |
| varchar | Służy do przechowywania znaków o zmiennej długości. | varchar [ ( n | max ) ], gdzie wartość n waha się od 1-8000, a maksymalna dozwolona pamięć to 2 GB. | |
| tekst | Służy do przechowywania danych innych niż Unicode o zmiennej długości | Maksymalna dozwolona długość ciągu – 2^31-1 (2147483647) | |
| Ciągi znaków Unicode | nchar | Służy do przechowywania znaków o stałym rozmiarze. | nchar [ ( n ) ] gdzie wartość n waha się od 1-4000 |
| nvarchar | Służy do przechowywania znaków o zmiennej długości. | varchar [ ( n | max ) ], gdzie wartość n waha się od 1-4000, a maksymalna dozwolona pamięć to 2 GB. | |
| ntext | Służy do przechowywania danych Unicode o zmiennej długości | Maksymalna dozwolona długość ciągu – 2^30-1 (2147483647) | |
| Ciągi binarne | binarny | Służy do przechowywania binarnych typów danych o stałej długości | binarny [ ( n ) ] gdzie wartość n waha się od 1 – 8000 |
| varbinary | Służy do przechowywania binarnych typów danych o stałej długości | varbinary [ ( n ) ], gdzie wartość n waha się od 1-8000, a maksymalna dozwolona pamięć to 2^31-1 bajtów. | |
| obraz | Służy do przechowywania danych binarnych o zmiennej długości | 0 – 2^31-1 (2147483647) bajtów | |
| Inne typy danych | kursor | Jest to typ danych dla parametrów procedury składowanej lub zmiennych OUTPUT, które zawierają odniesienie do kursora. | – |
| rowversion | Służy do eksponowania automatycznie generowanych, unikalnych liczb binarnych w bazie danych. | – | |
| hierarchyid | Służy do reprezentowania pozycji w hierarchii. | – | |
| unikalny identyfikator | Jest 16-bajtowym identyfikatorem GUID. | Składnia:unikalny identyfikator | |
| sql_variant | Służy do przechowywania wartości różnych typów danych obsługiwanych przez SQL Server | Składnia:sql_variant | |
| xml | Służy do przechowywania danych typu XML. | xml ( [ ZAWARTOŚĆ | DOKUMENT ] xml_schemacollection ) | |
| Typy geometrii przestrzennej | Służy do reprezentowania danych w euklidesowym (płaskim) układzie współrzędnych. | – | |
| Typy geografii przestrzennej | Służy do przechowywania danych elipsoidalnych (okrągłych), takich jak współrzędne szerokości i długości geograficznej GPS. | – | |
| tabela | Służy do przechowywania zestawu wyników do przetworzenia w późniejszym czasie | – |
Następnie w tym artykule wyjaśnimy różne typy kluczy i ograniczeń w bazie danych.
Różne typy kluczy w bazie danych
Oto różne typy kluczy używanych w bazie danych:
- Klucz kandydata – Klucz kandydata to zestaw atrybutów, które mogą jednoznacznie identyfikować tabelę. Tabela może mieć więcej niż jeden klucz kandydujący, a spośród wybranych kluczy kandydujących jeden klucz jest wybierany jako klucz podstawowy.
- Super klucz – Zestaw atrybutów może jednoznacznie identyfikować krotkę. Tak więc klucze kandydujące, klucze unikatowe i klucze podstawowe są superkluczami, ale odwrotnie nie jest prawdą.
- Klucz główny – Klucze podstawowe służą do jednoznacznej identyfikacji każdej krotki.
- Alternatywny klucz – Klucze alternatywne to te klucze kandydujące, które nie zostały wybrane jako klucz podstawowy.
- Unikalny klucz – Klucze unikatowe są podobne do klucza podstawowego, ale zezwalają na pojedynczą wartość NULL w kolumnie.
- Klucz zagraniczny – Atrybut, który może przyjmować tylko wartości obecne jako wartości jakiegoś innego atrybutu, jest kluczem obcym atrybutu, do którego się odnosi.
- Klucz złożony – Klucze złożone są kombinacją dwóch lub więcej kolumn, które jednoznacznie identyfikują każdą krotkę.
Ograniczenia używane w bazie danych
Ograniczenia są używane w bazie danych w celu określenia reguł dla danych przechowywanych w tabeli. The different types of constraints in SQL are as follows:
- NOT NULL
- UNIQUE
- CHECK
- DEFAULT
- INDEX
NOT NULL
The NOT NULL constraint ensures that a column cannot have a NULL value.
Example
CREATE TABLE StudentsInfo
(
StudentID int NOT NULL,
StudentName varchar(8000) NOT NULL,
ParentName varchar(8000),
PhoneNumber int ,
AddressofStudent varchar(8000) NOT NULL,
City varchar(8000),
Country varchar(8000)
);

--NOT NULL on ALTER TABLE
ALTER TABLE StudentsInfo
ALTER COLUMN PhoneNumber int NOT NULL;
UNIQUE
This constraint ensures that all the values in a column are unique.
Example
--UNIQUE on Create Table

CREATE TABLE StudentsInfo
(
StudentID int NOT NULL UNIQUE,
StudentName varchar(8000) NOT NULL,
ParentName varchar(8000),
PhoneNumber int ,
AddressofStudent varchar(8000) NOT NULL,
City varchar(8000),
Country varchar(8000)
);

--UNIQUE on Multiple Columns

CREATE TABLE StudentsInfo
(
StudentID int NOT NULL,
StudentName varchar(8000) NOT NULL,
ParentName varchar(8000),
PhoneNumber int ,
AddressofStudent varchar(8000) NOT NULL,
City varchar(8000),
Country varchar(8000)
CONSTRAINT UC_Student_Info UNIQUE(StudentID, PhoneNumber)
);

--UNIQUE on ALTER TABLE

ALTER TABLE StudentsInfo
ADD UNIQUE (StudentID);

--To drop a UNIQUE constraint

ALTER TABLE  StudentsInfo
DROP CONSTRAINT UC_Student_Info;
CHECK
The CHECK constraint ensures that all the values in a column satisfy a specific condition.
Example
--CHECK Constraint on CREATE TABLE

CREATE TABLE StudentsInfo
(
StudentID int NOT NULL,
StudentName varchar(8000) NOT NULL,
ParentName varchar(8000),
PhoneNumber int ,
AddressofStudent varchar(8000) NOT NULL,
City varchar(8000),
Country varchar(8000) CHECK (Country ='India')
);

--CHECK Constraint on multiple columns

CREATE TABLE StudentsInfo
(
StudentID int NOT NULL,
StudentName varchar8000) NOT NULL,
ParentName varchar(8000),
PhoneNumber int ,
AddressofStudent varchar(8000) NOT NULL,
City varchar(8000),
Country varchar(8000) CHECK (Country ='India'  AND City = 'Hyderabad')
);

--CHECK Constraint on ALTER TABLE

ALTER TABLE StudentsInfo
ADD CHECK (Country ='India');

--To give a name to the CHECK Constraint

ALTER TABLE StudentsInfo
ADD CONSTRAINT CheckConstraintName CHECK (Country ='India');

--To drop a CHECK Constraint

ALTER TABLE StudentsInfo
DROP CONSTRAINT CheckConstraintName;
DEFAULT
The DEFAULT constraint consists of a set of default values for a column when no value is specified.
Example
--DEFAULT Constraint on CREATE TABLE

CREATE TABLE StudentsInfo
(
StudentID int,
StudentName varchar(8000) NOT NULL,
ParentName varchar(8000),
PhoneNumber int ,
AddressofStudent varchar(8000) NOT NULL,
City varchar(8000),
Country varchar(8000) DEFAULT 'India'
);

--DEFAULT Constraint on ALTER TABLE

ALTER TABLE StudentsInfo
ADD CONSTRAINT defau_Country
DEFAULT 'India' FOR Country;

--To drop the Default Constraint

ALTER TABLE StudentsInfo
ALTER COLUMN Country DROP defau_Country;
INDEX
The INDEX constraint is used to create indexes in the table, through which you can create and retrieve data from the database very quickly.
Syntax
--Create an Index where duplicate values are allowed
CREATE INDEX IndexName
ON TableName (Column1, Column2, ...ColumnN);

--Create an Index where duplicate values are not allowed
CREATE UNIQUE INDEX IndexName
ON TableName (Column1, Column2, ...ColumnN);
Example
CREATE INDEX idex_StudentName
ON StudentsInfo (StudentName);

--To delete an index in a table
 DROP INDEX StudentsInfo.idex_StudentName;
Moving forward in this article on SQL Server tutorial, let us now understand the different Data Manipulation Language commands used in Microsoft SQL Server.
Data Manipulation Language commands
This section of the article will cover all those commands through which you can manipulate the database. The commands are as follows:
- USE
- INSERT INTO
- AKTUALIZUJ
- USUŃ
- MERGE
- WYBIERZ
- CUBE
- ROLLUP
- OFFSET
- FETCH
- TOP
- PIVOT
Oprócz tych poleceń istnieją również inne operatory/funkcje manipulacyjne, takie jak:
- Operators
- Operatory arytmetyczne
- Assignment Operators
- Bitwise Operators
- Operatory porównania
- Compound Operators
- Operatory logiczne
- Scope Resolution Operators
- Set Operators
- String Concatenation Operators
- Aggregate Functions
- User-Defined Functions
UŻYJ
This statement is used to select the database to start performing various operations on it.
Syntax
USE DatabaseName;
Example
USE Students;
INSERT INTO
The INSERT INTO statement is used to insert new records into an existing table.
Syntax
INSERT INTO TableName (Column1, Column2, Column3, ...,ColumnN)
VALUES (value1, value2, value3, ...);

--If you don't want to mention the column names then use the below syntax

INSERT INTO TableName
VALUES (Value1, Value2, Value3, ...);
Example
INSERT INTO StudentsInfo(StudentID, StudentName, ParentName, PhoneNumber, AddressofStudent, City, Country)
VALUES ('06', 'Sanjana','Kapoor', '9977331199', 'Buffalo Street House No 10', 'Kolkata', 'India');

INSERT INTO StudentsInfo
VALUES ('07', 'Vishal','Mishra', '9876509712', 'Nice Road 15', 'Pune', 'India');
AKTUALIZACJA
The UPDATE statement is used to modify or update the records already present in the table.
Syntax
UPDATE TableName
SET Column1 = Value1, Column2 = Value2, ...
WHERE Condition;
Example
UPDATE StudentsInfo
SET StudentName = 'Aahana', City= 'Ahmedabad'
WHERE StudentID = 1;
USUŃ
The DELETE statement is used to delete the existing records in a table.
Syntax
DELETE FROM TableName WHERE Condition;
Example
DELETE FROM StudentsInfo
WHERE StudentName='Aahana';
MERGE
The MERGE statement is used to perform the INSERT, UPDATE and DELETE operations on a specific table, where the source table is provided. Patrz poniżej.
Syntax
MERGE TagretTableName USING SourceTableName
ON MergeCondition
WHEN MATCHED
THEN Update_Statement
WHEN NOT MATCHED
THEN Insert_Statement
WHEN NOT MATCHED BY SOURCE
THEN DELETE;
Example
To understand the MERGE statement, consider the following tables as the Source table and the Target table.
Source Table:
| StudentID | StudentName | Marks |
| 1 | Vihaan | 87 |
| 2 | Manasa | 92 |
| 4 | Anay | 74 |
Target Table:
| StudentID | StudentName | Marks |
| 1 | Vihaan | 87 |
| 2 | Manasa | 67 |
| 3 | Saurabh | 55 |
MERGE SampleTargetTable TARGET USING SampleSourceTable SOURCE ON (TARGET.StudentID = SOURCE.StudentID)
WHEN MATCHED AND TARGET.StudentName <> SOURCE.StudentName OR TARGET.Marks <> SOURCE.Marks
THEN UPDATE SET TARGET.StudentName = SOURCE.StudentName, TARGET.Marks = SOURCE.Marks
WHEN NOT MATCHED BY TARGET THEN
INSERT (StudentID,StudentName,Marks) VALUES (SOURCE.StudentID,SOURCE.StudentName,SOURCE.Marks)
WHEN NOT MATCHED BY SOURCE THEN
DELETE;
Output
| StudentID | StudentName | Marks |
| 1 | Vihaan | 87 |
| 2 | Manasa | 92 |
| 4 | Anay | 74 |
WYBIERZ
The SELECT statement is used to select data from a database, table or view. The data returned is stored in a result table, called the result-set .
Syntax
SELECT Column1, Column2, ...ColumN
FROM TableName;

--(*) is used to select all from the table
SELECT * FROM table_name;

-- To select the number of records to return use:
SELECT TOP 3 * FROM TableName;
Example
-- To select few columns
SELECT StudentID, StudentName
FROM StudentsInfo;

--(*) is used to select all from the table
SELECT * FROM StudentsInfo;

-- To select the number of records to return use:
SELECT TOP 3 * FROM StudentsInfo;
We can also use the following keywords with the SELECT statement:
- DISTINCT
- ORDER BY
- GROUP BY
- GROUPING SETS
- HAVING Clause
- INTO
DISTINCT
The DISTINCT keyword is used with the SELECT statement to return only different values.
Syntax
SELECT DISTINCT Column1, Column2, ...ColumnN
FROM TableName;
Example
SELECT DISTINCT PhoneNumber FROM StudentsInfo;
ORDER BY
This statement is used to sort the required results either in the ascending or descending order. By default, the results are stored in ascending order. Yet, if you wish to get the results in descending order, you have to use the DESC słowo kluczowe.
Syntax
SELECT Column1, Column2, ...ColumnN
FROM TableName
ORDER BY Column1, Column2, ... ASC|DESC;
Example
-- Select all students from the 'StudentsInfo' table sorted by ParentName:
SELECT * FROM StudentsInfo
ORDER BY ParentName;

-- Select all students from the 'StudentsInfo' table sorted by ParentName in Descending order:
SELECT * FROM StudentsInfo
ORDER BY ParentName DESC;

-- Select all students from the 'StudentsInfo' table sorted by ParentName and StudentName:
SELECT * FROM StudentsInfo
ORDER BY ParentName, StudentName;

/* Select all students from the 'StudentsInfo' table sorted by ParentName
in Descending order and StudentName in Ascending order: */
SELECT * FROM StudentsInfo
ORDER BY ParentName ASC, StudentName DESC;
GROUP BY
Ta instrukcja jest używana z funkcjami agregacji do grupowania zestawu wyników według jednej lub więcej kolumn.
Syntax
SELECT Column1, Column2,..., ColumnN
FROM TableName
WHERE Condition
GROUP BY ColumnName(s)
ORDER BY ColumnName(s);
Example
-- To list the number of students from each city.
SELECT COUNT(StudentID), City
FROM StudentsInfo
GROUP BY City;
GROUPING SETS
GROUPING SETS were introduced in SQL Server 2008, used to generate a result-set that can be generated by a UNION ALL of the multiple simple GROUP BY clauses.
Syntax
SELECT ColumnNames(s)
FROM TableName
GROUP BY GROUPING SETS(ColumnName(s));
Example
SELECT StudentID, StudentName, COUNT(City)
from StudentsInfo
Group BY
GROUPING SETS
((StudentID, StudentName, City),(StudentID),(StudentName),(City));
HAVING
This clause is used in the scenario where the WHERE keyword cannot be used.
Syntax
SELECT ColumnName(s)
FROM TableName
WHERE Condition
GROUP BY ColumnName(s)
HAVING Condition
ORDER BY ColumnName(s);
Example
SELECT COUNT(StudentID), City
FROM StudentsInfo
GROUP BY City
HAVING COUNT(StudentID) > 2
ORDER BY COUNT(StudentID) DESC;
INTO
The INTO keyword can be used with the SELECT statement to copy data from one table to another. Well, you can understand these tables to be temporary tables. The temporary tables are generally used to perform manipulations on data present in the table, without disturbing the original table.
Syntax
SELECT *
INTO NewTable [IN ExternalDB]
FROM OldTable
WHERE Condition;
Example
-- To create a backup of table 'StudentsInfo'
SELECT * INTO StudentsBackup
FROM StudentsInfo;

--To select only few columns from StudentsInfo
SELECT StudentName, PhoneNumber INTO StudentsDetails
FROM StudentsInfo;

SELECT * INTO PuneStudents
FROM StudentsInfo
WHERE City = 'Pune';
CUBE
CUBE is an extension of the GROUP BY clause. It allows you to generate the sub-totals for all the combinations of the grouping columns specified in the GROUP BY clause.
Syntax
SELECT ColumnName(s)
FROM TableName
GROUP BY CUBE(ColumnName1, ColumnName2, ....., ColumnNameN);
Example
SELECT StudentID, COUNT(City)
FROM StudentsInfo
GROUP BY CUBE(StudentID)
ORDER BY StudentID;
ROLLUP
ROLLUP is an extension of the GROUP BY clause. This allows you to include the extra rows which represent the subtotals. These are referred to as super-aggregated rows along with the grand total row.
Syntax
SELECT ColumnName(s)
FROM TableName
GROUP BY ROLLUP(ColumnName1, ColumnName2, ....., ColumnNameN);
Example
SELECT StudentID, COUNT(City)
FROM StudentsInfo
GROUP BY ROLLUP(StudentID);
OFFSET
The OFFSET clause is used with the SELECT and ORDER BY statement to retrieve a range of records. It must be used with the ORDER BY clause since it cannot be used on its own. Also, the range that you mention must be equal to or greater than 0. If you mention a negative value, then it shows an error.
Syntax
SELECT ColumnNames)
FROM TableName
WHERE Condition
ORDER BY ColumnName(s)
OFFSET RowsToSkip ROWS;
Example
Consider a new column Marks in the StudentsInfo tabela.
SELECT StudentName, ParentName
FROM StudentsInfo
ORDER BY Marks
OFFSET 1 ROWS;
FETCH
The FETCH clause is used to return a set of a number of rows. It has to be used in conjunction with the OFFSET clause.
Syntax
SELECT ColumnNames)
FROM TableName
WHERE Condition
ORDER BY ColumnName(s)
OFFSET RowsToSkip
FETCH NEXT NumberOfRows ROWS ONLY;
Example
SELECT StudentName, ParentName
FROM StudentsInfo
ORDER BY Marks
OFFSET 1 ROWS
FETCH  NEXT 1 ROWS ONLY;
TOP
The TOP clause is used with the SELECT statement to mention the number of records to return.
Syntax
SELECT TOP Number ColumnName(s)
FROM TableName
WHERE Condition;
Example
SELECT TOP 3 * FROM StudentsInfo;
PIVOT
PIVOT is used to rotate the rows to column values and runs aggregations when required on the remaining column values.
Syntax
SELECT NonPivoted ColumnName,
    [First Pivoted ColumnName] AS ColumnName,
    [Second Pivoted ColumnName] AS ColumnName,
    [Third Pivoted ColumnName] AS ColumnName,
    ...
    [Last Pivoted ColumnName] AS ColumnName
FROM
    (SELECT query which produces the data)
    AS [alias for the initial query]
PIVOT
(
    [AggregationFunction](ColumName)
FOR
[ColumnName of the column whose values will become column headers]
    IN ( [First Pivoted ColumnName], [Second Pivoted ColumnName],  [Third Pivoted ColumnName]
    ... [last pivoted column])
) AS [alias for the Pivot Table];
Example
To get a detailed example, you can refer to my article on SQL PIVOT and UNPIVOT. Next in this SQL Server Tutorial let us look into the different operators supported by Microsoft SQL Server.
Operators
The different types of operators supported by SQL Server are as follows:
- Operatory arytmetyczne
- Assignment Operators
- Bitwise Operators
- Operatory porównania
- Compound Operators
- Operatory logiczne
- Scope Resolution Operators
- Set Operators
- String Concatenation Operators
Let us discuss each one of them one by one.
Arithmetic Operators
| Operator | Meaning | Syntax |
+ | Addition | expression + expression |
– | Subtraction | expression – expression |
* | Multiplication | expression * expression |
/ | Divison | expression / expression |
% | Modulous | expression % expression |
Assignment Operators
| Operator | Meaning | Syntax |
= | Assign a value to a variable | variable =‘value’ |
Bitwise Operators
| Operator | Meaning | Syntax |
&(Bitwise AND) | Used to perform a bitwise logical AND operation between two integer values. | expression &expression |
&=(Bitwise AND Assignment) | Used to perform a bitwise logical AND operation between two integer values. It also sets a value to the output of the operation. | expression &=expression |
| (Bitwise OR) | Used to perform a bitwise logical OR operation between two integer values as translated to binary expressions within Transact-SQL statements. | expression | expression |
|=(Bitwise OR Assignment) | Used to perform a bitwise logical OR operation between two integer values as translated to binary expressions within Transact-SQL statements. It also sets a value to the output of the operation. | expression |=expression |
^ (Bitwise Exclusive OR) | Used to perform a bitwise exclusive OR operation between two integer values. | expression ^ expression |
^=(Bitwise Exclusive OR Assignment) | Used to perform a bitwise exclusive OR operation between two integer values. It also sets a value to the output of the operation. | expression ^=expression |
~ (Bitwise NOT) | Used to perform a bitwise logical NOT operation on an integer value. | ~ expression |
Comparison Operators
| Operator | Meaning | Syntax |
= | Equal to | expression =expression |
> | Greater than | expression> expression |
< | Less than | expression |
>= | Greater than or equal to | expression>=expression |
<= | Less than or equal to | expression <=expression |
<> | Not equal to | expression <> expression |
!= | Not equal to | expression !=expression |
!< | Not less than | expression ! |
!> | Not greater than | expression !> expression |
Compound Operators
| Operator | Meaning | Syntax |
+ = | Used to add value to the original value and set the original value to the result. | expression +=expression |
-= | Used to subtract a value from the original value and set the original value to the result. | expression -=expression |
*= | Used to multiply value to the original value and set the original value to the result. | expression *=expression |
/= | Used to divide a value from the original value and set the original value to the result. | expression /=expression |
%= | Used to divide a value from the original value and set the original value to the result. | expression %=expression |
&= | Used to perform a bitwise AND operation and set the original value to the result. | expression &=expression |
^= | Used to perform a bitwise exclusive OR operation and set the original value to the result. | expression ^=expression |
|= | Used to perform a bitwise OR operation and set the original value to the result. | expression |=expression |
Logical Operators
| Operator | Meaning | Syntax |
ALL | Returns TRUE if all of set of comparisons are TRUE. | scalar_expression { =| <> | !=|> |>=| !> | <| <=| !<} ALL ( subquery ) |
AND | Returns TRUE if both the expressions are TRUE. | boolean_expression AND boolean_expression |
ANY | Returns TRUE if any one of a set of comparisons are TRUE. | scalar_expression { =| <> | ! =|> |> =| !> | <| <=| ! <} { ANY } ( subquery ) |
BETWEEN | Returns TRUE if an operand is within a range. | sampleexpression [ NOT ] BETWEEN beginexpression AND endexpression |
EXISTS | Returns TRUE if a subquery contains any rows. | EXISTS (sub query) |
IN | Returns TRUE if an operand is equal to one of a list of expressions. | test_expression [ NOT ] IN( subquery | expression [ ,…n ]) |
LIKE | Returns TRUE if an operand matches a pattern. | match_expression [ NOT ] LIKE pattern [ ESCAPE escape_character ] |
NOT | Reverses the value of any boolean operator. | [ NOT ] boolean_expression |
OR | Returns TRUE if either of the boolean expression is TRUE. | boolean_expression OR boolean_expression |
SOME | Returns TRUE if some of a set of comparisons are TRUE. | scalar_expression { =| <> | ! =|> |> =| !> | <| <=| ! <} { SOME} ( subquery ) |
Scope Resolution Operators
| Operator | Meaning | Example |
:: | Provides access to static members of a compound data type. Compound data types are those data types which contain multiple methods and simple data types. Compound data types These include the built-in CLR types and custom SQLCLR User-Defined Types (UDTs). | DECLARE @hid hierarchyid; SELECT @hid =hierarchyid::GetRoot(); PRINT @hid.ToString(); |
Set Operators
There are mainly three set operations:UNION, INTERSECT, MINUS. You can refer to the image below to understand the set operations in SQL. Refer to the below image:
| Operator | Meaning | Syntax |
UNION | The UNION operator is used to combine the result-set of two or more SELECT statements. | SELECT ColumnName(s) FROM Table1 UNION SELECT ColumnName(s )FROM Table2; |
INTERSECT | The INTERSECT clause is used to combine two SELECT statements and return the intersection of the data-sets of both the SELECT statements. | SELECT Column1 , Column2 …. FROM TableName; WHERE Condition INTERSECT SELECT Column1 , Column2 …. FROM TableName; WHERE Condition |
EXCEPT | The EXCEPT operator returns those tuples that are returned by the first SELECT operation, and are not returned by the second SELECT operation. | SELECT ColumnName FROM TableName; EXCEPT SELECT ColumnName FROM TableName; |
String Operators
| Operator | Meaning | Syntax/ Example |
+ (String Concatenation) | Concatenates two or more binary or character strings, columns, or a combination of strings and column names into a single expression | expression+expression |
+=(String Concatenation) | Used to concatenate two strings and sets the string to the result of the operation. | expression+=expression |
% (Wildcard Characters to match) | Used to matches any string of zero or more characters. | Example:‘sample%’ |
[] (Wildcard Characters to match) | Used to match a single character within the specified range or set that is specified between brackets []. | Example:m[n-z]%’ |
[^] (Wildcard Characters to match) | Used to match a single character which is not within the range or set specified between the square brackets. | Example:‘Al[^a]%’ |
_ (Wildcard Characters to match) | Used to match a single character in a string comparison operation | test_expression [ NOT ] IN( subquery | expression [ ,…n ]) |
Aggregate Functions
The different aggregate functions supported by SQL Server are as follows:
| Function | Description | Syntax | Example |
SUM() | Used to return the sum of a group of values. | SELECT SUM(ColumnName) FROM TableName; | SELECT SUM(Marks) FROM StudentsInfo; |
COUNT() | Returns the number of rows either based on a condition, or without a condition. | SELECT COUNT(ColumnName) FROM TableName WHERE Condition; | SELECT COUNT(StudentID) FROM StudentsInfo; |
AVG() | Used to calculate the average value of a numeric column. | SELECT AVG(ColumnName) FROM TableName; | SELECT AVG(Marks) FROM StudentsInfo; |
MIN() | This function returns the minimum value of a column. | SELECT MIN(ColumnName) FROM TableName; | SELECT MIN(Marks) FROM StudentsInfo; |
MAX() | Returns a maximum value of a column. | SELECT MAX(ColumnName) FROM TableName; | SELECT MAX(Marks) FROM StudentsInfo; |
FIRST() | Used to return the first value of the column. | SELECT FIRST(ColumnName) FROM TableName; | SELECT FIRST(Marks) FROM StudentsInfo; |
LAST() | This function returns the last value of the column. | SELECT LAST(ColumnName) FROM TableName; | SELECT LAST(Marks) FROM StudentsInfo; |
User-Defined Functions
Microsoft SQL Server allows the users to create user-defined functions which are routines. These routines accept parameters, can perform simple to complex actions and return the result of that particular action as a value. Here, the value returned can either be a single scalar value or a complete result-set.
You can use user-defined functions to:
- Allow modular programming
- Reduce network traffic
- Allow faster execution of queries
Also, there are different types of user-defined functions you can create. They are:
- Scalar Functions: Used to return a single data value of the type defined in the RETURNS clause.
- Table-Valued Functions: Used to return a table data type.
- System Functions: A variety of system functions are provided by the SQL Server to perform different operations.
Well, apart from the user-defined functions, there is a bunch of in-built functions in SQL Server; which can be used to perform a variety of tasks. Moving on in this article on SQL Server tutorial, let us now understand what are nested queries.
Nested Queries
Zagnieżdżone zapytania are those queries that have an outer query and inner subquery. Zasadniczo więc podzapytanie jest zapytaniem zagnieżdżonym w innym zapytaniu, takim jak SELECT, INSERT, UPDATE lub DELETE. Zobacz obrazek poniżej:
Next in this SQL Server tutorial, let us understand the different types of joins in SQL.
Joins
Joins are used to combine tuples from two or more tables, based on a related column between the tables. There are four types of joins:
- INNER JOIN: Returns records that have matching values in both the tables.
- LEFT JOIN: Returns records from the left table, and also those records which satisfy the condition from the right table.
- RIGHT JOIN: Returns records from the right table, and also those records which satisfy the condition from the left table.
- FULL JOIN: Returns records which either have a match in the left or the right table.
Consider the following table along with the StudentsInfo table, to understand the syntax of joins.
| SubjectID | StudentID | SubjectName |
| 10 | 10 | Maths |
| 2 | 11 | Physics |
| 3 | 12 | Chemistry |
INNER JOIN
Syntax
SELECT ColumnName(s)
FROM Table1
INNER JOIN Table2 ON Table1.ColumnName = Table2.ColumnName;
Example
SELECT Subjects.SubjectID, StudentsInfo.StudentName
FROM Subjects
INNER JOIN StudentsInfo ON Subjects.StudentID = StudentsInfo.StudentID;
LEFT JOIN
Syntax
SELECT ColumnName(s)
FROM Table1
LEFT JOIN Table2 ON Table1.ColumnName = Table2.ColumnName;
Example
SELECT StudentsInfo.StudentName, Subjects.SubjectID
FROM StudentsInfo
LEFT JOIN Subjects ON StudentsInfo.SubjectID = Subjects.SubjectID
ORDER BY StudentsInfo.StudentName;
RIGHT JOIN
Syntax
SELECT ColumnName(s)
FROM Table1
RIGHT JOIN Table2 ON Table1.ColumnName = Table2.ColumnName;
Example
SELECT StudentsInfo.StudentName, Subjects.SubjectID
FROM StudentsInfo
RIGHT JOIN Subjects ON StudentsInfo.SubjectID = Subjects.SubjectID
ORDER BY StudentsInfo.StudentName;
FULL JOIN
Syntax
SELECT ColumnName(s)
FROM Table1
FULL OUTER JOIN Table2 ON Table1.ColumnName = Table2.ColumnName;
Example
SELECT StudentsInfo.StudentName, Subjects.SubjectID
FROM StudentsInfo
FULL OUTER JOIN Subjects ON StudentsInfo.SubjectID = Subjects.SubjectID
ORDER BY StudentsInfo.StudentName;
Next, in this article on SQL Server tutorial, let us understand the different types of loops supported by the SQL Server.
Loops
The different control-of-flow commands are as follows:
- BEGIN..END
- BREAK
- CONTINUE
- GOTO
- IF..ELSE
- RETURN
- WAITFOR
- WHILE
Let us discuss each one of them one by one.
BEGIN..END
These keywords are used to enclose a series of SQL statements. Then, this group of SQL statements can be executed.
Syntax
BEGIN
     { SQLStatement | StatementBlock }
END
BREAK
This statement is used to exit the current WHILE loop. In case, the current WHILE loop is nested inside another loop, then the BREAK statement exits only the current loop and the control is passed on to the next statement in the current loop. The BREAK statement is generally used inside an IF statement.
Syntax
BREAK;
CONTINUE
The CONTINUE statement is used to restart a WHILE loop. So, any statements after the CONTINUE keyword will be ignored.
Syntax
CONTINUE;
Here, Label is the point after which processing starts if a GOTO is targeted to that particular label.
GOTO
Used to alter the flow of execution to a label. The statements written after the GOTO keyword are skipped and processing continues at the label.
Syntax
Define Label:
Label:
Alter Execution:
GOTO Label
Here, Label is the point after which processing starts if a GOTO is targeted to that particular label.
IF..ELSE
Like any other programming language, the If-else statement in SQL Server tests the condition and if the condition is false then ‘else’ statement is executed.
Syntax
IF BooleanExpression
     { SQLStatement | StatementBlock }
[ ELSE
     { SQLStatement | StatementBlock } ]
RETURN
Used to exit unconditionally from a query or procedure. So, the statements which are written after the RETURN clause are not executed.
Syntax
RETURN [ IntegerExpression ]
Here, an integer value is returned.
WAITFOR
The WAITFOR control flow is used to block the execution of a stored procedure, transaction or a batch until a specific statement modifies, returns at least one row or a specified time or time interval elapses.
Syntax
WAITFOR
{
    DELAY 'TimeToPass'
  | TIME 'TimeToExecute'
  | [ ( RecieveStatement ) | ( GetConversionGroupStatement ) ]
    [ , TIMEOUT timeout ]
}
where,
- DELAY – Period of time that must pass
- TimeToPass – Period of time to wait
- TIME – The time when the stored procedure, transaction or the batch runs.
- TimeToExecute – The time at which the WAITFOR statement finishes.
- RecieveStatement – A valid RECEIVE statement.
- GetConversionGroupStatement – A valid GET CONVERSATION GROUP statement.
- TIMEOUT timeout – Specifies the period of time, in milliseconds, to wait for a message to arrive on the queue.
WHILE
This loop is used to set a condition for repeated execution of a particular SQL statement or a SQL statement block. The statements are executed as long as the condition mentioned by the user is TRUE. As soon as the condition fails, the loop stops executing.
Syntax
WHILE BooleanExpression
{ SQLStatement | StatementBlock | BREAK | CONTINUE }
Now, that you guys know the DML commands, let’s move onto our next section in this article on SQL Tutorial i.e. the DCL commands.
Data Control Language Commands (DCL)
This section of SQL Server tutorial will give you an idea about the command through which are used to enforce database security in multiple user database environments. The commands are as follows:
- GRANT
- REVOKE
GRANT
The GRANT command is used to provide access or privileges on the database and its objects to the users.
Syntax
GRANT PrivilegeName
ON ObjectName
TO {UserName |PUBLIC |RoleName}
[WITH GRANT OPTION];
where,
- PrivilegeName – Is the privilege/right/access granted to the user.
- ObjectName – Name of a database object like TABLE/VIEW/STORED PROC.
- UserName – Name of the user who is given the access/rights/privileges.
- PUBLIC – To grant access rights to all users.
- RoleName – The name of a set of privileges grouped together.
- WITH GRANT OPTION – To give the user access to grant other users with rights.
Example
-- To grant SELECT permission to StudentsInfo table to user1
GRANT SELECT ON StudentsInfo TO user1;
REVOKE
The REVOKE command is used to withdraw the user’s access privileges given by using the GRANT command.
Syntax
REVOKE PrivilegeName
ON ObjectName
FROM {UserName |PUBLIC |RoleName}
Example
-- To revoke the granted permission from user1
REVOKE SELECT ON StudentsInfo TO user1;
Moving on in this SQL Server tutorial, let us understand the how to create and use Stored Procedures.
Stored Procedures
Stored Procedures are reusable units that encapsulate a specific business logic of the application. So, it is a group of SQL statements and logic, compiled and stored together to perform a specific task.
Syntax
CREATE [ OR REPLACE] PROCEDURE procedure_name [
(parameter_name [IN | OUT | IN OUT] type [ ])]
{IS | AS }
BEGIN [declaration_section]
executable_section
//SQL statement used in the stored procedure
END
GO
Example
--Create a procedure that will return a student name when the StudentId is given as the input parameter to the stored procedure
Create  PROCEDURE GetStudentName
(
@StudentId INT, --Input parameter ,
@StudName VARCHAR(50)  OUT  --Output parameter,
AS
BEGIN
SELECT @StudName = StudentName FROM StudentsInfo WHERE StudentID=@StudentId
END
Steps to execute:
- Declare @StudName as nvarchar(50)
- EXEC GetStudentName 01, @StudName output
- SELECT @StudName
The above procedure returns the name of a particular student, on giving that students id as input. Next in this SQL Server tutorial, let us understand the transaction control language commands.
Transaction Control Language Commands (TCL)
This section of SQL Server tutorial will give you an insight into the commands which are used to manage transactions in the database. The commands are as follows:
- COMMIT
- ROLLBACK
- SAVEPOINT
COMMIT
The COMMIT command is used to save the transaction into the database.
Syntax
COMMIT;
ROLLBACK
The ROLLBACK command is used to restore the database to the last committed state.
Syntax
ROLLBACK;
NOTE: When you use ROLLBACK with SAVEPOINT, then you can directly jump to a savepoint in an ongoing transaction. Syntax:ROLLBACK TO SavepointName;
SAVEPOINT
The SAVEPOINT command is used to temporarily save a transaction. So if you wish to rollback to any point, then you can save that point as a ‘SAVEPOINT’.
Syntax
SAVEPOINT SAVEPOINTNAME;
Consider the below table to understand the working of transactions in the database.
| StudentID | StudentName |
| 1 | Rohit |
| 2 | Suhana |
| 3 | Ashish |
| 4 | Prerna |
Now, use the below SQL queries to understand the transactions in the database.
INSERT INTO StudentTable VALUES(5, 'Avinash');
COMMIT;
UPDATE StudentTable SET name = 'Akash' WHERE id = '5';
SAVEPOINT S1;
INSERT INTO StudentTable VALUES(6, 'Sanjana');
SAVEPOINT S2;
INSERT INTO StudentTable VALUES(7, 'Sanjay');
SAVEPOINT S3;
INSERT INTO StudentTable VALUES(8, 'Veena');
SAVEPOINT S4;
SELECT * FROM StudentTable;
Next in this article on SQL Server tutorial let us understand how to handle exceptions in Transact-SQL.
Exception Handling
There are two types of exceptions, i.e, the system-defined exceptions and the user-defined exceptions. As the name suggests, exception handling is a process through which a user can handle the exceptions generated. To handle exceptions you have to understand the following control flow statements:
- THROW
- TRY…CATCH
THROW
This clause is used to raise an exception and transfers the execution to a CATCH block of a TRY…CATCH construct.
Syntax
THROW [ { ErrorNumber | @localvariable },
        { Message | @localvariable },
        { State | @localvariable } ]
[ ; ]
where,
- ErrorNumber – A constant or variable that represents the exception.
- Message – A variable or string that describes the exception.
- State – A constant or variable between 0 and 255 that indicates the state to associate with the message.
THROW 51000, 'Record does not exist.', 1;
TRY..CATCH
Used to implement exception handling in Transact-SQL. A group of statements can be enclosed in the TRY block. In case an error occurs in the TRY block, control is passed to another group of statements that are enclosed in a CATCH block.
Syntax
BEGIN TRY
     { SQLStatement | StatementBlock}
END TRY
BEGIN CATCH
     [ { SQLStatement | StatementBlock } ]
END CATCH
[ ; ]
BEGIN TRY
    SELECT * FROM StudentsInfo;
END TRY
BEGIN CATCH
    SELECT
        ERROR_NUMBER() AS ErNum , ERROR_MESSAGE() AS ErMsg;
END CATCH
W ith this, we come to the end of this article on SQL Server Tutorial. I hope you enjoyed reading this article on SQL Server Tutorial For Beginners. I f you wish to get a structured training on MySQL, then check out our MySQL DBA Certification Training który jest dostarczany z prowadzonym przez instruktora szkoleniem na żywo i doświadczeniem w rzeczywistych projektach. This training will help you understand MySQL in-depth and help you achieve mastery over the subject. Got a question for us? Please mention it in the comments section of ”SQL Server Tutorial ” i skontaktuję się z Tobą.