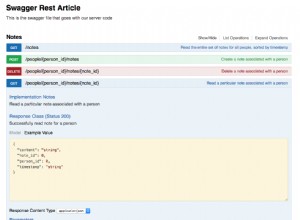
Baza danych
To druga część serii poświęconej Jak stworzyć bloga za pomocą PHP i MySQL. Możesz pobrać pierwszą część tutaj
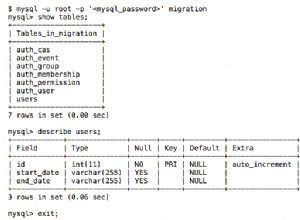
Będziemy kontynuować od miejsca, w którym skończyliśmy w poprzednim samouczku. W tej sekcji będziemy pracować nad projektem naszej bazy danych i uwierzytelnianiem użytkowników (rejestracja i logowanie). Utwórz bazę danych o nazwie complete-blog-php. W tej bazie danych utwórz 2 tabele:posty i użytkowników z następującymi polami.
posty:
+----+-----------+--------------+------------+
|     field      |     type     | specs      |
+----+-----------+--------------+------------+
|  id            | INT(11)      |            |
|  user_id       | INT(11)      |            |
|  title         | VARCHAR(255) |            |
|  slug          | VARCHAR(255) | UNIQUE     |
|  views         | INT(11)      |            |
|  image         | VARCHAR(255) |            |
|  body          | TEXT         |            |
|  published     | boolean      |            |
|  created_at    | TIMESTAMP    |            |
|  updated_at    | TIMESTAMP    |            |
+----------------+--------------+------------+
użytkownicy:
+----+-----------+------------------------+------------+
|     field      |     type               | specs      |
+----+-----------+------------------------+------------+
|  id            | INT(11)                |            |
|  username      | VARCHAR(255)           | UNIQUE     |
|  email         | VARCHAR(255)           | UNIQUE     |
|  role          | ENUM("Admin","Author") |            |
|  password      | VARCHAR(255)           |            |
|  created_at    | TIMESTAMP              |            |
|  updated_at    | TIMESTAMP              |            |
+----------------+--------------+---------+------------+
Możesz utworzyć te tabele za pomocą tych poleceń.
użytkownicy:
CREATE TABLE `users` (
  `id` int(11) AUTO_INCREMENT PRIMARY KEY NOT NULL,
  `username` varchar(255) NOT NULL,
  `email` varchar(255) NOT NULL,
  `role` enum('Author','Admin') DEFAULT NULL,
  `password` varchar(255) NOT NULL,
  `created_at` timestamp NULL DEFAULT CURRENT_TIMESTAMP,
  `updated_at` timestamp NULL DEFAULT NULL
) ENGINE=InnoDB DEFAULT CHARSET=latin1;
posty:
CREATE TABLE `posts` (
 `id` int(11) NOT NULL AUTO_INCREMENT PRIMARY KEY,
 `user_id` int(11) DEFAULT NULL,
 `title` varchar(255) NOT NULL,
 `slug` varchar(255) NOT NULL UNIQUE,
 `views` int(11) NOT NULL DEFAULT '0',
 `image` varchar(255) NOT NULL,
 `body` text NOT NULL,
 `published` tinyint(1) NOT NULL,
 `created_at` timestamp NOT NULL DEFAULT CURRENT_TIMESTAMP ON UPDATE CURRENT_TIMESTAMP,
 `updated_at` timestamp NOT NULL DEFAULT '0000-00-00 00:00:00',
  FOREIGN KEY (`user_id`) REFERENCES `users` (`id`) ON DELETE NO ACTION ON UPDATE NO ACTION
) ENGINE=InnoDB DEFAULT CHARSET=latin1
Możesz uruchomić te skrypty za pomocą wiersza polecenia SQL lub PHPMyAdmin. W PHPMyAdmin kliknij/wybierz bazę danych, w której chcesz utworzyć te tabele (w tym przypadku complete-blog-php), a następnie kliknij kartę SQL na pasku nawigacyjnym gdzieś u góry strony. Jeśli zobaczysz jakikolwiek skrypt SQL w polu poniżej, usuń go i wklej powyższy skrypt w odpowiednie miejsce i kliknij „Idź”, aby utworzyć tabele.

Jeśli zamiast tego zdecydujesz się utworzyć te tabele ręcznie, pamiętaj, aby pole informacji o pracy w tabeli postów było UNIKALNE i ustaw pole user_id tabeli posts jako klucz obcy, który odwołuje się do identyfikatora w tabeli użytkowników. Ustaw BRAK DZIAŁANIA jako wartość opcji PRZY USUNIĘCIU i PRZY AKTUALIZACJI, aby po usunięciu lub zaktualizowaniu użytkownika jego posty pozostały w tabeli postów i nie były usuwane.
Teraz wstaw kilku użytkowników do tabeli użytkowników i kilka postów do tabeli postów. Możesz to zrobić, uruchamiając te zapytania SQL, aby wstawić:
użytkownicy:
INSERT INTO `users` (`id`, `username`, `email`, `role`, `password`, `created_at`, `updated_at`) VALUES
(1, 'Awa', 'info@codewithawa.com', 'Admin', 'mypassword', '2018-01-08 12:52:58', '2018-01-08 12:52:58')
posty:
INSERT INTO `posts` (`id`, `user_id`, `title`, `slug`, `views`, `image`, `body`, `published`, `created_at`, `updated_at`) VALUES
(1, 1, '5 Habits that can improve your life', '5-habits-that-can-improve-your-life', 0, 'banner.jpg', 'Read every day', 1, '2018-02-03 07:58:02', '2018-02-01 19:14:31'),
(2, 1, 'Second post on LifeBlog', 'second-post-on-lifeblog', 0, 'banner.jpg', 'This is the body of the second post on this site', 0, '2018-02-02 11:40:14', '2018-02-01 13:04:36')
Połączmy się z bazą danych, przeszukujmy te posty i wyświetlajmy je na stronie internetowej.
W config.php dodajmy kod, który połączy naszą aplikację z bazą danych. Po dodaniu kodu nasz plik config.php będzie wyglądał tak:
<?php
	session_start();
	// connect to database
	$conn = mysqli_connect("localhost", "root", "", "complete-blog-php");

	if (!$conn) {
		die("Error connecting to database: " . mysqli_connect_error());
	}
    // define global constants
	define ('ROOT_PATH', realpath(dirname(__FILE__)));
	define('BASE_URL', 'https://localhost/complete-blog-php/');
?>
Zwraca to obiekt połączenia z bazą danych $conn, którego możemy użyć w całej naszej aplikacji do przeszukiwania bazy danych.
Ta aplikacja została skonstruowana w taki sposób, że kod PHP jest jak najbardziej oddzielony od HTML. Operacje, takie jak wysyłanie zapytań do bazy danych i wykonywanie pewnych czynności logicznych na danych, są wykonywane w funkcjach PHP, a wyniki są wysyłane do kodu HTML w celu wyświetlenia. Dlatego, aby pobrać wszystkie posty z bazy danych, zrobimy to w funkcji i zwrócimy wyniki w postaci tablicy asocjacyjnej, która zostanie zapętlona i wyświetlona na stronie.
Dlatego utwórz plik o nazwie public_functions.php w folderze include. Ten plik będzie zawierał wszystkie nasze funkcje PHP dla obszaru publicznego. Wszystkie strony korzystające z dowolnej funkcji w tym pliku muszą zawierać ten plik w górnej części strony.
Stwórzmy naszą pierwszą funkcję w naszym nowo utworzonym pliku public_functions.php. Nazwiemy funkcję getPublishedPosts(), która pobierze wszystkie posty z tabeli posts w bazie danych i zwróci je jako tablicę asocjacyjną:
public_functions.php:
<?php
/* * * * * * * * * * * * * * *
* Returns all published posts
* * * * * * * * * * * * * * */
function getPublishedPosts() {
	// use global $conn object in function
	global $conn;
	$sql = "SELECT * FROM posts WHERE published=true";
	$result = mysqli_query($conn, $sql);

	// fetch all posts as an associative array called $posts
	$posts = mysqli_fetch_all($result, MYSQLI_ASSOC);

	return $posts;
}

// more functions to come here ...
?>
W górnej części pliku index.php, tuż pod linią zawierającą config. php , dodaj ten kod, aby przeszukać bazę danych:
<!-- config.php should be here as the first include  -->

<?php require_once( ROOT_PATH . '/includes/public_functions.php') ?>

<!-- Retrieve all posts from database  -->
<?php $posts = getPublishedPosts(); ?>
Dodaliśmy dwie linie kodu. Pierwszy zawiera plik public_functions.php (który przechowuje funkcje) do naszego pliku index.php. Druga linia kodu wywołuje funkcję getPublishedPosts(), która odpytuje bazę danych i zwraca posty pobrane z bazy danych w zmiennej $posts. Teraz przejrzyjmy i wyświetlmy te posty na stronie index.php.
Otwórz ponownie nasz słynny plik index.php. W sekcji treści gdzieś pośrodku znajdziesz tag
i komentarz wskazujący, gdzie ma się pojawić więcej treści. W miejscu, tuż pod tagiem
, dodaj ten kod:
<hr>
<!-- more content still to come here ... -->

<!-- Add this ... -->
<?php foreach ($posts as $post): ?>
	<div class="post" style="margin-left: 0px;">
		<img src="<?php echo BASE_URL . '/static/images/' . $post['image']; ?>" class="post_image" alt="">
		<a href="single_post.php?post-slug=<?php echo $post['slug']; ?>">
			<div class="post_info">
				<h3><?php echo $post['title'] ?></h3>
				<div class="info">
					<span><?php echo date("F j, Y ", strtotime($post["created_at"])); ?></span>
					<span class="read_more">Read more...</span>
				</div>
			</div>
		</a>
	</div>
<?php endforeach ?>
OK, proszę, nie ładuj jeszcze strony ponownie. Dodajmy stylizację do tego wpisu. Otwórz public_styling.css i dodaj do niego ten kod:
/* CONTENT */
.content {
	margin: 5px auto;
	border-radius: 5px;
	min-height: 400px;
}
.content:after {
	content: "";
	display: block;
	clear: both;
}
.content .content-title {
	margin: 10px 0px;
	color: #374447;
	font-family: 'Averia Serif Libre', cursive;
}
.content .post {
	width: 335px;
	margin: 9px;
	min-height: 320px;
	float: left;
	border-radius: 2px;
	border: 1px solid #b3b3b3;
	position: relative;
}
.content .post .category {
	margin-top: 0px;
	padding: 3px 8px;
	color: #374447;
	background: white;
	display: inline-block;
	border-radius: 2px;
	border: 1px solid #374447;
	box-shadow: 3px 2px 2px;
	position: absolute;
	left: 5px; top: 5px;
	z-index: 3;
}
.content .post .category:hover {
	box-shadow: 3px 2px 2px;
	color: white;
	background: #374447;
	transition: .4s;
	opacity: 1;
}
.content .post .post_image {
	height: 260px;
	width: 100%;
	background-size: 100%;
}
.content .post .post_image {
	width: 100%;
	height: 260px;
}
.content .post .post_info {
	height: 100%;
	padding: 0px 5px;
	font-weight: 200;
    font-family: 'Noto Serif', serif;
}
.content .post .post_info {
	color: #222;
}
.content .post .post_info span {
	color: #A6A6A6;
	font-style: italic;
}
.content .post .post_info span.read_more {
	position: absolute;
	right: 5px; bottom: 5px;
}
Teraz możesz ponownie załadować stronę.
Jeśli wszystko poszło dobrze, zobaczysz jeden post stylizowany na miniaturę pod tytułem „Ostatnie artykuły”. Pamiętaj, że wprowadziliśmy do bazy dwa rekordy, ale wyświetlany jest tylko jeden. Dzieje się tak, ponieważ jeden z rekordów miał ustawione pole opublikowane na wartość false (czyli 0), a ponieważ wyświetlane są tylko opublikowane artykuły, widzimy tylko jeden, opublikowany.
Ale na razie nasze posty nie są sklasyfikowane pod żadnym tematem. Utwórzmy tabelę tematów i stwórzmy relację „wiele do wielu” między postami a tabelą tematów. W tym celu utworzymy dwie nowe tabele:tematy do przechowywania tematów i tabelę post_topic do obsługi relacji między postami a tematami.
tematy:
+----+-----------+------------------------+------------+
|     field      |     type               | specs      |
+----+-----------+------------------------+------------+
|  id            | INT(11)                |            |
|  name          | VARCHAR(255)           |            |
|  slug          | VARCHAR(255)           | UNIQUE     |
+----------------+--------------+---------+------------+
post_topic:
+----+-----------+------------------------+------------+
|     field      |     type               | specs      |
+----+-----------+------------------------+------------+
|  id            | INT(11)                |            |
|  post_id       | INT(11)                |  UNIQUE    |
|  topic_id      | INT(11)                |            |
+----------------+--------------+---------+------------+
To, co nas naprawdę interesuje, to tabela post_topic. To jest tabela, która obsługuje relacje między postami a tematami. Gdy post jest tworzony pod określonym tematem, jego identyfikator (post_id) oraz temat (topic_id), pod którym ten post jest tworzony, są wstawiane do tabeli post_topic.
Ustalmy tę relację, aby po usunięciu wpisu jego wpis w tabeli post_topic również został automatycznie usunięty; nie chcesz zachować informacji o związku posta, gdy post nie istnieje, prawda?
Kliknij/wybierz tabelę post_topic, a następnie kliknij kartę struktury paska nawigacyjnego PHPMyAdmin. Następnie kliknij Widok relacji tuż pod kartą struktury (można ją znaleźć w innym miejscu, w zależności od wersji PHPMyAdmin). Następnie wypełnij poniższy formularz w następujący sposób:

Wskazówka:link +Dodaj ograniczenie służy do dodawania nowego ograniczenia.
ON DELETE i ON UPDATE są ustawione odpowiednio na CASCADE i NO ACTION, więc gdy post lub temat zostanie usunięty, informacje o jego relacji w tabeli post_topic są również automatycznie usuwane. (Na obrazku popełniłem błąd, ustawiając ON UPDATE na CASCADE zamiast NO ACTION, przepraszam za to).
Kliknij Zapisz i gotowe. Tabele są teraz powiązane. Aby jednak ustalić związek między postami a tematami, musimy wypełnić tabelę tematów tematami i ostatecznie tabelą post_topic, która jest rzeczywistymi informacjami o relacji.
Teraz wstawmy kilka wpisów do dwóch tabel:
tematy:
INSERT INTO `topics` (`id`, `name`, `slug`) VALUES
(1, 'Inspiration', 'inspiration'),
(2, 'Motivation', 'motivation'),
(3, 'Diary', 'diary')
post_topic:
INSERT INTO `post_topic` (`id`, `post_id`, `topic_id`) VALUES
(1, 1, 1),
(2, 2, 2)
Relacja zdefiniowana w tabeli post_topic mówi, że temat o identyfikatorze 1 w tabeli tematów należy do posta o identyfikatorze 1 w tabeli postów. To samo dotyczy tematu o identyfikatorze 2 i posta o identyfikatorze 2.
Na każdej liście postów na stronie index.php będziemy wyświetlać temat, pod którym tworzony jest post.
Aby to zrobić, musimy zmodyfikować naszą metodę getPublishedPosts(), którą stworzyliśmy w public_functions.php, aby odpytywać temat każdego posta z bazy danych i zwracać post wraz z jego tematem.
Zmodyfikuj plik public_functions.php, aby wyglądał tak:
<?php
/* * * * * * * * * * * * * * *
* Returns all published posts
* * * * * * * * * * * * * * */
function getPublishedPosts() {
	// use global $conn object in function
	global $conn;
	$sql = "SELECT * FROM posts WHERE published=true";
	$result = mysqli_query($conn, $sql);
	// fetch all posts as an associative array called $posts
	$posts = mysqli_fetch_all($result, MYSQLI_ASSOC);

	$final_posts = array();
	foreach ($posts as $post) {
		$post['topic'] = getPostTopic($post['id']);
		array_push($final_posts, $post);
	}
	return $final_posts;
}
/* * * * * * * * * * * * * * *
* Receives a post id and
* Returns topic of the post
* * * * * * * * * * * * * * */
function getPostTopic($post_id){
	global $conn;
	$sql = "SELECT * FROM topics WHERE id=
			(SELECT topic_id FROM post_topic WHERE post_id=$post_id) LIMIT 1";
	$result = mysqli_query($conn, $sql);
	$topic = mysqli_fetch_assoc($result);
	return $topic;
}
?>
Teraz przejdź do pliku index.php. Wewnątrz pętli foreach, bezpośrednio pod tagiem obrazu , dodaj instrukcję if, aby wyświetlić temat. Twoja pętla foreach po zmodyfikowaniu powinna wyglądać tak:
<?php foreach ($posts as $post): ?>
	<div class="post" style="margin-left: 0px;">
		<img src="<?php echo BASE_URL . '/static/images/' . $post['image']; ?>" class="post_image" alt="">
        <!-- Added this if statement... -->
		<?php if (isset($post['topic']['name'])): ?>
			<a
				href="<?php echo BASE_URL . 'filtered_posts.php?topic=' . $post['topic']['id'] ?>"
				class="btn category">
				<?php echo $post['topic']['name'] ?>
			</a>
		<?php endif ?>

		<a href="single_post.php?post-slug=<?php echo $post['slug']; ?>">
			<div class="post_info">
				<h3><?php echo $post['title'] ?></h3>
				<div class="info">
					<span><?php echo date("F j, Y ", strtotime($post["created_at"])); ?></span>
					<span class="read_more">Read more...</span>
				</div>
			</div>
		</a>
	</div>
<?php endforeach ?>
Teraz odśwież stronę, a zobaczysz temat wyświetlony we wpisie.
Wewnątrz tej pętli foreach zauważysz, że istnieją dwa linki, które po kliknięciu przeniosą Cię na dwie strony:filter_posts.php i single_post.php.
filter_posts.php to strona, która wyświetla wszystkie posty w ramach określonego tematu, gdy użytkownik kliknie ten temat.
single_post.php to strona, która wyświetla szczegółowo cały post wraz z komentarzami, gdy użytkownik kliknie miniaturę posta.
Te dwa pliki wymagają kilku funkcji z naszego pliku public_functions.php. filter_posts.php wymaga dwóch funkcji o nazwie getPublishedPostsByTopic() i getTopicNameById(), podczas gdy single_posts.php wymaga getPost() i getAllTopics().
Zacznijmy od pliku filter_posts.php. Otwórz public_functions.php i dodaj te dwie funkcje do listy funkcji:
/* * * * * * * * * * * * * * * *
* Returns all posts under a topic
* * * * * * * * * * * * * * * * */
function getPublishedPostsByTopic($topic_id) {
	global $conn;
	$sql = "SELECT * FROM posts ps
			WHERE ps.id IN
			(SELECT pt.post_id FROM post_topic pt
				WHERE pt.topic_id=$topic_id GROUP BY pt.post_id
				HAVING COUNT(1) = 1)";
	$result = mysqli_query($conn, $sql);
	// fetch all posts as an associative array called $posts
	$posts = mysqli_fetch_all($result, MYSQLI_ASSOC);

	$final_posts = array();
	foreach ($posts as $post) {
		$post['topic'] = getPostTopic($post['id']);
		array_push($final_posts, $post);
	}
	return $final_posts;
}
/* * * * * * * * * * * * * * * *
* Returns topic name by topic id
* * * * * * * * * * * * * * * * */
function getTopicNameById($id)
{
	global $conn;
	$sql = "SELECT name FROM topics WHERE id=$id";
	$result = mysqli_query($conn, $sql);
	$topic = mysqli_fetch_assoc($result);
	return $topic['name'];
}
Najpierw utwórzmy plik filter_posts.php w głównym folderze naszej aplikacji (czyli complete-blog-php/filtered_posts.php). Po prostu wkleję cały kod tej strony do pliku:
filter_posts.php:
<?php include('config.php'); ?>
<?php include('includes/public_functions.php'); ?>
<?php include('includes/head_section.php'); ?>
<?php
	// Get posts under a particular topic
	if (isset($_GET['topic'])) {
		$topic_id = $_GET['topic'];
		$posts = getPublishedPostsByTopic($topic_id);
	}
?>
	<title>LifeBlog | Home </title>
</head>
<body>
<div class="container">
<!-- Navbar -->
	<?php include( ROOT_PATH . '/includes/navbar.php'); ?>
<!-- // Navbar -->
<!-- content -->
<div class="content">
	<h2 class="content-title">
		Articles on <u><?php echo getTopicNameById($topic_id); ?></u>
	</h2>
	<hr>
	<?php foreach ($posts as $post): ?>
		<div class="post" style="margin-left: 0px;">
			<img src="<?php echo BASE_URL . '/static/images/' . $post['image']; ?>" class="post_image" alt="">
			<a href="single_post.php?post-slug=<?php echo $post['slug']; ?>">
				<div class="post_info">
					<h3><?php echo $post['title'] ?></h3>
					<div class="info">
						<span><?php echo date("F j, Y ", strtotime($post["created_at"])); ?></span>
						<span class="read_more">Read more...</span>
					</div>
				</div>
			</a>
		</div>
	<?php endforeach ?>
</div>
<!-- // content -->
</div>
<!-- // container -->

<!-- Footer -->
	<?php include( ROOT_PATH . '/includes/footer.php'); ?>
<!-- // Footer -->
Teraz odśwież stronę, kliknij temat i jeśli przeniesie Cię na stronę wyświetlającą posty pod tym tematem, to postępujesz właściwie.
Zróbmy to samo z single_post.php. Otwórz public_functions.php i dodaj do niego te 2 funkcje:
/* * * * * * * * * * * * * * *
* Returns a single post
* * * * * * * * * * * * * * */
function getPost($slug){
	global $conn;
	// Get single post slug
	$post_slug = $_GET['post-slug'];
	$sql = "SELECT * FROM posts WHERE slug='$post_slug' AND published=true";
	$result = mysqli_query($conn, $sql);

	// fetch query results as associative array.
	$post = mysqli_fetch_assoc($result);
	if ($post) {
		// get the topic to which this post belongs
		$post['topic'] = getPostTopic($post['id']);
	}
	return $post;
}
/* * * * * * * * * * * *
*  Returns all topics
* * * * * * * * * * * * */
function getAllTopics()
{
	global $conn;
	$sql = "SELECT * FROM topics";
	$result = mysqli_query($conn, $sql);
	$topics = mysqli_fetch_all($result, MYSQLI_ASSOC);
	return $topics;
}
Teraz utwórz plik complete-blog-php/single_post.php i wklej do niego ten kod:
<?php  include('config.php'); ?>
<?php  include('includes/public_functions.php'); ?>
<?php
	if (isset($_GET['post-slug'])) {
		$post = getPost($_GET['post-slug']);
	}
	$topics = getAllTopics();
?>
<?php include('includes/head_section.php'); ?>
<title> <?php echo $post['title'] ?> | LifeBlog</title>
</head>
<body>
<div class="container">
	<!-- Navbar -->
		<?php include( ROOT_PATH . '/includes/navbar.php'); ?>
	<!-- // Navbar -->

	<div class="content" >
		<!-- Page wrapper -->
		<div class="post-wrapper">
			<!-- full post div -->
			<div class="full-post-div">
			<?php if ($post['published'] == false): ?>
				<h2 class="post-title">Sorry... This post has not been published</h2>
			<?php else: ?>
				<h2 class="post-title"><?php echo $post['title']; ?></h2>
				<div class="post-body-div">
					<?php echo html_entity_decode($post['body']); ?>
				</div>
			<?php endif ?>
			</div>
			<!-- // full post div -->

			<!-- comments section -->
			<!--  coming soon ...  -->
		</div>
		<!-- // Page wrapper -->

		<!-- post sidebar -->
		<div class="post-sidebar">
			<div class="card">
				<div class="card-header">
					<h2>Topics</h2>
				</div>
				<div class="card-content">
					<?php foreach ($topics as $topic): ?>
						<a
							href="<?php echo BASE_URL . 'filtered_posts.php?topic=' . $topic['id'] ?>">
							<?php echo $topic['name']; ?>
						</a>
					<?php endforeach ?>
				</div>
			</div>
		</div>
		<!-- // post sidebar -->
	</div>
</div>
<!-- // content -->

<?php include( ROOT_PATH . '/includes/footer.php'); ?>
Zastosujmy teraz do tego stylizację. Otwórz public_styling.css i dodaj do niego ten kod stylizacji:
/* * * * * * * * *
* SINGLE PAGE
* * * * * * * * */
.content .post-wrapper {
	width: 70%;
	float: left;
	min-height: 250px;
}
.full-post-div {
	min-height: 300px;
	padding: 20px;
	border: 1px solid #e4e1e1;
	border-radius: 2px;
}
.full-post-div h2.post-title {
	margin: 10px auto 20px;
	text-align: center;
}
.post-body-div {
	font-family: 'Noto Serif', serif;
	font-size: 1.2em;
}
.post-body-div p {
	margin:20px 0px;
}
.post-sidebar {
	width: 24%;
	float: left;
	margin-left: 5px;
	min-height: 400px;
}
.content .post-comments {
	margin-top: 25px;
	border-radius: 2px;
	border-top: 1px solid #e4e1e1;
	padding: 10px;
}
.post-sidebar .card {
	width: 95%;
	margin: 10px auto;
	border: 1px solid #e4e1e1;
	border-radius: 10px 10px 0px 0px;
}
.post-sidebar .card .card-header {
	padding: 10px;
	text-align: center;
	border-radius: 3px 3px 0px 0px;
	background: #3E606F;
}
.post-sidebar .card .card-header h2 {
	color: white;
}
.post-sidebar .card .card-content a {
	display: block;
	box-sizing: border-box;
	padding: 8px 10px;
	border-bottom: 1px solid #e4e1e1;
	color: #444;
}
.post-sidebar .card .card-content a:hover {
	padding-left: 20px;
	background: #F9F9F9;
	transition: 0.1s;
}
Wygląda teraz dobrze, prawda?
Ostatnia rzecz do zrobienia i prawie skończymy z obszarem publicznym:wdrożymy rejestrację i logowanie użytkowników.
Rejestracja i logowanie użytkownika
Ponieważ zrobiłem już samouczek dotyczący rejestracji i logowania użytkownika, będę w tej części bardzo rzeczowy i nie będę się zbytnio tłumaczył.
Utwórz dwa pliki w folderze głównym o nazwach register.php i login.php. Otwórz każdy z nich i umieść w nich ten kod:
register.php:
<?php  include('config.php'); ?>
<!-- Source code for handling registration and login -->
<?php  include('includes/registration_login.php'); ?>

<?php include('includes/head_section.php'); ?>

<title>LifeBlog | Sign up </title>
</head>
<body>
<div class="container">
	<!-- Navbar -->
		<?php include( ROOT_PATH . '/includes/navbar.php'); ?>
	<!-- // Navbar -->

	<div style="width: 40%; margin: 20px auto;">
		<form method="post" action="register.php" >
			<h2>Register on LifeBlog</h2>
			<?php include(ROOT_PATH . '/includes/errors.php') ?>
			<input  type="text" name="username" value="<?php echo $username; ?>"  placeholder="Username">
			<input type="email" name="email" value="<?php echo $email ?>" placeholder="Email">
			<input type="password" name="password_1" placeholder="Password">
			<input type="password" name="password_2" placeholder="Password confirmation">
			<button type="submit" class="btn" name="reg_user">Register</button>
			<p>
				Already a member? <a href="login.php">Sign in</a>
			</p>
		</form>
	</div>
</div>
<!-- // container -->
<!-- Footer -->
	<?php include( ROOT_PATH . '/includes/footer.php'); ?>
<!-- // Footer -->
login.php:
<?php  include('config.php'); ?>
<?php  include('includes/registration_login.php'); ?>
<?php  include('includes/head_section.php'); ?>
	<title>LifeBlog | Sign in </title>
</head>
<body>
<div class="container">
	<!-- Navbar -->
	<?php include( ROOT_PATH . '/includes/navbar.php'); ?>
	<!-- // Navbar -->

	<div style="width: 40%; margin: 20px auto;">
		<form method="post" action="login.php" >
			<h2>Login</h2>
			<?php include(ROOT_PATH . '/includes/errors.php') ?>
			<input type="text" name="username" value="<?php echo $username; ?>" value="" placeholder="Username">
			<input type="password" name="password" placeholder="Password">
			<button type="submit" class="btn" name="login_btn">Login</button>
			<p>
				Not yet a member? <a href="register.php">Sign up</a>
			</p>
		</form>
	</div>
</div>
<!-- // container -->

<!-- Footer -->
	<?php include( ROOT_PATH . '/includes/footer.php'); ?>
<!-- // Footer -->
W górnej części obu plików umieściliśmy plik o nazwie registeration_login.php, który obsługuje logikę rejestracji i logowania. Jest to plik, do którego zostaną przesłane informacje z formularza logowania i rejestracji oraz zostanie nawiązana komunikacja z bazą danych. Utwórzmy go w naszym folderze include i wrzućmy do niego ten kod:
kompletny-blog-php/includes/registration_login.php:
<?php
	// variable declaration
	$username = "";
	$email    = "";
	$errors = array();

	// REGISTER USER
	if (isset($_POST['reg_user'])) {
		// receive all input values from the form
		$username = esc($_POST['username']);
		$email = esc($_POST['email']);
		$password_1 = esc($_POST['password_1']);
		$password_2 = esc($_POST['password_2']);

		// form validation: ensure that the form is correctly filled
		if (empty($username)) {  array_push($errors, "Uhmm...We gonna need your username"); }
		if (empty($email)) { array_push($errors, "Oops.. Email is missing"); }
		if (empty($password_1)) { array_push($errors, "uh-oh you forgot the password"); }
		if ($password_1 != $password_2) { array_push($errors, "The two passwords do not match");}

		// Ensure that no user is registered twice.
		// the email and usernames should be unique
		$user_check_query = "SELECT * FROM users WHERE username='$username'
								OR email='$email' LIMIT 1";

		$result = mysqli_query($conn, $user_check_query);
		$user = mysqli_fetch_assoc($result);

		if ($user) { // if user exists
			if ($user['username'] === $username) {
			  array_push($errors, "Username already exists");
			}
			if ($user['email'] === $email) {
			  array_push($errors, "Email already exists");
			}
		}
		// register user if there are no errors in the form
		if (count($errors) == 0) {
			$password = md5($password_1);//encrypt the password before saving in the database
			$query = "INSERT INTO users (username, email, password, created_at, updated_at)
					  VALUES('$username', '$email', '$password', now(), now())";
			mysqli_query($conn, $query);

			// get id of created user
			$reg_user_id = mysqli_insert_id($conn);

			// put logged in user into session array
			$_SESSION['user'] = getUserById($reg_user_id);

			// if user is admin, redirect to admin area
			if ( in_array($_SESSION['user']['role'], ["Admin", "Author"])) {
				$_SESSION['message'] = "You are now logged in";
				// redirect to admin area
				header('location: ' . BASE_URL . 'admin/dashboard.php');
				exit(0);
			} else {
				$_SESSION['message'] = "You are now logged in";
				// redirect to public area
				header('location: index.php');
				exit(0);
			}
		}
	}

	// LOG USER IN
	if (isset($_POST['login_btn'])) {
		$username = esc($_POST['username']);
		$password = esc($_POST['password']);

		if (empty($username)) { array_push($errors, "Username required"); }
		if (empty($password)) { array_push($errors, "Password required"); }
		if (empty($errors)) {
			$password = md5($password); // encrypt password
			$sql = "SELECT * FROM users WHERE username='$username' and password='$password' LIMIT 1";

			$result = mysqli_query($conn, $sql);
			if (mysqli_num_rows($result) > 0) {
				// get id of created user
				$reg_user_id = mysqli_fetch_assoc($result)['id'];

				// put logged in user into session array
				$_SESSION['user'] = getUserById($reg_user_id);

				// if user is admin, redirect to admin area
				if ( in_array($_SESSION['user']['role'], ["Admin", "Author"])) {
					$_SESSION['message'] = "You are now logged in";
					// redirect to admin area
					header('location: ' . BASE_URL . '/admin/dashboard.php');
					exit(0);
				} else {
					$_SESSION['message'] = "You are now logged in";
					// redirect to public area
					header('location: index.php');
					exit(0);
				}
			} else {
				array_push($errors, 'Wrong credentials');
			}
		}
	}
	// escape value from form
	function esc(String $value)
	{
		// bring the global db connect object into function
		global $conn;

		$val = trim($value); // remove empty space sorrounding string
		$val = mysqli_real_escape_string($conn, $value);

		return $val;
	}
	// Get user info from user id
	function getUserById($id)
	{
		global $conn;
		$sql = "SELECT * FROM users WHERE id=$id LIMIT 1";

		$result = mysqli_query($conn, $sql);
		$user = mysqli_fetch_assoc($result);

		// returns user in an array format:
		// ['id'=>1 'username' => 'Awa', 'email'=>'a@a.com', 'password'=> 'mypass']
		return $user;
	}
?>
Wejdź na https://localhost/complete-blog-php/register.php, a zobaczysz błąd informujący, że nie znaleziono pliku error.php.
Plik Errors.php to plik z kodem wyświetlającym błędy walidacji formularza. Utwórz plik Errors.php w pliku complete-blog-php/includes i wklej do niego ten kod:
<?php if (count($errors) > 0) : ?>
  <div class="message error validation_errors" >
  	<?php foreach ($errors as $error) : ?>
  	  <p><?php echo $error ?></p>
  	<?php endforeach ?>
  </div>
<?php endif ?>
Jeszcze raz otwórz public_styling.css, dodajmy ten ostatni fragment kodu stylizacji dla tego pliku Errors.php i kilku innych elementów:
/* NOTIFICATION MESSAGES */
.message {
	width: 100%;
	margin: 0px auto;
	padding: 10px 0px;
	color: #3c763d;
	background: #dff0d8;
	border: 1px solid #3c763d;
	border-radius: 5px;
	text-align: center;
}
.error {
	color: #a94442;
	background: #f2dede;
	border: 1px solid #a94442;
	margin-bottom: 20px;
}
.validation_errors p {
	text-align: left;
	margin-left: 10px;
}
.logged_in_info {
	text-align: right;
	padding: 10px;
}
A teraz komunikat o błędzie zniknął. Kliknij przycisk rejestracji bez wypełniania formularza, a zobaczysz wyrenderowane piękne komunikaty o błędach.
Utwórzmy nowego użytkownika, wypełniając formularz na stronie register.php i klikając przycisk rejestracji. Możesz podać dowolne ważne informacje dotyczące nazwy użytkownika, adresu e-mail i hasła; po prostu upewnij się, że je pamiętasz, ponieważ wkrótce użyjemy ich do zalogowania się na stronie logowania.
Gdy użytkownik się zaloguje, na pewno będzie musiał się wylogować. W folderze głównym aplikacji utwórz plik o nazwie logout.php.
kompletny-blog-php/logout.php:
<?php
	session_start();
	session_unset($_SESSION['user']);
	session_destroy();
	header('location: index.php');
?>
Również, gdy użytkownik się loguje, chcemy wyświetlić jego nazwę i link lub przycisk, który kliknie, aby się wylogować. W przypadku obszaru publicznego zrobimy to w dołączonym pliku banner.php. Otwórz plik banner.php i zmodyfikuj kod, aby wyglądał tak:
kompletny-blog-php/includes/banner.php:
<?php if (isset($_SESSION['user']['username'])) { ?>
	<div class="logged_in_info">
		<span>welcome <?php echo $_SESSION['user']['username'] ?></span>
		|
		<span><a href="logout.php">logout</a></span>
	</div>
<?php }else{ ?>
	<div class="banner">
		<div class="welcome_msg">
			<h1>Today's Inspiration</h1>
			<p>
			    One day your life <br>
			    will flash before your eyes. <br>
			    Make sure it's worth watching. <br>
				<span>~ Gerard Way</span>
			</p>
			<a href="register.php" class="btn">Join us!</a>
		</div>

		<div class="login_div">
			<form action="<?php echo BASE_URL . 'index.php'; ?>" method="post" >
				<h2>Login</h2>
				<div style="width: 60%; margin: 0px auto;">
					<?php include(ROOT_PATH . '/includes/errors.php') ?>
				</div>
				<input type="text" name="username" value="<?php echo $username; ?>" placeholder="Username">
				<input type="password" name="password"  placeholder="Password">
				<button class="btn" type="submit" name="login_btn">Sign in</button>
			</form>
		</div>
	</div>
<?php } ?>
It checks the session to see if a user is available (logged in). If logged in, the username is displayed with the logout link. When there is a logged in user, the banner does not get displayed since it is some sort of a welcome screen to guest users.
You notice that the banner has a login form and this banner is included inside index.php file. Therefore we need to include the code that handles registration and login inside our index.php file also. Open index.php and add this line directly under the include for public_functions.php:
top section of complete-blog-php/index.php:
<?php require_once( ROOT_PATH . '/includes/registration_login.php') ?>And that's it with user registration and login. In the next section, we begin work on the admin area.
Thank you so much for sticking around up to this point. I hope you found it helpful. If you have any worries, please leave it in the comments below. Your feedback is always very helpful and if you have any bugs in your code, I will try my best to help you out.
I will be very much encouraged to create more of these tutorials with improved quality if you share, subscribe to my site and recommend my site to your friends.