W części 2 tej serii dodałeś możliwość zapisywania zmian dokonanych przez REST API w bazie danych za pomocą SQLAlchemy i nauczyłeś się serializować te dane dla REST API za pomocą Marshmallow. Połączenie interfejsu API REST z bazą danych, aby aplikacja mogła wprowadzać zmiany w istniejących danych i tworzyć nowe, jest świetne i sprawia, że aplikacja jest znacznie bardziej użyteczna i niezawodna.
To jednak tylko część możliwości, jakie oferuje baza danych. Jeszcze potężniejszą funkcją jest R część RDBMS systemy:związki . W bazie danych relacja to możliwość połączenia ze sobą dwóch lub więcej tabel w znaczący sposób. W tym artykule dowiesz się, jak zaimplementować relacje i zmienić swoją Person bazy danych do aplikacji internetowej do mini-blogowania.
Z tego artykułu dowiesz się:
- Dlaczego więcej niż jedna tabela w bazie danych jest przydatna i ważna
- Jak tabele są ze sobą powiązane
- Jak SQLAlchemy może pomóc w zarządzaniu relacjami
- W jaki sposób relacje pomagają w tworzeniu aplikacji do mini-blogowania
Dla kogo jest ten artykuł
Część 1 tej serii poprowadziła Cię przez proces tworzenia interfejsu API REST, a część 2 pokazała, jak połączyć ten interfejs API REST z bazą danych.
Ten artykuł jeszcze bardziej poszerza zakres Twoich narzędzi programistycznych. Dowiesz się, jak tworzyć hierarchiczne struktury danych reprezentowane przez SQLAlchemy jako relacje jeden-do-wielu. Ponadto rozszerzysz interfejs API REST, który już zbudowałeś, aby zapewnić obsługę CRUD (Create, Read, Update i Delete) dla elementów w tej hierarchicznej strukturze.
Aplikacja internetowa przedstawiona w części 2 będzie miała swoje pliki HTML i JavaScript zmodyfikowane na wiele sposobów, aby stworzyć bardziej funkcjonalną aplikację do mini-blogowania. Możesz przejrzeć ostateczną wersję kodu z części 2 w repozytorium GitHub dla tego artykułu.
Poczekaj, gdy zaczniesz tworzyć relacje i swoją mini-aplikację do blogowania!
Dodatkowe zależności
Nie ma nowych zależności Pythona poza tym, co było wymagane w artykule 2. Jednak będziesz używać dwóch nowych modułów JavaScript w aplikacji internetowej, aby wszystko było łatwiejsze i bardziej spójne. Te dwa moduły są następujące:
- Handlebars.js to silnik szablonów dla JavaScript, podobnie jak Jinja2 for Flask.
- Moment.js to moduł parsowania i formatowania daty i godziny, który ułatwia wyświetlanie znaczników czasu UTC.
Nie musisz pobierać żadnego z nich, ponieważ aplikacja internetowa pobierze je bezpośrednio z Cloudflare CDN (Content Delivery Network), tak jak robisz to już w przypadku modułu jQuery.
Dane osób rozszerzone do blogowania
W części 2, People dane istniały jako słownik w build_database.py Kod w Pythonie. To jest to, czego użyłeś do wypełnienia bazy danych początkowymi danymi. Zamierzasz zmodyfikować People struktura danych, aby dać każdej osobie listę powiązanych z nimi notatek. Nowi People struktura danych będzie wyglądać tak:
# Data to initialize database with
PEOPLE = [
    {
        "fname": "Doug",
        "lname": "Farrell",
        "notes": [
            ("Cool, a mini-blogging application!", "2019-01-06 22:17:54"),
            ("This could be useful", "2019-01-08 22:17:54"),
            ("Well, sort of useful", "2019-03-06 22:17:54"),
        ],
    },
    {
        "fname": "Kent",
        "lname": "Brockman",
        "notes": [
            (
                "I'm going to make really profound observations",
                "2019-01-07 22:17:54",
            ),
            (
                "Maybe they'll be more obvious than I thought",
                "2019-02-06 22:17:54",
            ),
        ],
    },
    {
        "fname": "Bunny",
        "lname": "Easter",
        "notes": [
            ("Has anyone seen my Easter eggs?", "2019-01-07 22:47:54"),
            ("I'm really late delivering these!", "2019-04-06 22:17:54"),
        ],
    },
]
Każda osoba w grupie People słownik zawiera teraz klawisz o nazwie notes , który jest powiązany z listą zawierającą krotki danych. Każda krotka w notes lista reprezentuje pojedynczą notatkę zawierające treść i sygnaturę czasową. Sygnatury czasowe są inicjowane (a nie tworzone dynamicznie), aby później zademonstrować zamawianie w interfejsie API REST.
Każda pojedyncza osoba jest powiązana z wieloma notatkami, a każda pojedyncza notatka jest powiązana tylko z jedną osobą. Ta hierarchia danych jest znana jako relacja jeden-do-wielu, w której pojedynczy obiekt nadrzędny jest powiązany z wieloma obiektami podrzędnymi. Zobaczysz, jak ta relacja jeden-do-wielu jest zarządzana w bazie danych za pomocą SQLAlchemy.
Podejście brutalne
Zbudowana baza danych przechowywała dane w tabeli, a tabela jest dwuwymiarową tablicą wierszy i kolumn. Czy People? słownik powyżej być reprezentowany w jednej tabeli wierszy i kolumn? Może to być w następujący sposób w Twojej person tabela bazy danych. Niestety uwzględnienie wszystkich rzeczywistych danych w przykładzie tworzy pasek przewijania tabeli, jak widać poniżej:
person_id | lname | fname | timestamp | content | note_timestamp |
|---|---|---|---|---|---|
| 1 | Farrel | Doug | 2018-08-08 21:16:01 | Super, aplikacja do mini blogowania! | 2019-01-06 22:17:54 |
| 2 | Farrel | Doug | 2018-08-08 21:16:01 | To może być przydatne | 2019-01-08 22:17:54 |
| 3 | Farrel | Doug | 2018-08-08 21:16:01 | Cóż, trochę przydatne | 2019-03-06 22:17:54 |
| 4 | Brockman | Kent | 2018-08-08 21:16:01 | Poczynię naprawdę głębokie obserwacje | 2019-01-07 22:17:54 |
| 5 | Brockman | Kent | 2018-08-08 21:16:01 | Może będą bardziej oczywiste, niż myślałem | 2019-02-06 22:17:54 |
| 6 | Wielkanoc | Królik | 2018-08-08 21:16:01 | Czy ktoś widział moje pisanki? | 2019-01-07 22:47:54 |
| 7 | Wielkanoc | Królik | 2018-08-08 21:16:01 | Naprawdę spóźniam się z dostarczeniem tego! | 2019-04-06 22:17:54 |
Powyższa tabela faktycznie zadziała. Wszystkie dane są reprezentowane, a pojedyncza osoba jest powiązana ze zbiorem różnych notatek.
Zalety
Koncepcyjnie powyższa struktura tabeli ma tę zaletę, że jest stosunkowo łatwa do zrozumienia. Możesz nawet założyć, że dane mogą zostać utrwalone w płaskim pliku zamiast w bazie danych.
Dzięki dwuwymiarowej strukturze tabeli możesz przechowywać i wykorzystywać te dane w arkuszu kalkulacyjnym. Arkusze kalkulacyjne zostały w pewnym stopniu wykorzystane do przechowywania danych.
Wady
Chociaż powyższa struktura tabeli zadziała, ma pewne wady.
Aby przedstawić zbiór notatek, wszystkie dane dla każdej osoby są powtarzane dla każdej unikalnej notatki, dlatego dane osoby są zbędne. To nie jest tak wielka sprawa dla twoich danych osobowych, ponieważ nie ma tak wielu kolumn. Ale wyobraź sobie, że dana osoba ma o wiele więcej kolumn. Nawet w przypadku dużych dysków może to stanowić problem w zakresie przechowywania, jeśli masz do czynienia z milionami wierszy danych.
Posiadanie takich nadmiarowych danych może prowadzić do problemów z konserwacją w miarę upływu czasu. Na przykład, co by było, gdyby Zajączek uznał, że zmiana nazwy to dobry pomysł. W tym celu każdy rekord zawierający imię Zajączka Wielkanocnego musiałby zostać zaktualizowany, aby dane były spójne. Ten rodzaj pracy z bazą danych może prowadzić do niespójności danych, szczególnie jeśli praca jest wykonywana przez osobę wykonującą ręcznie zapytanie SQL.
Nazywanie kolumn staje się niewygodne. W powyższej tabeli znajduje się timestamp kolumna służąca do śledzenia czasu utworzenia i aktualizacji osoby w tabeli. Chcesz również mieć podobną funkcjonalność dla czasu tworzenia i aktualizowania notatki, ale ponieważ timestamp jest już używany, wymyślona nazwa note_timestamp jest używany.
Co by było, gdybyś chciał dodać dodatkowe relacje jeden-do-wielu do person? stół? Na przykład, aby dołączyć dzieci lub numery telefonów danej osoby. Każda osoba może mieć wiele dzieci i wiele numerów telefonów. Można to zrobić stosunkowo łatwo dla Pythona People słownik powyżej, dodając children i phone_numbers klucze z nowymi listami zawierającymi dane.
Jednak reprezentowanie tych nowych relacji jeden-do-wielu w Twojej person powyższa tabela bazy danych staje się znacznie trudniejsza. Każda nowa relacja jeden-do-wielu znacznie zwiększa liczbę wierszy niezbędnych do jej reprezentacji dla każdego wpisu w danych podrzędnych. Ponadto problemy związane z nadmiarowością danych stają się coraz większe i trudniejsze do rozwiązania.
Wreszcie dane, które uzyskasz z powyższej struktury tabeli, nie byłyby zbyt pytoniczne:byłaby to po prostu duża lista list. SQLAlchemy nie byłaby w stanie ci bardzo pomóc, ponieważ nie ma związku.
Podejście do relacyjnej bazy danych
W oparciu o to, co widzieliśmy powyżej, staje się jasne, że próba przedstawienia nawet umiarkowanie złożonego zestawu danych w jednej tabeli staje się dość szybko niemożliwa do zarządzania. Biorąc to pod uwagę, jaką alternatywę oferuje baza danych? W tym miejscu R część RDBMS w grę wchodzą bazy danych. Reprezentowanie relacji usuwa wady opisane powyżej.
Zamiast próbować reprezentować dane hierarchiczne w jednej tabeli, dane są dzielone na wiele tabel z mechanizmem powiązania ich ze sobą. Tabele są podzielone wzdłuż linii kolekcji, więc dla Twoich People słowniku powyżej, oznacza to, że pojawi się tabela przedstawiająca osoby i druga reprezentująca notatki. To przywraca twoją pierwotną person tabela, która wygląda tak:
person_id | lname | fname | timestamp |
|---|---|---|---|
| 1 | Farrel | Doug | 2018-08-08 21:16:01.888444 |
| 2 | Brockman | Kent | 2018-08-08 21:16:01.889060 |
| 3 | Wielkanoc | Królik | 2018-08-08 21:16:01.886834 |
Aby przedstawić nowe informacje o notatkach, utworzysz nową tabelę o nazwie note . (Zapamiętaj naszą pojedynczą konwencję nazewnictwa tabel.) Tabela wygląda tak:
note_id | person_id | content | timestamp |
|---|---|---|---|
| 1 | 1 | Super, aplikacja do mini blogowania! | 2019-01-06 22:17:54 |
| 2 | 1 | To może być przydatne | 2019-01-08 22:17:54 |
| 3 | 1 | Cóż, trochę przydatne | 2019-03-06 22:17:54 |
| 4 | 2 | Poczynię naprawdę głębokie obserwacje | 2019-01-07 22:17:54 |
| 5 | 2 | Może będą bardziej oczywiste, niż myślałem | 2019-02-06 22:17:54 |
| 6 | 3 | Czy ktoś widział moje pisanki? | 2019-01-07 22:47:54 |
| 7 | 3 | Naprawdę spóźniam się z dostarczeniem tego! | 2019-04-06 22:17:54 |
Zauważ, że podobnie jak person tabela, note tabela ma unikalny identyfikator o nazwie note_id , który jest kluczem podstawowym dla notes stół. Jedna rzecz, która nie jest oczywista, to włączenie person_id wartość w tabeli. Do czego to służy? To właśnie tworzy relację z person stół. Natomiast note_id jest kluczem podstawowym tabeli, person_id to tak zwany klucz obcy.
Klucz obcy podaje każdy wpis w note podaj klucz główny person rekord, z którym jest powiązany. Korzystając z tego, SQLAlchemy może zebrać wszystkie notatki związane z każdą osobą, łącząc person.person_id klucz główny do note.person_id klucz obcy, tworzenie relacji.
Zalety
Dzieląc zestaw danych na dwie tabele i wprowadzając koncepcję klucza obcego, sprawiłeś, że dane stały się nieco bardziej złożone do przemyślenia, rozwiązałeś wady reprezentacji pojedynczej tabeli. SQLAlchemy pomoże ci dość łatwo zakodować zwiększoną złożoność.
Dane w bazie danych nie są już zbędne. Na każdą osobę, którą chcesz przechowywać w bazie danych, przypada tylko jeden wpis dotyczący osoby. To natychmiast rozwiązuje problem przechowywania i znacznie upraszcza problemy związane z konserwacją.
Gdyby Zajączek nadal chciał zmienić imiona, wystarczyłoby zmienić tylko jeden wiersz w person tabela i wszystko inne związane z tym wierszem (np. note tabeli) natychmiast skorzysta na tej zmianie.
Nazewnictwo kolumn jest bardziej spójne i znaczące. Ponieważ dane osób i notatek istnieją w osobnych tabelach, znacznik czasu tworzenia i aktualizacji może być nazwany spójnie w obu tabelach, ponieważ nie ma konfliktu nazw w różnych tabelach.
Ponadto nie musisz już tworzyć permutacji każdego wiersza dla nowych relacji jeden-do-wielu, które możesz chcieć reprezentować. Zabierz nasze children i phone_numbers przykład z wcześniejszego. Implementacja tego wymagałaby child i phone_number tabele. Każda tabela zawierałaby klucz obcy person_id odniesienie go z powrotem do person tabela.
Korzystając z SQLAlchemy, dane, które uzyskasz z powyższych tabel, będą bardziej przydatne, ponieważ otrzymasz obiekt dla każdego wiersza osoby. Ten obiekt ma nazwane atrybuty odpowiadające kolumnom w tabeli. Jednym z tych atrybutów jest lista Pythona zawierająca powiązane obiekty notatek.
Wady
Tam, gdzie podejście brute force było prostsze do zrozumienia, koncepcja kluczy obcych i relacji sprawia, że myślenie o danych jest nieco bardziej abstrakcyjne. Ta abstrakcja musi być przemyślana w przypadku każdej relacji nawiązanej między tabelami.
Korzystanie z relacji oznacza zobowiązanie się do korzystania z systemu bazodanowego. Jest to kolejne narzędzie do instalacji, nauki i obsługi wykraczające poza aplikację, która faktycznie korzysta z danych.
Modele SQLAlchemy
Aby użyć dwóch powyższych tabel i relacji między nimi, musisz utworzyć modele SQLAlchemy, które będą świadome istnienia obu tabel i relacji między nimi. Oto SQLAlchemy Person model z części 2, zaktualizowany w celu uwzględnienia relacji do zbioru notes :
 1class Person(db.Model):
 2    __tablename__ = 'person'
 3    person_id = db.Column(db.Integer, primary_key=True)
 4    lname = db.Column(db.String(32))
 5    fname = db.Column(db.String(32))
 6    timestamp = db.Column(
 7        db.DateTime, default=datetime.utcnow, onupdate=datetime.utcnow
 8    )
 9    notes = db.relationship(
10        'Note',
11        backref='person',
12        cascade='all, delete, delete-orphan',
13        single_parent=True,
14        order_by='desc(Note.timestamp)'
15    )
Linie od 1 do 8 powyższej klasy Pythona wyglądają dokładnie tak samo, jak to, co utworzyłeś wcześniej w Części 2. Linie od 9 do 16 tworzą nowy atrybut w Person klasa o nazwie notes . Te nowe notes atrybuty są zdefiniowane w następujących wierszach kodu:
-
Wiersz 9: Podobnie jak inne atrybuty klasy, ta linia tworzy nowy atrybut o nazwie
notesi ustawia ją na instancję obiektu o nazwiedb.relationship. Ten obiekt tworzy relację, którą dodajesz dopersonklasy i jest tworzony ze wszystkimi parametrami zdefiniowanymi w kolejnych wierszach. -
Wiersz 10: Parametr ciągu
'Note'definiuje klasę SQLAlchemy, którąPersonklasa będzie powiązana.Noteclass nie jest jeszcze zdefiniowana, dlatego jest to ciąg znaków. Jest to odwołanie do przodu i pomaga radzić sobie z problemami, które kolejność definicji może powodować, gdy potrzebne jest coś, co nie jest zdefiniowane w dalszej części kodu.'Note'ciąg umożliwiapersonklasę, aby znaleźćNoteklasa w czasie wykonywania, czyli po obuPersoniNotezostały zdefiniowane. -
Wiersz 11:
backref='person'parametr jest trudniejszy. Tworzy to, co jest znane jako odwołanie wsteczne wNoteprzedmioty. Każde wystąpienieNoteobiekt będzie zawierał atrybut o nazwieperson.personatrybut odwołuje się do obiektu nadrzędnego, do którego konkretnaNoteinstancja jest powiązana. Posiadanie referencji do obiektu nadrzędnego (personw tym przypadku) w dziecku może być bardzo przydatne, jeśli twój kod powtarza notatki i musi zawierać informacje o rodzicu. Zdarza się to zaskakująco często w kodzie renderowania wyświetlania. -
Wiersz 12:
cascade='all, delete, delete-orphan'parametr określa, jak traktować instancje obiektu notatek, gdy wprowadzane są zmiany w rodzicuPersoninstancja. Na przykład, gdyPersonobiekt zostanie usunięty, SQLAlchemy utworzy kod SQL niezbędny do usunięciapersonz bazy danych. Ponadto ten parametr mówi mu, aby również usunąć wszystkieNoteinstancje z nim związane. Możesz przeczytać więcej o tych opcjach w dokumentacji SQLAlchemy. -
Wiersz 13:
single_parent=Trueparametr jest wymagany, jeślidelete-orphanjest częścią poprzedniejcascadeparametr. To mówi SQLAlchemy, aby nie zezwalać na osieroconąNoteinstancje (Notebez rodzicaPersonobiekt) istnieć, ponieważ każdaNotema jednego rodzica. -
Wiersz 14:
order_by='desc(Note.timestamp)'parametr mówi SQLAlchemy, jak posortowaćNoteinstancje powiązane zperson. KiedyPersonobiekt jest pobierany, domyślnienoteslista atrybutów będzie zawieraćNoteobiekty w nieznanej kolejności. SQLAlchemydesc(...)funkcja posortuje notatki w porządku malejącym od najnowszych do najstarszych. Gdyby ta linia była zamiast tegoorder_by='Note.timestamp', SQLAlchemy domyślnie używaasc(...)funkcji i posortuj notatki w porządku rosnącym, od najstarszych do najnowszych.
Teraz, gdy Twoja Person model ma nowe notes atrybut, który reprezentuje relację jeden-do-wielu z Note obiektów, musisz zdefiniować model SQLAlchemy dla Note :
 1class Note(db.Model):
 2    __tablename__ = 'note'
 3    note_id = db.Column(db.Integer, primary_key=True)
 4    person_id = db.Column(db.Integer, db.ForeignKey('person.person_id'))
 5    content = db.Column(db.String, nullable=False)
 6    timestamp = db.Column(
 7        db.DateTime, default=datetime.utcnow, onupdate=datetime.utcnow
 8    )
Note class definiuje atrybuty tworzące notatkę, jak widać w naszym przykładzie note tabela bazy danych z góry. Atrybuty są zdefiniowane tutaj:
-
Wiersz 1 tworzy
Noteklasa, dziedzicząca zdb.Model, dokładnie tak, jak robiłeś wcześniej podczas tworzeniapersonklasa. -
Wiersz 2 mówi klasie, jakiej tabeli bazy danych użyć do przechowywania
Noteobiekty. -
Linia 3 tworzy
note_idatrybut, definiując go jako wartość całkowitą i jako klucz podstawowy dlaNoteobiekt. -
Wiersz 4 tworzy
person_idatrybut i definiuje go jako klucz obcy, odnoszący się doNotedo klasyPersonklasa przy użyciuperson.person_idklucz podstawowy. To orazPerson.notesatrybut, dzięki którym SQLAlchemy wie, co robić podczas interakcji zPersoniNoteobiekty. -
Wiersz 5 tworzy
contentatrybut, który zawiera rzeczywisty tekst notatki.nullable=Falseparametr wskazuje, że można tworzyć nowe notatki, które nie mają treści. -
Linia 6 tworzy
timestampatrybut i dokładnie tak jakPersonklasa, zawiera czas utworzenia lub aktualizacji dla dowolnej konkretnejNoteprzykład.
Zainicjuj bazę danych
Teraz, gdy zaktualizowałeś Person i utworzył Note modele, użyjesz ich do odbudowania testowej bazy danych people.db . Zrobisz to, aktualizując build_database.py kod z Części 2. Oto jak będzie wyglądał kod:
 1import os
 2from datetime import datetime
 3from config import db
 4from models import Person, Note
 5
 6# Data to initialize database with
 7PEOPLE = [
 8    {
 9        "fname": "Doug",
10        "lname": "Farrell",
11        "notes": [
12            ("Cool, a mini-blogging application!", "2019-01-06 22:17:54"),
13            ("This could be useful", "2019-01-08 22:17:54"),
14            ("Well, sort of useful", "2019-03-06 22:17:54"),
15        ],
16    },
17    {
18        "fname": "Kent",
19        "lname": "Brockman",
20        "notes": [
21            (
22                "I'm going to make really profound observations",
23                "2019-01-07 22:17:54",
24            ),
25            (
26                "Maybe they'll be more obvious than I thought",
27                "2019-02-06 22:17:54",
28            ),
29        ],
30    },
31    {
32        "fname": "Bunny",
33        "lname": "Easter",
34        "notes": [
35            ("Has anyone seen my Easter eggs?", "2019-01-07 22:47:54"),
36            ("I'm really late delivering these!", "2019-04-06 22:17:54"),
37        ],
38    },
39]
40
41# Delete database file if it exists currently
42if os.path.exists("people.db"):
43    os.remove("people.db")
44
45# Create the database
46db.create_all()
47
48# Iterate over the PEOPLE structure and populate the database
49for person in PEOPLE:
50    p = Person(lname=person.get("lname"), fname=person.get("fname"))
51
52    # Add the notes for the person
53    for note in person.get("notes"):
54        content, timestamp = note
55        p.notes.append(
56            Note(
57                content=content,
58                timestamp=datetime.strptime(timestamp, "%Y-%m-%d %H:%M:%S"),
59            )
60        )
61    db.session.add(p)
62
63db.session.commit()
Powyższy kod pochodzi z Części 2, z kilkoma zmianami w celu stworzenia relacji jeden-do-wielu między Person i Note . Oto zaktualizowane lub nowe wiersze dodane do kodu:
-
Wiersz 4 został zaktualizowany, aby zaimportować
Noteklasa zdefiniowana wcześniej. -
Linie od 7 do 39 zawierają zaktualizowane
PEOPLEsłownik zawierający nasze dane osobowe, wraz z listą notatek związanych z każdą osobą. Te dane zostaną wstawione do bazy danych. -
Linie od 49 do 61 iteruj przez
PEOPLEsłownik, pobieranie każdejpersonz kolei i używając go do tworzeniapersonobiekt. -
Linia 53 iteruje po
person.noteslista, pobierając każdąnotez kolei. -
Linia 54 rozpakowuje
contentitimestampz każdejnoteskrotka. -
Linia 55 do 60 tworzy
Noteobiektu i dołącza go do kolekcji notatek osoby za pomocąp.notes.append(). -
Linia 61 dodaje
Personobiektpdo sesji bazy danych. -
Linia 63 wprowadza całą aktywność w sesji do bazy danych. W tym momencie wszystkie dane są zapisywane do
personinotetabele wpeople.dbplik bazy danych.
Możesz to zobaczyć, pracując z notes kolekcja w Person instancja obiektu p jest jak praca z każdą inną listą w Pythonie. SQLAlchemy dba o podstawowe informacje o relacji jeden-do-wielu, gdy db.session.commit() połączenie zostało wykonane.
Na przykład, tak jak Person instancja ma swoje pole klucza podstawowego person_id zainicjowany przez SQLAlchemy, gdy zostanie zatwierdzony do bazy danych, instancje Note będą miały zainicjowane pola klucza podstawowego. Ponadto Note klucz obcy person_id zostanie również zainicjowany wartością klucza podstawowego Person instancja, z którą jest powiązany.
Oto przykładowe wystąpienie person obiekt przed db.session.commit() w rodzaju pseudokodu:
Person (
    person_id = None
    lname = 'Farrell'
    fname = 'Doug'
    timestamp = None
    notes = [
        Note (
            note_id = None
            person_id = None
            content = 'Cool, a mini-blogging application!'
            timestamp = '2019-01-06 22:17:54'
        ),
        Note (
            note_id = None
            person_id = None
            content = 'This could be useful'
            timestamp = '2019-01-08 22:17:54'
        ),
        Note (
            note_id = None
            person_id = None
            content = 'Well, sort of useful'
            timestamp = '2019-03-06 22:17:54'
        )
    ]
)
Oto przykład Person obiekt po db.session.commit() :
Person (
    person_id = 1
    lname = 'Farrell'
    fname = 'Doug'
    timestamp = '2019-02-02 21:27:10.336'
    notes = [
        Note (
            note_id = 1
            person_id = 1
            content = 'Cool, a mini-blogging application!'
            timestamp = '2019-01-06 22:17:54'
        ),
        Note (
            note_id = 2
            person_id = 1
            content = 'This could be useful'
            timestamp = '2019-01-08 22:17:54'
        ),
        Note (
            note_id = 3
            person_id = 1
            content = 'Well, sort of useful'
            timestamp = '2019-03-06 22:17:54'
        )
    ]
)
Ważną różnicą między nimi jest to, że klucz podstawowy person i Note obiekty zostały zainicjowane. Silnik bazy danych zadbał o to, ponieważ obiekty zostały utworzone ze względu na funkcję automatycznego zwiększania kluczy podstawowych omówioną w Części 2.
Dodatkowo person_id klucz obcy we wszystkich Note instancje zostały zainicjowane, aby odwoływać się do swojego rodzica. Dzieje się tak z powodu kolejności, w jakiej Person i Note obiekty są tworzone w bazie danych.
SQLAlchemy jest świadomy relacji między Person i Note przedmioty. Kiedy Person obiekt jest przypisany do person tabela bazy danych, SQLAlchemy pobiera person_id wartość klucza podstawowego. Ta wartość jest używana do inicjalizacji wartości klucza obcego person_id w Note obiekt przed zatwierdzeniem do bazy danych.
SQLAlchemy zajmuje się tą pracą porządkową bazy danych ze względu na informacje, które przekazałeś, gdy Person.notes atrybut został zainicjowany za pomocą db.relationship(...) obiekt.
Ponadto Person.timestamp atrybut został zainicjowany z bieżącym znacznikiem czasu.
Uruchamianie build_database.py program z wiersza poleceń (w środowisku wirtualnym odtworzy bazę danych z nowymi dodatkami, przygotowując ją do użycia z aplikacją internetową. Ta linia poleceń odbuduje bazę danych:
$ python build_database.py
build_database.py program narzędziowy nie wyświetla żadnych komunikatów, jeśli działa pomyślnie. Jeśli zgłosi wyjątek, na ekranie zostanie wyświetlony błąd.
Zaktualizuj interfejs API REST
Zaktualizowałeś modele SQLAlchemy i użyłeś ich do aktualizacji pliku people.db Baza danych. Teraz nadszedł czas na aktualizację REST API, aby zapewnić dostęp do nowych informacji o notatkach. Oto interfejs API REST, który zbudowałeś w części 2:
| Działanie | Czasownik HTTP | Ścieżka adresu URL | Opis |
|---|---|---|---|
| Utwórz | POST | /api/people | URL do utworzenia nowej osoby |
| Czytaj | GET | /api/people | URL do odczytywania zbioru osób |
| Czytaj | GET | /api/people/{person_id} | URL do odczytania pojedynczej osoby według person_id |
| Aktualizacja | PUT | /api/people/{person_id} | URL do aktualizacji istniejącej osoby według person_id |
| Usuń | DELETE | /api/people/{person_id} | URL, aby usunąć istniejącą osobę według person_id |
Powyższe API REST udostępnia ścieżki URL HTTP do kolekcji rzeczy i do samych rzeczy. Możesz uzyskać listę osób lub wchodzić w interakcję z jedną osobą z tej listy osób. Ten styl ścieżki poprawia to, co jest zwracane, od lewej do prawej, stając się bardziej szczegółowe w miarę postępu.
Będziesz kontynuować ten wzorzec od lewej do prawej, aby uzyskać bardziej szczegółowy dostęp i uzyskać dostęp do kolekcji notatek. Oto rozszerzony interfejs API REST, który utworzysz w celu dostarczania notatek do aplikacji internetowej mini-blogu:
| Działanie | Czasownik HTTP | Ścieżka adresu URL | Opis |
|---|---|---|---|
| Utwórz | POST | /api/people/{person_id}/notes | URL do tworzenia nowej notatki |
| Czytaj | GET | /api/people/{person_id}/notes/{note_id} | URL do czytania pojedynczej notatki jednej osoby |
| Aktualizacja | PUT | api/people/{person_id}/notes/{note_id} | URL do aktualizacji pojedynczej notatki jednej osoby |
| Usuń | DELETE | api/people/{person_id}/notes/{note_id} | URL, aby usunąć pojedynczą notatkę jednej osoby |
| Czytaj | GET | /api/notes | URL, aby uzyskać wszystkie notatki dla wszystkich osób posortowane według note.timestamp |
Istnieją dwie odmiany notes część REST API w porównaniu do konwencji stosowanej w people sekcja:
-
Nie zdefiniowano adresu URL, aby pobrać wszystkie
notespowiązane z osobą, tylko adres URL, aby uzyskać pojedynczą notatkę. W ten sposób interfejs API REST byłby kompletny, ale aplikacja internetowa, którą utworzysz później, nie potrzebuje tej funkcji. Dlatego został pominięty. -
Istnieje uwzględnienie ostatniego adresu URL
/api/notes. This is a convenience method created for the web application. It will be used in the mini-blog on the home page to show all the notes in the system. There isn’t a way to get this information readily using the REST API pathing style as designed, so this shortcut has been added.
As in Part 2, the REST API is configured in the swagger.yml file.
Uwaga:
The idea of designing a REST API with a path that gets more and more granular as you move from left to right is very useful. Thinking this way can help clarify the relationships between different parts of a database. Just be aware that there are realistic limits to how far down a hierarchical structure this kind of design should be taken.
For example, what if the Note object had a collection of its own, something like comments on the notes. Using the current design ideas, this would lead to a URL that went something like this:/api/people/{person_id}/notes/{note_id}/comments/{comment_id}
There is no practical limit to this kind of design, but there is one for usefulness. In actual use in real applications, a long, multilevel URL like that one is hardly ever needed. A more common pattern is to get a list of intervening objects (like notes) and then use a separate API entry point to get a single comment for an application use case.
Implement the API
With the updated REST API defined in the swagger.yml file, you’ll need to update the implementation provided by the Python modules. This means updating existing module files, like models.py and people.py , and creating a new module file called notes.py to implement support for Notes in the extended REST API.
Update Response JSON
The purpose of the REST API is to get useful JSON data out of the database. Now that you’ve updated the SQLAlchemy Person and created the Note models, you’ll need to update the Marshmallow schema models as well. As you may recall from Part 2, Marshmallow is the module that translates the SQLAlchemy objects into Python objects suitable for creating JSON strings.
The updated and newly created Marshmallow schemas are in the models.py module, which are explained below, and look like this:
 1class PersonSchema(ma.ModelSchema):
 2    class Meta:
 3        model = Person
 4        sqla_session = db.session
 5    notes = fields.Nested('PersonNoteSchema', default=[], many=True)
 6
 7class PersonNoteSchema(ma.ModelSchema):
 8    """
 9    This class exists to get around a recursion issue
10    """
11    note_id = fields.Int()
12    person_id = fields.Int()
13    content = fields.Str()
14    timestamp = fields.Str()
15
16class NoteSchema(ma.ModelSchema):
17    class Meta:
18        model = Note
19        sqla_session = db.session
20    person = fields.Nested('NotePersonSchema', default=None)
21
22class NotePersonSchema(ma.ModelSchema):
23    """
24    This class exists to get around a recursion issue
25    """
26    person_id = fields.Int()
27    lname = fields.Str()
28    fname = fields.Str()
29    timestamp = fields.Str()
There are some interesting things going on in the above definitions. The PersonSchema class has one new entry:the notes attribute defined in line 5. This defines it as a nested relationship to the PersonNoteSchema . It will default to an empty list if nothing is present in the SQLAlchemy notes relationship. The many=True parameter indicates that this is a one-to-many relationship, so Marshmallow will serialize all the related notes .
The PersonNoteSchema class defines what a Note object looks like as Marshmallow serializes the notes lista. The NoteSchema defines what a SQLAlchemy Note object looks like in terms of Marshmallow. Notice that it has a person attribute. This attribute comes from the SQLAlchemy db.relationship(...) definition parameter backref='person' . The person Marshmallow definition is nested, but because it doesn’t have the many=True parameter, there is only a single person connected.
The NotePersonSchema class defines what is nested in the NoteSchema.person attribute.
Uwaga:
You might be wondering why the PersonSchema class has its own unique PersonNoteSchema class to define the notes collection attribute. By the same token, the NoteSchema class has its own unique NotePersonSchema class to define the person attribute. You may be wondering whether the PersonSchema class could be defined this way:
class PersonSchema(ma.ModelSchema):
    class Meta:
        model = Person
        sqla_session = db.session
    notes = fields.Nested('NoteSchema', default=[], many=True)
Additionally, couldn’t the NoteSchema class be defined using the PersonSchema to define the person attribute? A class definition like this would each refer to the other, and this causes a recursion error in Marshmallow as it will cycle from PersonSchema to NoteSchema until it runs out of stack space. Using the unique schema references breaks the recursion and allows this kind of nesting to work.
People
Now that you’ve got the schemas in place to work with the one-to-many relationship between Person and Note , you need to update the person.py and create the note.py modules in order to implement a working REST API.
The people.py module needs two changes. The first is to import the Note class, along with the Person class at the top of the module. Then only read_one(person_id) needs to change in order to handle the relationship. That function will look like this:
 1def read_one(person_id):
 2    """
 3    This function responds to a request for /api/people/{person_id}
 4    with one matching person from people
 5
 6    :param person_id:   Id of person to find
 7    :return:            person matching id
 8    """
 9    # Build the initial query
10    person = (
11        Person.query.filter(Person.person_id == person_id)
12        .outerjoin(Note)
13        .one_or_none()
14    )
15
16    # Did we find a person?
17    if person is not None:
18
19        # Serialize the data for the response
20        person_schema = PersonSchema()
21        data = person_schema.dump(person).data
22        return data
23
24    # Otherwise, nope, didn't find that person
25    else:
26        abort(404, f"Person not found for Id: {person_id}")
The only difference is line 12:.outerjoin(Note) . An outer join (left outer join in SQL terms) is necessary for the case where a user of the application has created a new person object, which has no notes related to it. The outer join ensures that the SQL query will return a person object, even if there are no note rows to join with.
At the start of this article, you saw how person and note data could be represented in a single, flat table, and all of the disadvantages of that approach. You also saw the advantages of breaking that data up into two tables, person and note , with a relationship between them.
Until now, we’ve been working with the data as two distinct, but related, items in the database. But now that you’re actually going to use the data, what we essentially want is for the data to be joined back together. This is what a database join does. It combines data from two tables together using the primary key to foreign key relationship.
A join is kind of a boolean and operation because it only returns data if there is data in both tables to combine. If, for example, a person row exists but has no related note row, then there is nothing to join, so nothing is returned. This isn’t what you want for read_one(person_id) .
This is where the outer join comes in handy. It’s a kind of boolean or operacja. It returns person data even if there is no associated note data to combine with. This is the behavior you want for read_one(person_id) to handle the case of a newly created Person object that has no notes yet.
You can see the complete people.py in the article repository.
Notes
You’ll create a notes.py module to implement all the Python code associated with the new note related REST API definitions. In many ways, it works like the people.py module, except it must handle both a person_id and a note_id as defined in the swagger.yml configuration file. As an example, here is read_one(person_id, note_id) :
 1def read_one(person_id, note_id):
 2    """
 3    This function responds to a request for
 4    /api/people/{person_id}/notes/{note_id}
 5    with one matching note for the associated person
 6
 7    :param person_id:       Id of person the note is related to
 8    :param note_id:         Id of the note
 9    :return:                json string of note contents
10    """
11    # Query the database for the note
12    note = (
13        Note.query.join(Person, Person.person_id == Note.person_id)
14        .filter(Person.person_id == person_id)
15        .filter(Note.note_id == note_id)
16        .one_or_none()
17    )
18
19    # Was a note found?
20    if note is not None:
21        note_schema = NoteSchema()
22        data = note_schema.dump(note).data
23        return data
24
25    # Otherwise, nope, didn't find that note
26    else:
27        abort(404, f"Note not found for Id: {note_id}")
The interesting parts of the above code are lines 12 to 17:
- Line 13 begins a query against the
NoteSQLAlchemy objects and joins to the relatedPersonSQLAlchemy object comparingperson_idfrom bothPersonandNote. - Linia 14 filters the result down to the
Noteobjects that has aPerson.person_idequal to the passed inperson_idparameter. - Line 15 filters the result further to the
Noteobject that has aNote.note_idequal to the passed innote_idparameter. - Line 16 returns the
Noteobject if found, orNoneif nothing matching the parameters is found.
You can check out the complete notes.py .
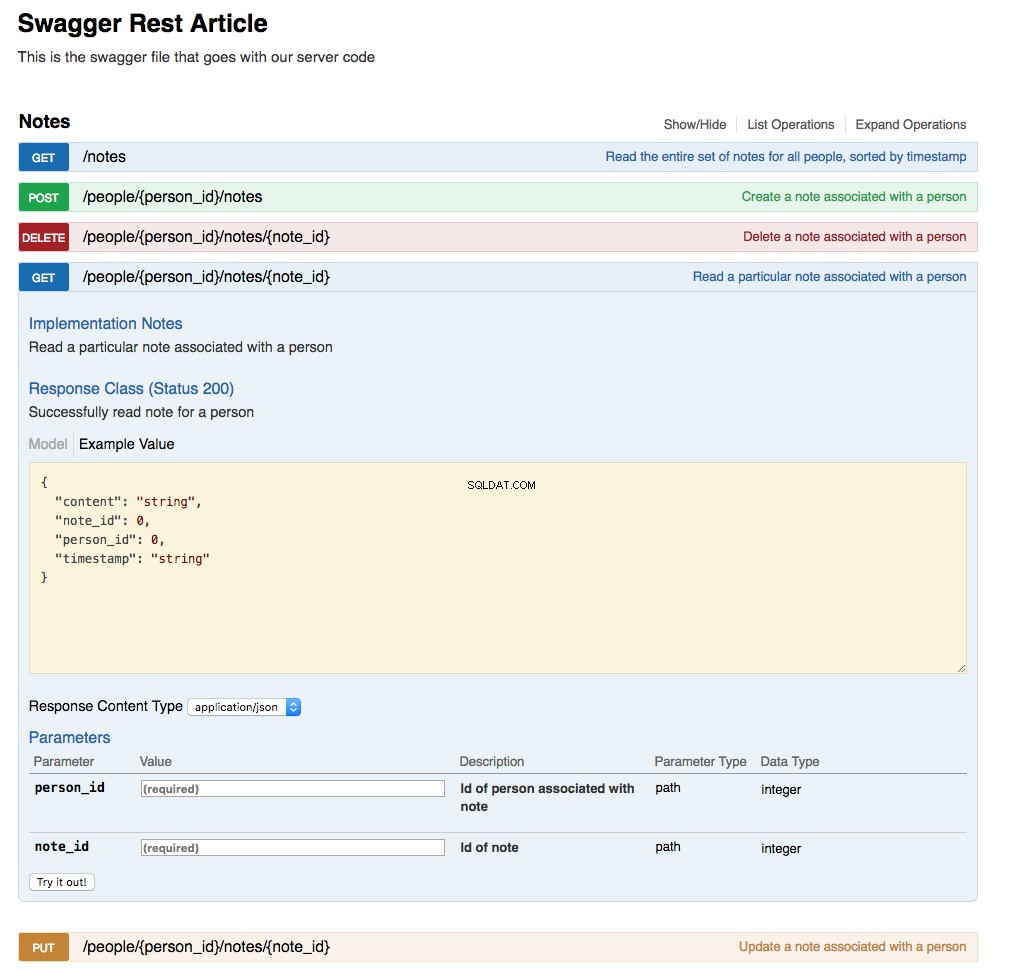
Updated Swagger UI
The Swagger UI has been updated by the action of updating the swagger.yml file and creating the URL endpoint implementations. Below is a screenshot of the updated UI showing the Notes section with the GET /api/people/{person_id}/notes/{note_id} expanded:
Mini-Blogging Web Application
The web application has been substantially changed to show its new purpose as a mini-blogging application. It has three pages:
-
The home page (
localhost:5000/) , which shows all of the blog messages (notes) sorted from newest to oldest -
The people page (
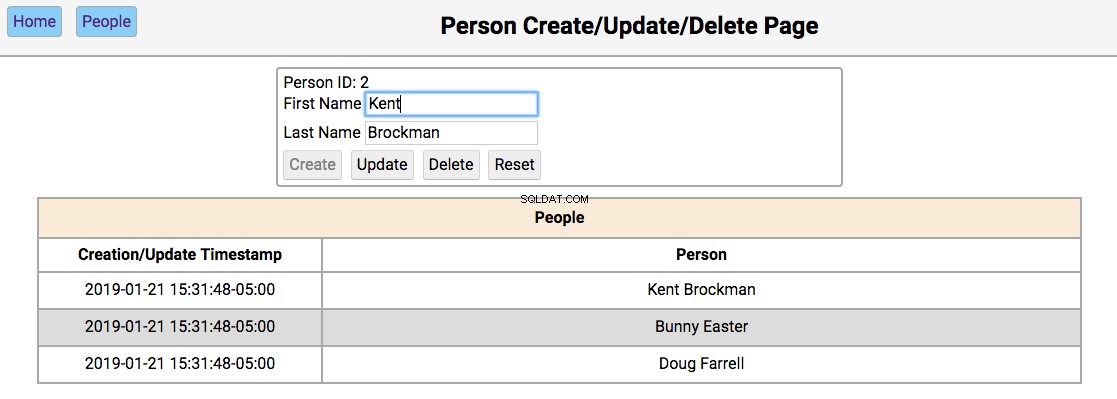
localhost:5000/people) , which shows all the people in the system, sorted by last name, and also allows the user to create a new person and update or delete an existing one -
The notes page (
localhost:5000/people/{person_id}/notes) , which shows all the notes associated with a person, sorted from newest to oldest, and also allows the user to create a new note and update or delete an existing one
Navigation
There are two buttons on every page of the application:
- The Home button will navigate to the home screen.
- The People button navigates to the
/peoplescreen, showing all people in the database.
These two buttons are present on every screen in the application as a way to get back to a starting point.
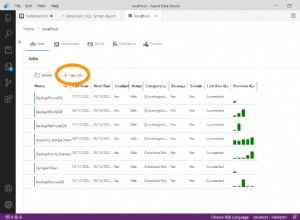
Home Page
Below is a screenshot of the home page showing the initialized database contents:
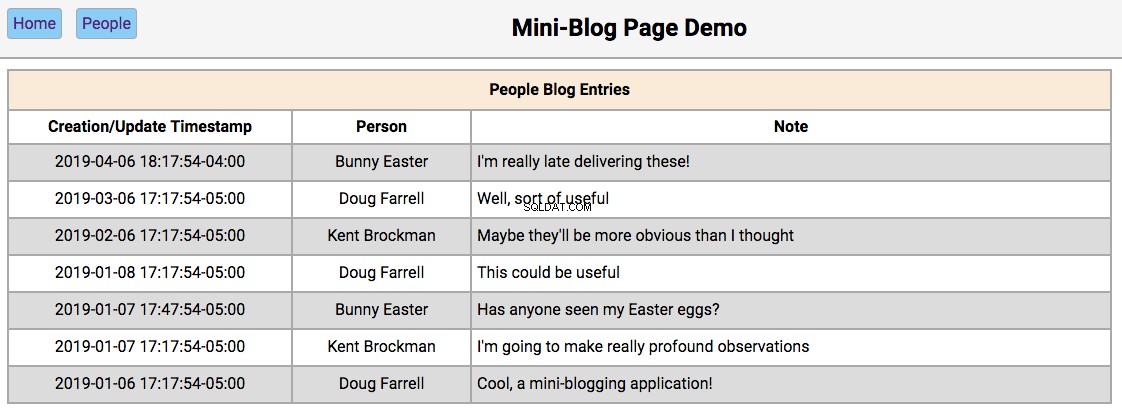
The functionality of this page works like this:
-
Double-clicking on a person’s name will take the user to the
/people/{person_id}page, with the editor section filled in with the person’s first and last names and the update and reset buttons enabled. -
Double-clicking on a person’s note will take the user to the
/people/{person_id}/notes/{note_id}page, with the editor section filled in with the note’s contents and the Update and Reset buttons enabled.
People Page
Below is a screenshot of the people page showing the people in the initialized database:
The functionality of this page works like this:
-
Single-clicking on a person’s name will populate the editor section of the page with the person’s first and last name, disabling the Create button, and enabling the Update and Delete buttons.
-
Double clicking on a person’s name will navigate to the notes pages for that person.
The functionality of the editor works like this:
-
If the first and last name fields are empty, the Create and Reset buttons are enabled. Entering a new name in the fields and clicking Create will create a new person and update the database and re-render the table below the editor. Clicking Reset will clear the editor fields.
-
If the first and last name fields have data, the user navigated here by double-clicking the person’s name from the home screen. In this case, the Update , Usuń , and Reset buttons are enabled. Changing the first or last name and clicking Update will update the database and re-render the table below the editor. Clicking Delete will remove the person from the database and re-render the table.
Notes Page
Below is a screenshot of the notes page showing the notes for a person in the initialized database:
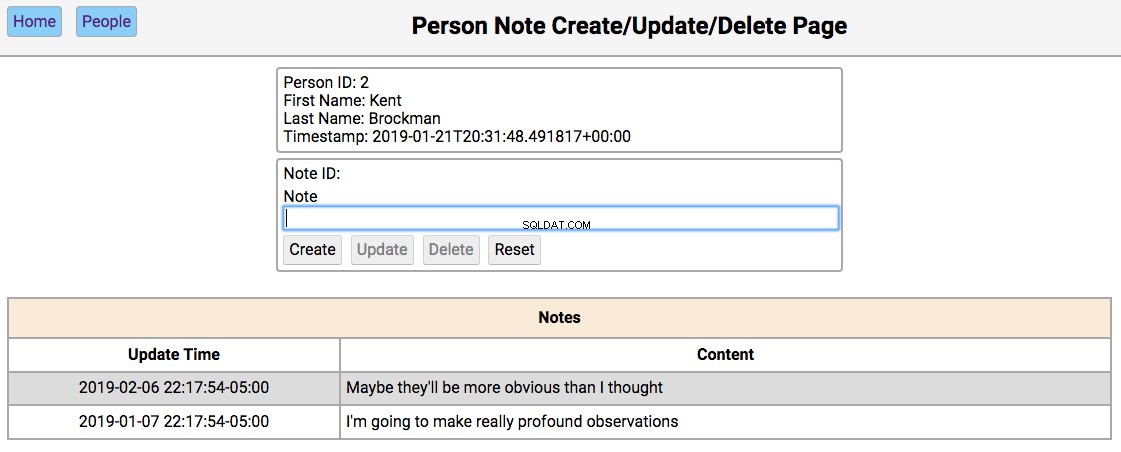
The functionality of this page works like this:
-
Single-clicking on a note will populate the editor section of the page with the notes content, disabling the Create button, and enabling the Update and Delete buttons.
-
All other functionality of this page is in the editor section.
The functionality of the editor works like this:
-
If the note content field is empty, then the Create and Reset buttons are enabled. Entering a new note in the field and clicking Create will create a new note and update the database and re-render the table below the editor. Clicking Reset will clear the editor fields.
-
If the note field has data, the user navigated here by double-clicking the person’s note from the home screen. In this case, the Update , Usuń , and Reset buttons are enabled. Changing the note and clicking Update will update the database and re-render the table below the editor. Clicking Delete will remove the note from the database and re-render the table.
Web Application
This article is primarily focused on how to use SQLAlchemy to create relationships in the database, and how to extend the REST API to take advantage of those relationships. As such, the code for the web application didn’t get much attention. When you look at the web application code, keep an eye out for the following features:
-
Each page of the application is a fully formed single page web application.
-
Each page of the application is driven by JavaScript following an MVC (Model/View/Controller) style of responsibility delegation.
-
The HTML that creates the pages takes advantage of the Jinja2 inheritance functionality.
-
The hardcoded JavaScript table creation has been replaced by using the Handlebars.js templating engine.
-
The timestamp formating in all of the tables is provided by Moment.js.
You can find the following code in the repository for this article:
- The HTML for the web application
- The CSS for the web application
- The JavaScript for the web application
All of the example code for this article is available in the GitHub repository for this article. This contains all of the code related to this article, including all of the web application code.
Wniosek
Congratulations are in order for what you’ve learned in this article! Knowing how to build and use database relationships gives you a powerful tool to solve many difficult problems. There are other relationship besides the one-to-many example from this article. Other common ones are one-to-one, many-to-many, and many-to-one. All of them have a place in your toolbelt, and SQLAlchemy can help you tackle them all!
For more information about databases, you can check out these tutorials. You can also set up Flask to use SQLAlchemy. You can check out Model-View-Controller (MVC) more information about the pattern used in the web application JavaScript code.
In Part 4 of this series, you’ll focus on the HTML, CSS, and JavaScript files used to create the web application.
« Part 2:Database PersistencePart 3:Database RelationshipsPart 4:Simple Web Applications »