Poniżej znajduje się klasa, która przedstawi podstawy tego, co chcesz zrobić podczas odczytywania danych z bazy danych MySQL do JTable w Javie.
import java.awt.*;
import java.sql.*;
import java.util.*;
import javax.swing.*;
import javax.swing.table.*;

public class TableFromMySqlDatabase extends JFrame
{
    public TableFromMySqlDatabase()
    {
        ArrayList columnNames = new ArrayList();
        ArrayList data = new ArrayList();

        //  Connect to an MySQL Database, run query, get result set
        String url = "jdbc:mysql://localhost:3306/yourdb";
        String userid = "root";
        String password = "sesame";
        String sql = "SELECT * FROM animals";

        // Java SE 7 has try-with-resources
        // This will ensure that the sql objects are closed when the program
        // is finished with them
        try (Connection connection = DriverManager.getConnection( url, userid, password );
            Statement stmt = connection.createStatement();
            ResultSet rs = stmt.executeQuery( sql ))
        {
            ResultSetMetaData md = rs.getMetaData();
            int columns = md.getColumnCount();

            //  Get column names
            for (int i = 1; i <= columns; i++)
            {
                columnNames.add( md.getColumnName(i) );
            }

            //  Get row data
            while (rs.next())
            {
                ArrayList row = new ArrayList(columns);

                for (int i = 1; i <= columns; i++)
                {
                    row.add( rs.getObject(i) );
                }

                data.add( row );
            }
        }
        catch (SQLException e)
        {
            System.out.println( e.getMessage() );
        }

        // Create Vectors and copy over elements from ArrayLists to them
        // Vector is deprecated but I am using them in this example to keep
        // things simple - the best practice would be to create a custom defined
        // class which inherits from the AbstractTableModel class
        Vector columnNamesVector = new Vector();
        Vector dataVector = new Vector();

        for (int i = 0; i < data.size(); i++)
        {
            ArrayList subArray = (ArrayList)data.get(i);
            Vector subVector = new Vector();
            for (int j = 0; j < subArray.size(); j++)
            {
                subVector.add(subArray.get(j));
            }
            dataVector.add(subVector);
        }

        for (int i = 0; i < columnNames.size(); i++ )
            columnNamesVector.add(columnNames.get(i));

        //  Create table with database data
        JTable table = new JTable(dataVector, columnNamesVector)
        {
            public Class getColumnClass(int column)
            {
                for (int row = 0; row < getRowCount(); row++)
                {
                    Object o = getValueAt(row, column);

                    if (o != null)
                    {
                        return o.getClass();
                    }
                }

                return Object.class;
            }
        };

        JScrollPane scrollPane = new JScrollPane( table );
        getContentPane().add( scrollPane );

        JPanel buttonPanel = new JPanel();
        getContentPane().add( buttonPanel, BorderLayout.SOUTH );
    }

    public static void main(String[] args)
    {
        TableFromMySqlDatabase frame = new TableFromMySqlDatabase();
        frame.setDefaultCloseOperation( EXIT_ON_CLOSE );
        frame.pack();
        frame.setVisible(true);
    }
}
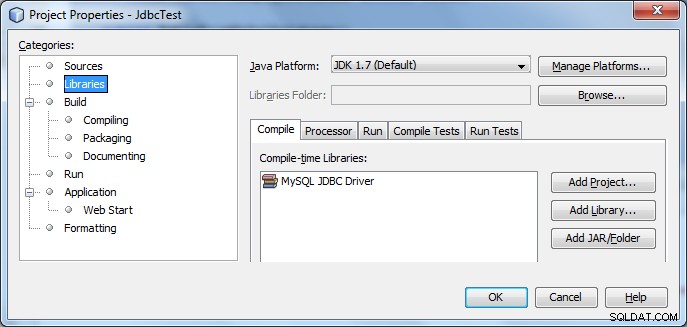
W NetBeans IDE, którego używasz — musisz dodać Sterownik MySQL JDBC we właściwościach projektu, tak jak tutaj wyświetlam:

W przeciwnym razie kod zgłosi SQLException z informacją, że nie można znaleźć sterownika.
Teraz w moim przykładzie yourdb to nazwa bazy danych i animals to nazwa tabeli, do której wykonuję zapytanie.
Oto, co zostanie wydrukowane:

Notatka pożegnalna:
Powiedziałeś, że jesteś nowicjuszem i potrzebujesz pomocy w zrozumieniu niektórych podstawowych klas i koncepcji Java. Wymienię tutaj kilka, ale pamiętaj, że zawsze możesz przeglądać dokumenty na stronie Oracle.


