Wprowadzenie
Prędzej czy później każdy system informacyjny otrzymuje bazę danych, często więcej niż jedną. Z czasem baza ta gromadzi bardzo dużo danych, od kilku GB do kilkudziesięciu TB. Aby zrozumieć, jak funkcje będą działać wraz ze wzrostem ilości danych, musimy wygenerować dane, aby wypełnić tę bazę danych.

Wszystkie przedstawione i zaimplementowane skrypty zostaną wykonane w JobEmplDB baza danych serwisu rekrutacyjnego. Realizacja bazy danych dostępna jest tutaj.
Podejścia do wypełniania danych w bazach danych w celu testowania i rozwoju
Tworzenie i testowanie bazy danych obejmuje dwa podstawowe podejścia do wypełniania danych:
- Aby skopiować całą bazę danych ze środowiska produkcyjnego ze zmienionymi danymi osobowymi i innymi danymi wrażliwymi. W ten sposób zapewniasz dane i usuwasz poufne dane.
- Aby wygenerować dane syntetyczne. Oznacza to generowanie danych testowych podobnych do rzeczywistych danych pod względem wyglądu, właściwości i połączeń.
Zaletą podejścia 1 jest to, że przybliża dane i ich dystrybucję według różnych kryteriów do produkcyjnej bazy danych. Pozwala nam to dokładnie przeanalizować wszystko, a tym samym wyciągnąć odpowiednie wnioski i prognozy.
Jednak takie podejście nie pozwala na wielokrotne zwiększanie samej bazy danych. Przewidywanie zmian w funkcjonalności całego systemu informatycznego w przyszłości staje się problematyczne.
Z drugiej strony możesz analizować bezosobowe, oczyszczone dane pobrane z produkcyjnej bazy danych. Na ich podstawie można zdefiniować sposób generowania danych testowych, które pod względem wyglądu, właściwości i wzajemnych relacji będą odpowiadały rzeczywistym danym. W ten sposób Podejście 1 tworzy Podejście 2.
Teraz przejrzyjmy szczegółowo oba podejścia do wypełniania danych w bazach danych w celu testowania i rozwoju.
Kopiowanie i zmiana danych w produkcyjnej bazie danych
Najpierw zdefiniujmy ogólny algorytm kopiowania i zmiany danych ze środowiska produkcyjnego.
Ogólny algorytm
Ogólny algorytm wygląda następująco:
- Utwórz nową pustą bazę danych.
- Utwórz schemat w nowo utworzonej bazie danych – ten sam system, który pochodzi z produkcyjnej bazy danych.
- Skopiuj niezbędne dane z produkcyjnej bazy danych do nowo utworzonej bazy danych.
- Oczyść i zmień tajne dane w nowej bazie danych.
- Zrób kopię zapasową nowo utworzonej bazy danych.
- Dostarcz i przywróć kopię zapasową w niezbędnym środowisku.
Jednak algorytm staje się bardziej skomplikowany po kroku 5. Na przykład krok 6 wymaga określonego, chronionego środowiska do wstępnego testowania. Ten etap musi zapewnić, że wszystkie dane są bezosobowe, a tajne dane zostaną zmienione.
Po tym etapie można ponownie wrócić do kroku 5 dla testowanej bazy danych w chronionym środowisku nieprodukcyjnym. Następnie przekazujesz przetestowaną kopię zapasową do niezbędnych środowisk w celu jej przywrócenia i wykorzystania do programowania i testowania.
Przedstawiliśmy ogólny algorytm kopiowania i zmiany danych w produkcyjnej bazie danych. Opiszmy, jak to zaimplementować.
Realizacja ogólnego algorytmu
Nowe tworzenie pustej bazy danych
Możesz stworzyć pustą bazę danych za pomocą konstrukcji CREATE DATABASE jak tutaj.
Baza danych nosi nazwę JobEmplDB_Test . Ma trzy grupy plików:
- PODSTAWOWA – domyślnie jest to podstawowa grupa plików. Definiuje dwa pliki:JobEmplDB_Test1(ścieżka D:\DBData\JobEmplDB_Test1.mdf) i JobEmplDB_Test2 (ścieżka D:\DBData\JobEmplDB_Test2.ndf) . Początkowy rozmiar każdego pliku to 64 Mb, a krok wzrostu to 8 Mb dla każdego pliku.
- DBTableGroup – niestandardowa grupa plików, która określa dwa pliki:JobEmplDB_TestTableGroup1 (ścieżka D:\DBData\JobEmplDB_TestTableGroup1.ndf) i JobEmplDB_TestTableGroup2 (ścieżka D:\DBData\JobEmplDB_TestTableGroup2.ndf) . Początkowy rozmiar każdego pliku to 8 GB, a krok wzrostu to 1 GB dla każdego pliku.
- DBIndexGroup – niestandardowa grupa plików, która określa dwa pliki:JobEmplDB_TestIndexGroup1 (ścieżka D:\DBData\JobEmplDB_TestIndexGroup1.ndf) oraz JobEmplDB_TestIndexGroup2 (ścieżka D:\DBData\JobEmplDB_TestIndexGroup2.ndf) . Początkowy rozmiar to 16 GB dla każdego pliku, a krok wzrostu to 1 GB dla każdego pliku.
Ponadto ta baza danych zawiera jeden dziennik transakcji:JobEmplDB_Testlog , ścieżka E:\DBLog\JobEmplDB_Testlog.ldf . Początkowy rozmiar pliku to 8 GB, a krok wzrostu to 1 GB.
Kopiowanie schematu i niezbędnych danych z produkcyjnej bazy danych do nowo utworzonej bazy
Aby skopiować schemat i niezbędne dane z produkcyjnej bazy danych do nowej, można skorzystać z kilku narzędzi. Po pierwsze, jest to Visual Studio (SSDT). Możesz też użyć narzędzi innych firm, takich jak:
- DbForge Schema Compare i DbForge Data Compare
- Różnica danych ApexSQL i danych Apex
- Narzędzie do porównywania danych SQL i narzędzie do porównywania danych SQL
Tworzenie skryptów do zmian danych
Zasadnicze wymagania dotyczące skryptów zmian danych
1. Musi być niemożliwe przywrócenie prawdziwych danych za pomocą tego skryptu.
np. Inwersja linii nie będzie pasować, ponieważ pozwala nam przywrócić rzeczywiste dane. Zwykle metoda polega na zastąpieniu każdego znaku lub bajtu pseudolosowym znakiem lub bajtem. To samo dotyczy daty i godziny.
2. Zmiana danych nie może wpływać na selektywność ich wartości.
Przypisanie NULL do pola tabeli nie zadziała. Zamiast tego musisz upewnić się, że te same wartości w rzeczywistych danych pozostaną takie same w zmienionych danych. Na przykład w danych rzeczywistych masz wartość 103785 znalezioną w tabeli 12 razy. Gdy zmienisz tę wartość w zmienionych danych, nowa wartość musi pozostać 12 razy w tych samych polach tabeli.
3. Wielkość i długość wartości nie powinny znacząco różnić się w zmienionych danych. Np. zastępujesz każdy bajt lub znak pseudolosowym bajtem lub znakiem. Początkowy ciąg pozostaje taki sam pod względem rozmiaru i długości.
4. Powiązania w danych nie mogą zostać zerwane po zmianach. Dotyczy to kluczy zewnętrznych i wszystkich innych przypadków, w których odwołujesz się do zmienionych danych. Zmienione dane muszą pozostawać w tych samych relacjach, w jakich były rzeczywiste dane.
Implementacja skryptów zmian danych
Teraz przejrzyjmy konkretny przypadek zmiany danych w celu depersonalizacji i ukrycia tajnych informacji. Przykładem jest baza danych rekrutacyjnych.
Przykładowa baza danych zawiera następujące dane osobowe, które należy zdepersonalizować:
- Nazwisko i imię;
- Data urodzenia;
- Data wydania dowodu osobistego;
- Certyfikat dostępu zdalnego jako sekwencja bajtów;
- Opłata serwisowa za promocję wznowienia.
Najpierw sprawdzimy proste przykłady dla każdego typu zmienionych danych:
- Zmiana daty i godziny;
- Zmiana wartości liczbowej;
- Zmiana sekwencji bajtów;
- Zmiana danych znaków.
Zmiana daty i godziny
Możesz uzyskać losową datę i godzinę za pomocą następującego skryptu:
DECLARE @dt DATETIME;

SET @dt = CAST(CAST(@StartDate AS FLOAT) + (CAST(@FinishDate AS FLOAT) - CAST(@StartDate AS FLOAT)) * RAND(CHECKSUM(NEWID())) AS DATETIME);
Tutaj, @DataRozpoczęcia i @DataZakończenia są wartościami początkowymi i końcowymi zakresu. Korelują one odpowiednio dla pseudolosowego generowania daty i czasu.
Aby wygenerować te dane, użyj funkcji systemowych RAND, CHECKSUM i NEWID.
UPDATE [dbo].[Employee]
SET [DocDate] = CAST(CAST(CAST(CAST([BirthDate] AS DATETIME) AS FLOAT) + (CAST(GETDATE() AS FLOAT) - CAST(CAST([BirthDate] AS DATETIME) AS FLOAT)) * RAND(CHECKSUM(NEWID())) AS DATETIME) AS DATE);
Pole [DocDate] oznacza datę wydania dokumentu. Zastępujemy ją pseudolosową datą, pamiętając o zakresach dat i ich ograniczeniach.
„Dolny” limit to data urodzenia kandydata. „Górna” krawędź to aktualna data. Nie potrzebujemy tutaj czasu, więc transformacja formatu czasu i daty do wymaganej daty nadchodzi w końcu. Możesz uzyskać pseudolosowe wartości dla dowolnej części daty i godziny w ten sam sposób.
Zmiana wartości liczbowej
Możesz uzyskać losową liczbę całkowitą za pomocą następującego skryptu:
DECLARE @Int INT;

SET @Int = CAST(((@MaxVal + 1) - @MinVal) *
    RAND(CHECKSUM(NEWID())) + @MinVal AS INT);
@MinVal и @MaxVal są wartościami początkowymi i końcowymi zakresu dla generowania liczb pseudolosowych. Generujemy go za pomocą funkcji systemowych RAND, CHECKSUM i NEWID.
UPDATE [dbo].[Employee]
SET [CountRequest] = CAST(((@MaxVal + 1) - @MinVal) *
    RAND(CHECKSUM(NEWID())) + @MinVal AS INT);
Pole [CountRequest] oznacza liczbę wniosków składanych przez firmy dotyczące CV tego kandydata.
Podobnie możesz uzyskać wartości pseudolosowe dla dowolnej wartości liczbowej. Np. spójrz na losową liczbę typu dziesiętnego (18,2) generowanie:
DECLARE @Dec DECIMAL(18,2);

SET @Dec=CAST(((@MaxVal + 1) - @MinVal) *
    RAND(CHECKSUM(NEWID())) + @MinVal AS DECIMAL(18,2));
W związku z tym możesz zaktualizować opłatę za usługę promocji CV w następujący sposób:
UPDATE [dbo].[Employee]
SET [PaymentAmount] = CAST(((@MaxVal + 1) - @MinVal) *
    RAND(CHECKSUM(NEWID())) + @MinVal AS DECIMAL(18,2));
Zmiana sekwencji bajtów
Możesz uzyskać losową sekwencję bajtów za pomocą następującego skryptu:
DECLARE @res VARBINARY(MAX);

SET @res = CRYPT_GEN_RANDOM(@Length, CAST(NEWID() AS VARBINARY(16)));
@Długość oznacza długość sekwencji. Określa liczbę zwracanych bajtów. Tutaj @Długość nie może być większa niż 16.
Generowanie odbywa się za pomocą funkcji systemowych CRYPT_GEN_RANDOM i NEWID.
Np. możesz zaktualizować certyfikat dostępu zdalnego dla każdego kandydata w następujący sposób:
UPDATE [dbo].[Employee]
SET [RemoteAccessCertificate] = CRYPT_GEN_RANDOM(CAST(LEN([RemoteAccessCertificate]) AS INT), CAST(NEWID() AS VARBINARY(16)));
Generujemy pseudolosową sekwencję bajtów o tej samej długości, która znajduje się w polu [RemoteAccessCertificate] w momencie zmiany. Przypuszczamy, że długość sekwencji bajtów nie przekracza 16.
Podobnie możemy stworzyć naszą funkcję, która zwróci pseudolosowe sekwencje bajtów o dowolnej długości. Spowoduje to połączenie wyników działania funkcji systemowej CRYPT_GEN_RANDOM za pomocą prostego operatora dodawania „+”. Ale w praktyce zwykle wystarczy 16 bajtów.
Zróbmy przykładową funkcję zwracającą pseudolosową sekwencję bajtów o określonej długości, gdzie będzie można ustawić długość większą niż 16 bajtów. W tym celu zrób następującą prezentację:
CREATE VIEW [test].[GetNewID]
AS
SELECT NEWID() AS [NewID];
GO
Potrzebujemy go, aby ominąć ograniczenie zabraniające nam używania NEWID w ramach funkcji.
W ten sam sposób utwórz następną prezentację w tym samym celu:
CREATE VIEW [test].[GetRand]
AS
SELECT RAND(CHECKSUM((SELECT TOP(1) [NewID] FROM [test].[GetNewID]))) AS [Value];
GO
Utwórz jeszcze jedną prezentację:
CREATE VIEW [test].[GetRandVarbinary16]
AS
SELECT CRYPT_GEN_RANDOM(16, CAST((SELECT TOP(1) [NewID] FROM [test].[GetNewID]) AS VARBINARY(16))) AS [Value];
GO
Definicje wszystkich trzech funkcji są tutaj. A oto implementacja funkcji, która zwraca pseudolosową sekwencję bajtów o określonej długości.
Najpierw określamy, czy potrzebna funkcja jest obecna. Jeśli nie – najpierw tworzymy stadninę. W każdym razie kod wiąże się z odpowiednią zmianą definicji funkcji. Na koniec dodajemy opis funkcji poprzez rozszerzone właściwości. Więcej szczegółów na temat dokumentacji bazy danych znajduje się w tym artykule.
Aby zaktualizować certyfikat dostępu zdalnego dla każdego kandydata, możesz wykonać następujące czynności:
UPDATE [dbo].[Employee]
SET [RemoteAccessCertificate] = [test].[GetRandVarbinary](CAST(LEN([RemoteAccessCertificate]) AS INT));
Jak widać, nie ma tutaj ograniczeń co do długości sekwencji bajtów.
Zmiana danych – zmiana danych postaci
Tutaj bierzemy przykład dla alfabetu angielskiego i rosyjskiego, ale możesz to zrobić dla dowolnego innego alfabetu. Jedynym warunkiem jest to, że jego znaki muszą być obecne w typach NCHAR.
Musimy stworzyć funkcję, która przyjmie linię, zamieni każdy znak na znak pseudolosowy, a następnie złoży wynik i zwróci go.
Jednak najpierw musimy zrozumieć, jakich postaci potrzebujemy. W tym celu możemy wykonać następujący skrypt:
DECLARE @tbl TABLE ([ValueInt] INT, [ValueNChar] NCHAR(1), [ValueChar] CHAR(1));

DECLARE @ind int=0;
DECLARE @count INT=65535;

WHILE(@count>=0)
BEGIN
	INSERT INTO @tbl ([ValueInt], [ValueNChar], [ValueChar])
	SELECT @ind, NCHAR(@ind), CHAR(@ind)

	SET @ind+=1;
	SET @count-=1;
END

SELECT *
INTO [test].[TblCharactersCode]
FROM @tbl;
Tworzymy tabelę [test].[TblCharacterCode] zawierającą następujące pola:
- ValueInt – wartość liczbowa znaku;
- ValueNChar – znak typu NCHAR;
- ValueChar – znak typu CHAR.
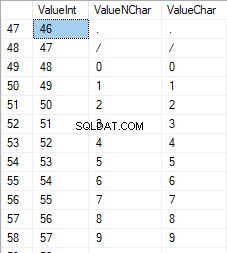
Przyjrzyjmy się zawartości tej tabeli. Potrzebujemy następującej prośby:
SELECT [ValueInt]
      ,[ValueNChar]
      ,[ValueChar]
  FROM [test].[TblCharactersCode];
Liczby mieszczą się w zakresie od 48 do 57:
Wielkie litery alfabetu łacińskiego mieszczą się w zakresie od 65 do 90:
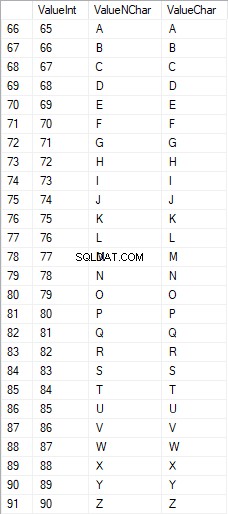
Znaki łacińskie w dolnej części opieki mieszczą się w zakresie od 97 do 122:
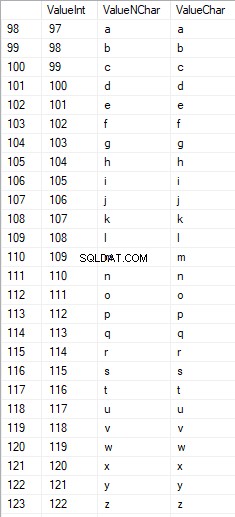
Rosyjskie znaki pisane wielkimi literami mieszczą się w zakresie od 1040 do 1071:

Rosyjskie znaki pisane małymi literami mieszczą się w zakresie od 1072 do 1103:


Oraz znaki z zakresu od 58 do 64:

Wybieramy potrzebne znaki i umieszczamy je w tabeli [test].[SelectCharactersCode] w następujący sposób:
SELECT
	[ValueInt]
   ,[ValueNChar]
   ,[ValueChar]
   ,CASE
		WHEN ([ValueInt] BETWEEN 48 AND 57) THEN 1
		ELSE 0
	END AS [IsNumeral]
   ,CASE
		WHEN (([ValueInt] BETWEEN 65 AND 90) OR
			([ValueInt] BETWEEN 1040 AND 1071)) THEN 1
		ELSE 0
	END AS [IsUpperCase]
   ,CASE
		WHEN (([ValueInt] BETWEEN 65 AND 90) OR
			([ValueInt] BETWEEN 97 AND 122)) THEN 1
		ELSE 0
	END AS [IsLatin]
   ,CASE
		WHEN (([ValueInt] BETWEEN 1040 AND 1071) OR
			([ValueInt] BETWEEN 1072 AND 1103)) THEN 1
		ELSE 0
	END AS [IsRus]
   ,CASE
		WHEN (([ValueInt] BETWEEN 33 AND 47) OR
			([ValueInt] BETWEEN 58 AND 64)) THEN 1
		ELSE 0
	END AS [IsExtra]
INTO [test].[SelectCharactersCode]
FROM [test].[TblCharactersCode]
WHERE ([ValueInt] BETWEEN 48 AND 57)
OR ([ValueInt] BETWEEN 65 AND 90)
OR ([ValueInt] BETWEEN 97 AND 122)
OR ([ValueInt] BETWEEN 1040 AND 1071)
OR ([ValueInt] BETWEEN 1072 AND 1103)
OR ([ValueInt] BETWEEN 33 AND 47)
OR ([ValueInt] BETWEEN 58 AND 64);
Przyjrzyjmy się teraz zawartości tej tabeli za pomocą następującego skryptu:
SELECT [ValueInt]
      ,[ValueNChar]
      ,[ValueChar]
      ,[IsNumeral]
      ,[IsUpperCase]
      ,[IsLatin]
      ,[IsRus]
      ,[IsExtra]
  FROM [test].[SelectCharactersCode];
Otrzymujemy następujący wynik:

W ten sposób mamy [test].[SelectCharactersCode] tabela, gdzie:
- WartośćInt – wartość liczbowa znaku
- WartośćNChar – znak typu NCHAR
- ValueChar – znak typu CHAR
- Isliczne – kryterium znaku będącego cyfrą
- IsUpperCase – kryterium znaku pisanego wielkimi literami
- jest łaciński – kryterium znaku będącego znakiem łacińskim;
- IsRus – kryterium charakteru rosyjskiego
- IsExtra – kryterium postaci będącej postacią dodatkową
Teraz możemy uzyskać kod do wstawienia niezbędnych znaków. Na przykład, tak to zrobić dla znaków łacińskich pisanych małymi literami:
SELECT 'SELECT '+CAST([ValueInt] AS NVARCHAR(255))+' AS [ValueInt], '+''''+[ValueNChar]+''''+' AS [ValueNChar], '+''''+[ValueChar]+''''+' AS [ValueChar] UNION ALL'
  FROM [test].[SelectCharactersCode]
  WHERE [IsUpperCase]=0
    AND [IsLatin]=1;
Otrzymujemy następujący wynik:

To samo dotyczy liter rosyjskich pisanych małymi literami:
SELECT 'SELECT '+CAST([ValueInt] AS NVARCHAR(255))+' AS [ValueInt], '+''''+[ValueNChar]+''''+' AS [ValueNChar], '+COALESCE(''''+[ValueChar]+'''', 'NULL')+' AS [ValueChar] UNION ALL'
  FROM [test].[SelectCharactersCode]
  WHERE [IsUpperCase]=0
    AND [IsRus]=1;
Otrzymujemy następujący wynik:

To samo dotyczy postaci:
SELECT 'SELECT '+CAST([ValueInt] AS NVARCHAR(255))+' AS [ValueInt], '+''''+[ValueNChar]+''''+' AS [ValueNChar], '+''''+[ValueChar]+''''+' AS [ValueChar] UNION ALL'
  FROM [test].[SelectCharactersCode]
  WHERE [IsNumeral]=1;
Wynik jest następujący:

Mamy więc kody do oddzielnego wstawiania następujących danych:
- Znaki łacińskie pisane małymi literami.
- Rosyjskie litery pisane małymi literami.
- Cyfry.
Działa zarówno dla typów NCHAR, jak i CHAR.
Podobnie możemy przygotować skrypt wstawiania dla dowolnego zestawu znaków. Poza tym każdy zestaw otrzyma własną funkcję tabelaryczną.
Aby uprościć, implementujemy wspólną funkcję tabulacji, która zwróci niezbędny zestaw danych dla poprzednio wybranych danych w następujący sposób:
SELECT
	'SELECT ' + CAST([ValueInt] AS NVARCHAR(255)) + ' AS [ValueInt], '
	+ '''' + [ValueNChar] + '''' + ' AS [ValueNChar], '
	+ COALESCE('''' + [ValueChar] + '''', ‘NULL’) + ' AS [ValueChar], '
	+ CAST([IsNumeral] AS NCHAR(1)) + ' AS [IsNumeral], ' +
	+CAST([IsUpperCase] AS NCHAR(1)) + ' AS [IsUpperCase], ' +
	+CAST([IsLatin] AS NCHAR(1)) + ' AS [IsLatin], ' +
	+CAST([IsRus] AS NCHAR(1)) + ' AS [IsRus], ' +
	+CAST([IsExtra] AS NCHAR(1)) + ' AS [IsExtra]' +
	+' UNION ALL'
FROM [test].[SelectCharactersCode];
Ostateczny wynik wygląda następująco:

Gotowy skrypt jest pakowany w funkcję tabulacji [test].[GetSelectCharacters].
Ważne jest, aby usunąć dodatkowy UNION ALL na końcu wygenerowanego skryptu, a w [ValueInt]=39 musimy zmienić „” na „”:
SELECT 39 AS [ValueInt], '''' AS [ValueNChar], '''' AS [ValueChar], 0 AS [IsNumeral], 0 AS [IsUpperCase], 0 AS [IsLatin], 0 AS [IsRus], 1 AS [IsExtra] UNION ALLTa funkcja tabulacji zwraca następujący zestaw pól:
- Liczba – numer linii w zwróconym zestawie danych;
- WartośćInt – wartość liczbowa znaku;
- WartośćNChar – znak typu NCHAR;
- ValueChar – znak typu CHAR;
- Isliczne – kryterium znaku będącego cyfrą;
- IsUpperCase – kryterium określające, że znak jest pisany wielkimi literami;
- jest łaciński – kryterium określające, że znak jest znakiem łacińskim;
- IsRus – kryterium określające, że postać jest rosyjską;
- IsExtra – kryterium określające, że postać jest dodatkową.
Dla danych wejściowych masz następujące parametry:
- @IsNumeral – czy powinien zwrócić liczby;
- @IsUpperCase :
- 0 – musi zwracać tylko małe litery dla liter;
- 1 – musi zwracać tylko wielkie litery;
- NULL – musi zwracać litery we wszystkich przypadkach.
- @IsLatin – musi zwracać znaki łacińskie
- @IsRus – musi zwracać rosyjskie znaki
- @IsExtra – musi zwracać dodatkowe znaki.
Wszystkie flagi są używane zgodnie z logicznym OR. Np. jeśli chcesz, aby zwracane były małe litery i cyfry, wywołujesz funkcję tabulacji w następujący sposób:
Otrzymujemy następujący wynik:
declare
@IsNumeral BIT=1
   ,@IsUpperCase BIT=0
   ,@IsLatin BIT=1
   ,@IsRus BIT=0
   ,@IsExtra BIT=0;

SELECT *
FROM [test].[GetSelectCharacters](@IsNumeral, @IsUpperCase, @IsLatin, @IsRus, @IsExtra);
Otrzymujemy następujący wynik:

Implementujemy funkcję [test].[GetRandString], która zastąpi linię znakami pseudolosowymi, zachowując początkową długość ciągu. Ta funkcja musi zawierać możliwość operowania tylko tymi znakami, które są cyframi. Np. może to być przydatne podczas zmiany serii i numeru dowodu osobistego.
Gdy implementujemy funkcję [test].[GetRandString], najpierw otrzymujemy zestaw znaków niezbędny do wygenerowania pseudolosowej linii o określonej długości w parametrze wejściowym @Length. Pozostałe parametry działają jak opisano powyżej.
Następnie wstawiamy otrzymany zestaw danych do zmiennej tabulacji @tbl . W tej tabeli zapisane są pola [ID] – numer zamówienia w wynikowej tabeli znaków oraz [Value] – prezentacja znaku w typie NCHAR.
Następnie w cyklu generuje liczbę pseudolosową z zakresu od 1 do liczności otrzymanych wcześniej znaków @tbl. Wstawiamy tę liczbę do [ID] zmiennej tabulacji @tbl w celu wyszukiwania. Gdy wyszukiwanie zwróci linię, bierzemy znak [Wartość] i „przyklejamy” go do wynikowej linii @res.
Po zakończeniu pracy cyklu otrzymana linia wraca przez zmienną @res.
Możesz zmienić imię i nazwisko kandydata w następujący sposób:
UPDATE [dbo].[Employee]
SET [FirstName] = [test].[GetRandString](LEN([FirstName])),
        [LastName] = [test].[GetRandString](LEN([LastName]));
W związku z tym zbadaliśmy implementację funkcji i jej użycie dla typów NCHAR i NVARCHAR. Możemy łatwo zrobić to samo dla typów CHAR i VARCHAR.
Czasami jednak musimy wygenerować linię zgodnie z zestawem znaków, a nie literami lub cyframi. W ten sposób najpierw musimy użyć następującej funkcji wielu operatorów [test].[GetListCharacters].
Funkcja [test].[GetListCharacters] pobiera dwa następujące parametry dla danych wejściowych:
- @str – sama linia znaków;
- @IsGroupUnique – określa, czy musi grupować unikalne znaki w linii.
Przy rekurencyjnym CTE linia wejściowa @str jest przekształcana w tablicę znaków – @ListCharacters. Ta tabela zawiera następujące pola:
- ID – numer porządkowy linii w wynikowej tabeli znaków;
- Znak – prezentacja postaci w NCHAR(1)
- Liczba – liczba powtórzeń postaci w linii (zawsze 1 jeśli parametr @IsGroupUnique=0)
Weźmy dwa przykłady użycia tej funkcji, aby lepiej zrozumieć jej działanie:
- Transformacja linii na listę nieunikatowych znaków:
SELECT *
FROM [test].[GetListCharacters]('123456888  789 0000', 0);
Otrzymujemy wynik:

Ten przykład pokazuje, że linia jest przekształcana w listę znaków „tak jak jest”, bez grupowania jej według unikalności znaków (pole [Count] zawsze zawiera 1).
- Przekształcenie linii w listę unikalnych znaków
SELECT *
FROM [test].[GetListCharacters]('123456888  789 0000', 1);
Wynik jest następujący:
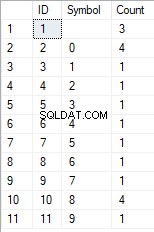
Ten przykład pokazuje, że linia jest przekształcana w listę znaków pogrupowanych według ich unikalności. Pole [Count] wyświetla liczbę wyników każdego znaku w wierszu wejściowym.
Na podstawie funkcji wielooperatorowej [test].[GetListCharacters] tworzymy funkcję skalarną [test].[GetRandString2].
Definicja nowej funkcji skalarnej pokazuje jej podobieństwo do funkcji skalarnej [test].[GetRandString]. Jedyna różnica polega na tym, że używa funkcji wielooperatorowej [test].[GetListCharacters] zamiast funkcji tabulacji [test].[GetSelectCharacters].
Tutaj przejrzyjmy dwa przykłady użycia zaimplementowanej funkcji skalarnej :
Generujemy pseudolosową linię o długości 12 znaków z linii wejściowej zawierającej znaki niepogrupowane według unikalności:
SELECT [test].[GetRandString2](12, '123456789!!!!!!!!0!!!', DEFAULT);Wynik:
64017!!5!!!7
Słowo kluczowe to DOMYŚLNE. Stwierdza, że wartość domyślna ustawia parametr. Tutaj jest zero (0).
Lub
Generujemy pseudolosową linię o długości 12 znaków z linii wejściowej znaków pogrupowanych według unikalności:
SELECT [test].[GetRandString2](12, '123456789!!!!!!!!0!!!', 1);Wynik:
35792!428273
Wdrożenie ogólnego skryptu do oczyszczania danych i tajnych zmian danych
Zbadaliśmy proste przykłady dla każdego typu zmienionych danych:
- Zmiana daty i godziny;
- Zmiana wartości liczbowej;
- Zmiana sekwencji bajtów;
- Zmiana danych postaci.
Jednak te przykłady nie spełniają kryteriów 2 i 3 dla skryptów zmieniających dane:
- Kryterium 2 :selektywność wartości nie zmieni się znacząco w zmienionych danych. Nie możesz użyć NULL dla pola tabeli. Zamiast tego musisz upewnić się, że te same rzeczywiste wartości danych pozostaną takie same w zmienionych danych. Np. jeśli rzeczywiste dane zawierają 12-krotną wartość 103785 w polu tabeli podlegającym zmianom, zmodyfikowane dane muszą zawierać inną (zmienioną) wartość znalezioną 12 razy w tym samym polu tabeli.
- Kryterium 3 :długość i rozmiar wartości nie powinny być znacząco zmieniane w zmienionych danych. Np. zastępujesz każdy znak/bajt pseudolosowym znakiem/bajtem.
Dlatego musimy stworzyć skrypt uwzględniający selektywność wartości w polach tabeli.
Zajrzyjmy do naszej bazy danych dla usługi rekrutacyjnej. Jak widzimy, dane osobowe są obecne tylko w tabeli kandydatów [dbo]. [Pracownik].
Załóżmy, że tabela zawiera następujące pola:
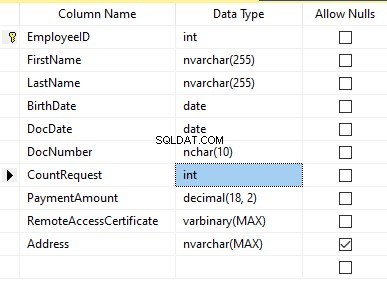
Opisy:
- Imię – nazwa, wiersz NVARCHAR(255)
- Nazwisko – nazwisko, linia NVARCHAR(255)
- Data urodzenia – data urodzenia, DATA
- DocNumber – numer dowodu osobistego z dwiema cyframi na początku serii paszportowej, a kolejne siedem cyfr to numer dokumentu. Pomiędzy nimi mamy myślnik jako linię NCHAR(10).
- DocDate – data wydania dowodu osobistego, DATA
- CountRequest – liczba zapytań dla tego kandydata podczas poszukiwania CV, liczba całkowita INT
- Kwota płatności – otrzymana opłata za usługę promocji CV, liczba dziesiętna (18,2)
- RemoteAccessCertificate – certyfikat zdalnego dostępu, sekwencja bajtów VARBINARY
- Adres – adres zamieszkania lub adres rejestracyjny, linia NVARCHAR(MAX)
Następnie, aby zachować początkową selektywność, musimy zaimplementować następujący algorytm:
- Wyodrębnij wszystkie unikalne wartości dla każdego pola i zachowaj wyniki w tabelach tymczasowych lub zmiennych tabulacji;
- Generuj wartość pseudolosową dla każdej unikatowej wartości. Ta pseudolosowa wartość nie może znacząco różnić się długością i rozmiarem od wartości oryginalnej. Zapisz wynik w tym samym miejscu, w którym zapisaliśmy wyniki z punktu 1. Każda nowo wygenerowana wartość musi mieć skorelowaną unikalną wartość bieżącą.
- Zastąp wszystkie wartości w tabeli nowymi wartościami z punktu 2.
Na początku depersonalizujemy imiona i nazwiska kandydatów. Zakładamy, że nazwisko i imię są zawsze obecne i mają nie mniej niż dwa znaki w każdym polu.
Najpierw wybieramy unikalne nazwy. Następnie generuje pseudolosową linię dla każdej nazwy. Długość nazwy pozostaje taka sama; pierwszy znak jest pisany wielką literą, a pozostałe małymi. Używamy utworzonej wcześniej funkcji skalarnej [test].[GetRandString] do wygenerowania pseudolosowej linii o określonej długości zgodnie ze zdefiniowanymi kryteriami znaków.
Następnie aktualizujemy nazwiska w tabeli kandydatów zgodnie z ich unikalnymi wartościami. To samo dotyczy nazwisk.
Depersonalizujemy pole DocNumber. Jest to numer dowodu osobistego (paszportu). Pierwsze dwa znaki oznaczają serię dokumentu, a ostatnie siedem cyfr to numer dokumentu. Łącznik jest między nimi. Następnie wykonujemy operację odkażania.
Zbieramy wszystkie unikalne numery dokumentów i generujemy pseudolosową linię dla każdego z nich. Linia ma format 'XX-XXXXXXX', gdzie X jest cyfrą z zakresu od 0 do 9. Tutaj używamy wcześniej utworzonej funkcji skalarnej [test].[GetRandString] do wygenerowania pseudolosowej linii o określonej długości zgodnie z zestaw parametrów postaci.
Następnie pole [DocNumber] jest aktualizowane w tabeli kandydatów [dbo].[Pracownik].
Depersonalizujemy pole DocDate (data wydania dowodu osobistego) i pole BirthDate (data urodzenia kandydata).
First, we select all the unique pairs made of “date of birth &date of the ID-card issue.” For each such pair, we create a pseudorandom date for the date of birth. The pseudorandom date of the ID-card issue is made according to that “date of birth” – the date of the document’s issue must not be earlier than the date of birth.
After that, these data are updated in the respective fields of the candidates’ table [dbo].[Employee].
And, we update the remaining fields of the table.
The CountRequest value stands for the number of requests made for that candidate by companies during the resume search.
The PaymentAmount is the final amount of the resume promotion service fee paid. We calculate these numbers similarly to the previous fields.
Note that it generates a pseudorandom integer for the first case and a pseudorandom decimal for the second case. In both cases, the pseudorandom number generation occurs in the range of “two times less than original” to “two times more than original.” The selectivity of values in the fields is not changed too much.
After that, it writes the values into the fields of the candidates’ table [dbo].[Employee].
Further, we collect unique values of the RemoteAccessCertificate field for the remote access certificate. We generate a pseudorandom byte sequence for each such value. The length of the sequence must be the same as the original. Here, we use the previously created [test].[GetRandVarbinary] scalar function to generate the pseudorandom byte sequence of the specified length.
Then recording into the respective field [RemoteAccessCertificate] of the [dbo].[Employee] candidates’ table takes place.
The last step is the collection of the unique addresses from the [Address] field. For each value, we generate a pseudorandom line of the same length as the original. Note that if it was NULL originally, it must be NULL in the generated field. It allows you to keep NULL and don’t replace it with an empty line. It minimizes the selectivity values’ mismatch in this field between the production database and the altered data.
We use the previously created [test].[GetRandString] scalar function to generate the pseudorandom line of the specified length according to the characters’ parameters defined.
It then records the data into the respective [Address] field of the candidates’ table [dbo].[Employee].
This way, we get the full script for depersonalization and altering of the confidential data.
Finally, we get the database with altered personal and confidential data. The algorithms we used make it impossible to restore the original data from the altered data. Also, the values’ selectivity, length, and size aren’t changed significantly. So, the three criteria for the personal and secret data altering scripts are ensured.
We won’t review the criterion 4 separately here. Our database contains all the data subject to change in one candidates’ table [dbo].[Employee]. The data conformity is needed within this table only. Thus, criterion 4 is also here. However, we need to remember this criterion 4 claiming that all interrelations must remain the same in the altered data.
We often see other conditions for personal and confidential data altering algorithms, but we won’t review them here. Besides, the four criteria described above are always present. In many cases, it is enough to estimate the functionality of the algorithm suitable to use it.
Now, we need to make a backup of the created database, check it by restoring on another instance, and transfer that copy into the necessary environment for development and testing. For this, we examine the full database backup creation.
Full database backup creation
We can make a database backup with construction BACKUP DATABASE as in our example.
Make a compressed full backup of the database JobEmplDB_Test. The checksum calculation takes place in the file E:\Backup\JobEmplDB_Test.bak. Further, we check the backup created.
Then, we check the backup created by restoring the database for it. Let’s examine the database restoring.
Restoring the database
You can restore the database with the help of RESTORE DATABASE construction in the following way:
USE [master]
RESTORE DATABASE [JobEmplDB_Test]
FROM  DISK = N'E:\Backup\JobEmplDB_Test.bak' WITH  FILE = 1,
MOVE N'JobEmplDB' TO N'E:\DBData\JobEmplDB.mdf',
MOVE N'JobEmplDB_log' TO N'F:\DBLog\JobEmplDB_log.ldf',
NOUNLOAD,
REPLACE,
STATS = 5;
GO
We restore the JobEmplDB_Test database of the E:\Backup\JobEmplDB_Test.bak backup. The files will be overwritten, and the data file will be transferred into the file E:\DBData\JobEmplDB.mdf , while the transactions log file will be moved into F:\DBLog\JobEmplDB_log.ldf .
After we successfully check how the database is restored from the backup, we forward the backup to the development and testing environments. It will be restored again with the same method as described above.
We’ve examined the first approach to the data populating into the database for testing and development. This approach implies copying and altering the data from the production database. Now, we’ll examine the second approach – the synthetic data generation.
Synthetic data generation
The General algorithm for the synthetic data generation is following:
- Make a new empty database or clear a previously created database by purging all data.
- Create or renew a scheme in the newly created database – the same as that of the production databases.
- Copy of renew guidelines and regulations from the production database and transfer them into the new database.
- Generate synthetic data into the necessary tables of the new database.
- Make a backup of a new database.
- Deliver and restore the new backup in the necessary environment.
We already have the JobEmplDB_Test database to practice, and we have reviewed the means of creating a schema in the new database. Let’s focus on the tasks that are specific to this approach.
Clean up the database with the data purge
To clear the database off all its data, we need to do the following:
- Keep the definitions of all external keys.
- Disable all limitations and triggers.
- Delete all external keys.
- Clear the tables using the TRUNCATE construction.
- Restore all the external keys deleted in point 3.
- Enable all the limitations disabled in point 2.
You can save the definitions of all external keys with the following script:
1. The external keys’ definitions are saved in the tabulation variable @tbl_create_FK
2. You can disable the limitations and triggers with the following script:
EXEC sp_MSforeachtable "ALTER TABLE ? NOCHECK CONSTRAINT ALL";
EXEC sp_MSforeachtable "ALTER TABLE ? DISABLE TRIGGER ALL";
To enable the limitations and triggers, you can use the following script:
EXEC sp_MSforeachtable "ALTER TABLE ? WITH CHECK CHECK CONSTRAINT ALL";
EXEC sp_MSforeachtable "ALTER TABLE ? ENABLE TRIGGER ALL";
Here, we use the saved procedure sp_MSforeachtable that applies the construction to all the database’s tables.
3. To delete external keys, use the special script. Here, we receive the information about the external keys through the INFORMATION_SCHEMA.TABLE_CONSTRAINTS system presentation. We delete external keys through the cursor, one by one, using the formed dynamic script T-SQL, transferring the request into the system saved procedure sp_executesql .
4. To clear the tables with the TRUNCATE construction, use the dedicated script. The script works in the same way as above, but it receives the data for tables, and then it clears the tables one by one through the cursor, using the TRUNCATE construction.
5. Restoring the external keys is possible with the below script (earlier, we saved the external keys’ definitions in the tabulation variable @tbl_create_FK):
DECLARE @tsql NVARCHAR(4000);

DECLARE FK_Create CURSOR LOCAL FOR SELECT
	[Script]
FROM @tbl_create_FK;

OPEN FK_Create;

FETCH NEXT FROM FK_Create INTO @tsql;

WHILE (@@fetch_status = 0)
BEGIN
	EXEC sp_executesql @tsql = @tsql;
	FETCH NEXT FROM FK_Create INTO @tsql;
END

CLOSE FK_Create;
DEALLOCATE FK_Create;
The script works in the same way as the two other scripts we mentioned above. But it restores the external keys’ definitions through the cursor, one for each iteration.
A particular case of data purging in the database is the current script. To get this output, we need the below construction in the scripts:
EXEC sp_executesql @tsql = @tsql;Before this construction, or instead of it, we need to write the generated construction output. It is necessary to call it manually or via the dynamic T-SQL query. We do it via the system saved procedure sp_executesql.
Instead of the below code fragment in all cases:
WHILE (@@fetch_status = 0)
BEGIN
	EXEC sp_executesql @tsql = @tsql;
...

We write:

WHILE (@@fetch_status = 0)
BEGIN
	PRINT @tsql;

	EXEC sp_executesql @tsql = @tsql;
...
Lub:
WHILE (@@fetch_status = 0)
BEGIN
	PRINT @tsql;
...
The first case implies both the output of constructions and their execution. The second case if for the output only – it is helpful for the scripts’ debugging.
Thus, we get the general database cleaning script.
Copy guidelines and references from the production database to the new one
Here you can use the T-SQL scripts. Our example database of the recruitment service includes 5 guidelines:
- [dbo].[Company] – companies
- [dbo].[Skill] – skills
- [dbo].[Position] – positions (occupation)
- [dbo].[Project] – projects
- [dbo].[ProjectSkill] – project and skills’ correlations
The “skills” table [dbo].[Skill] serves to show how to make a script for the data insertion from the production database into the test database.
We form the following script:
SELECT 'SELECT '+CAST([SkillID] AS NVARCHAR(255))+' AS [SkillID], '+''''+[SkillName]+''''+' AS [SkillName] UNION ALL'
  FROM [dbo].[Skill]
ORDER BY [SkillID];
We execute it in a copy of the production database that is usually available in read-only mode. It is a replica of the production database.
Wynik:
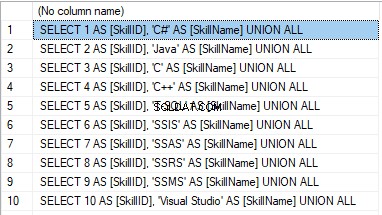
Now, wrap the result up into the script for the data adding as here. We have a script for the skills’ guideline compilation. The scripts for other guidelines are made in the same way.
However, it is much easier to copy the guidelines’ data through the data export and import in SSMS. Or, you can use the data import and export wizard.
Generate synthetic data
We’ve determined the pseudorandom values’ generation for lines, numbers, and byte sequences. It took place when we examined the implementation of the data sanitization and the confidential data altering algorithms for approach 1. Those implemented functions and scripts are also used for the synthetic data generation.
The recruitment service database requires us to fill the synthetic data in two tables only:
- [dbo].[Employee] – candidates
- [dbo].[JobHistory] – a candidate’s work history (experience), the resume itself
We can fill the candidates’ table [dbo].[Employee] with synthetic data using this script.
At the beginning of the script, we set the following parameters:
- @count – the number of lines to be generated
- @LengthFirstName – the name’s length
- @LengthLastName – the last name’s length
- @StartBirthDate – the lower limit of the date for the date of birth
- @FinishBirthDate – the upper limit of the date for the date of birth
- @StartCountRequest – the lower limit for the field [CountRequest]
- @FinishCountRequest – the upper limit for the field [CountRequest]
- @StartPaymentAmount – the lower limit for the field [PaymentAmount]
- @FinishPaymentAmount – the upper limit for the field [PaymentAmount]
- @LengthRemoteAccessCertificate – the byte sequence’s length for the certificate
- @LengthAddress – the length for the field [Address]
- @count_get_unique_DocNumber – the number of attempts to generate the unique document’s number [DocNumber]
The script complies with the uniqueness of the [DocNumber] field’s value.
Now, let’s fill the [dbo].[JobHistory] table with synthetic data as follows.
The start date of work [StartDate] is later than the issuing date of the candidate’s document [DocDate]. The end date of work [FinishDate] is later than the start date of work [StartDate].
It is important to note that the current script is simplified, as it does not deal with parameters of the generated data selectivity configuration.
Make a full database backup
We can make a database backup with the construction BACKUP DATABASE, using our script.
We create a full compressed backup of the database JobEmplDB_Test. The checksum is calculated into the file E:\Backup\JobEmplDB_Test.bak. It also ensures further testing of the backup.
Let’s check the backup by restoring the database from it. We need to examine the database restoring then.
Restore the database
You can restore the database with the help of the RESTORE DATABASE construction, as shown below:
USE [master]
RESTORE DATABASE [JobEmplDB_Test]
FROM  DISK = N'E:\Backup\JobEmplDB_Test.bak' WITH  FILE = 1,
MOVE N'JobEmplDB' TO N'E:\DBData\JobEmplDB.mdf',
MOVE N'JobEmplDB_log' TO N'F:\DBLog\JobEmplDB_log.ldf',
NOUNLOAD,
REPLACE,
STATS = 5;
GO
We restore the database JobEmplDB_Test from the backup E:\Backup\JobEmplDB_Test.bak. The files are overwritten, and the data file is transferred to the file E:\DBData\JobEmplDB.mdf. The transaction log file is transferred to file F:\DBLog\JobEmplDB_log.ldf.
After checking the database restoring from the backup successfully, we transfer the backup to the necessary environments. It will be used for testing and development, and further deployment through the database restoring, as described above.
This way, we’ve examined the second approach to filling the database in with data for testing and development purposes. It is the synthetic data generation approach.
Data generation tools (for external resources)
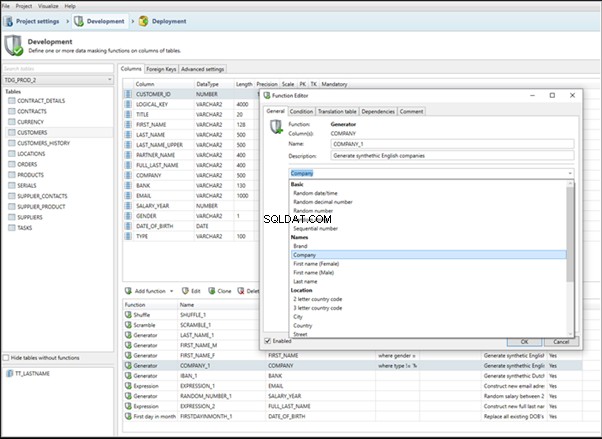
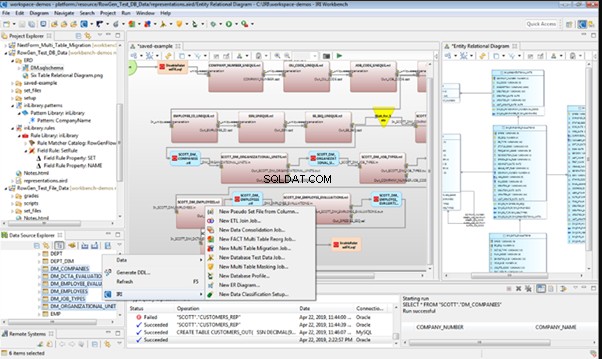
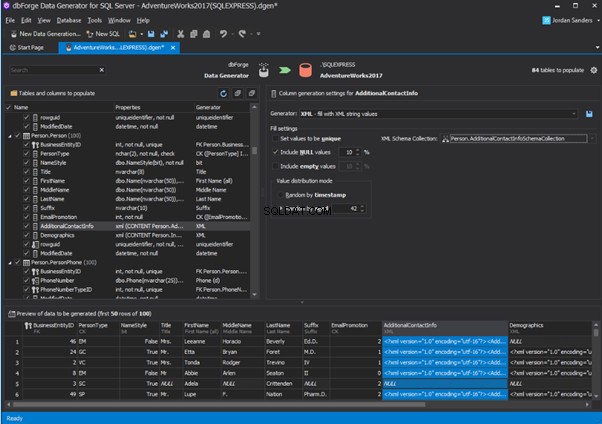
When we have a job to fill in the database with data for testing and development purposes, it can be much faster and easier with the help of specialized tools. Let’s review the most popular and powerful data generation tools and explore their practical usage.
Full list of tools
DATPROF
IRI RowGen
Data Generator for SQL Server
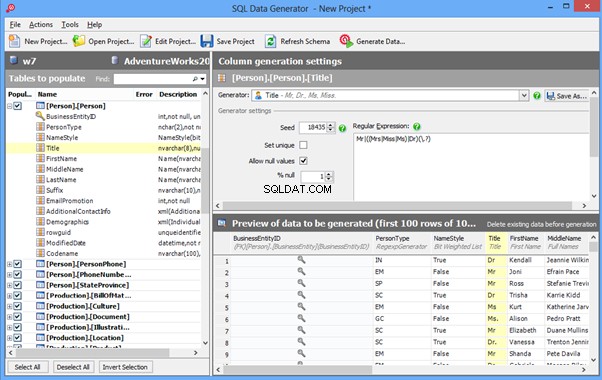
Redgate SQL Data Generator
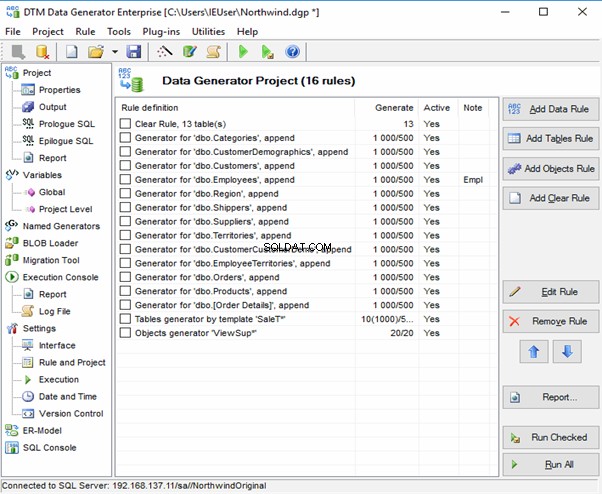
DTM Data Generator
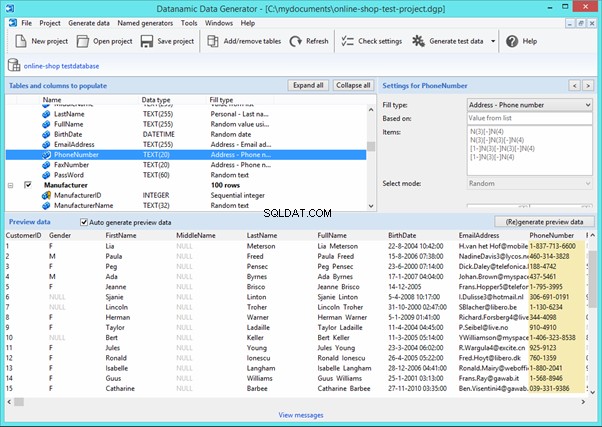
Datanamic Data Generator MultiDB
Now, let’s examine one of these tools more precisely.
An overview of the employees’ generation by the Data Generator for SQL Server
The Data Generator for SQL Server utility is embedded in SSMS, and also it is a part of dbForge Studio. We reviewed this utility here. Let’s now examine how it works for synthetic data generation. As examples, we use the [dbo].[Employee] and the [dbo].[JobHistory] tables.
This generator can quickly generate first and last names of candidates for the [FirstName] and [LastName] fields respectively:

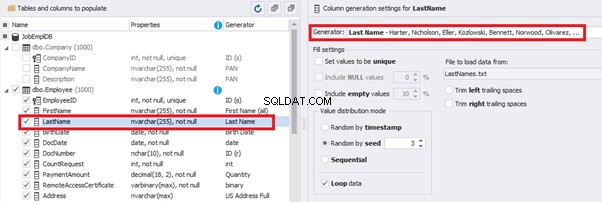
Note that FirstName requires choosing the “First Name” value in the “Generator” section. For LastName, you need to select the “Last Name” value from the “Generator” section.
It is important to note that the generator automatically determines which generation type it needs to apply to every field. The settings above were set by the generator itself, without manual correction.
You can configure distribution of values for the date of birth [BirthDate]:

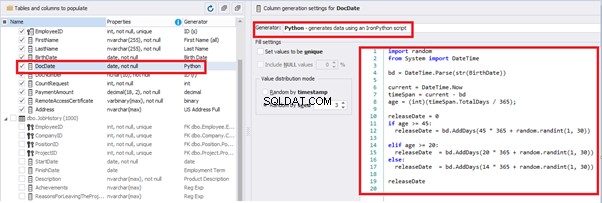
Set the distribution for the document’s date of issue [DocDate] through the Phyton generator using the below script:
import random
from System import DateTime
# receive the value from the Birthday field
bd = DateTime.Parse(str(BirthDate))
# receive the current date
current = DateTime.Now
# calculate the age in years
timeSpan = current - bd
age = (int)(timeSpan.TotalDays / 365);
# passport’s date of issue
releaseDate = 0
if age >= 45:
releaseDate = bd.AddDays(45 * 365 + random.randint(1, 30))
# randomize the issue during the month
elif age >= 20:
  releaseDate  = bd.AddDays(20 * 365 + random.randint(1, 30))
 # randomize the issue during the month
else:
  releaseDate  = bd.AddDays(14 * 365 + random.randint(1, 30))
# randomize the issue during the month
releaseDate
This way, the [DocDate] configuration will look as follows:
For the document’s number [DocNumber], we can select the necessary type of unique data generation, and edit the generated data format, if needed:

E.g., instead of the format
(0[1-6]|1[0-6]|2[0-7]|3[0-9]|4[0-68]|5[0-9]|6[0-8]|7[1-7]|8[0-8]|9[0-589])-(\d{7})We can set the following format:
(\d{2})-(\d{7})This format means that the line will be generated in format XX-XXXXXXX (X – is a digit in the range of 0 to 9).
We set up the generator for [CountRequest] and [PaymentAmount] fields in the same way, according to the generated data type:


In the first case, we set the values’ range of 0 to 2048 for [CountRequest]. In the second case, it is the range of 0 to 100000 for [PaymentAmount].
We configure generation for [RemoteAccessCertificate] and [Address] fields in the same way:


In the first case, we limit the byte sequence [RemoteAccessCertificate] with the range of lengths of 16 to 32. In the second case, we select values for [Address] as real addresses. It makes the generated values looking like the real ones.
This way, we’ve configured the synthetic data generation settings for the candidates’ table [dbo].[Employee]. Let’s now set up the synthetic data generation for the [dbo].[JobHistory] table.
We set it to take the data for the [EmployeeID] field from the candidates’ table [dbo].[Employee] in the following way:
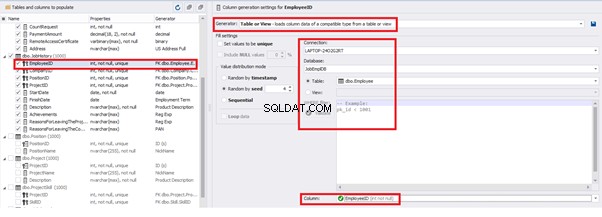
We select the generator’s type from the table or presentation. We then define the sample of MS SQL Server, the database, and the table to take the data from. We can also configure filters in the “WHERE filter” section, and select the [EmployeeID] field.
Here we suppose that we generate the “employees” first, and then we generate the data for the [dbo].[JobHistory] table, basing on the filled [dbo].[Employee] reference.
However, if we need to generate the data for both [dbo].[Employee] and [dbo].[JobHistory] at the same time, we need to select “Foreign Key (manually assigned) – references a column from the parent table,” referring to the [dbo].[Employee].[EmployeeID] column:

Similarly, we set up the data generation for the following fields.
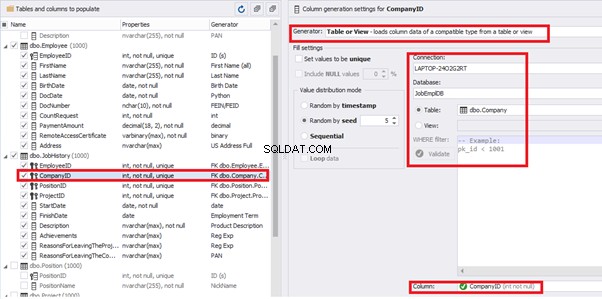
[CompanyID] – from [dbo].[Company], the “companies” table:
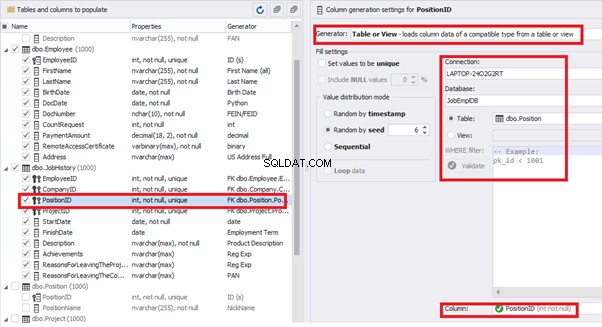
[PositionID] – from the table of positions [dbo].[Position]:
[ProjectID] – from the table of projects [dbo].[Project]:
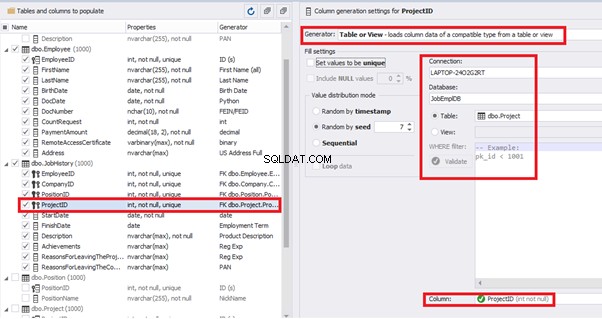
The tool cannot link the columns from different tables and shift them in some way. However, the generator can shift the date within one table – the “date” generator – fill with date values with Range – Offset from the column. Also, it can use data from a different table, but without any transformation (Table or View, SQL query, Foreign key generators).
That’s why we resolve the dates’ problem (BirthDate
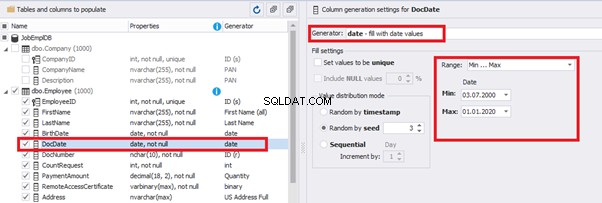
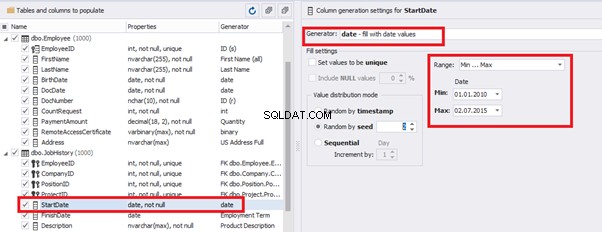
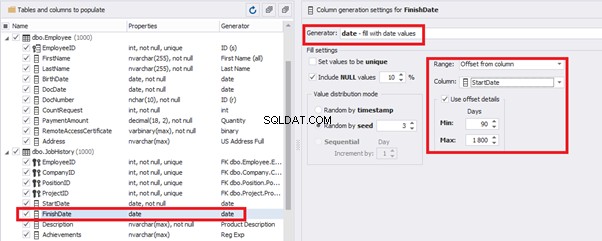
E.g., we limit the BirthDate with the 40-50 years’ interval. Then, we restrict the DocDate with 20-40 years’ interval. The StartDate is, respectively, limited with 25-35 years’ interval, and we set up the FinishDate with the offset from StartDate.
We set up the date of birth:
Set up the date of the document’s issue
Then, the StartDate will match the age from 35 to 45:
The simple offset generator sets FinishDate:
The result is, a person has worked for three months till the current date.
Also, to configure the date of the working end, we can use a small Python script:
This way, we receive the below configuration for the dates of work end [FinishDate] data generation:
Similarly, we fill in the rest of fields. We set the generator type – string, and set the range for generated lines’ lengths:
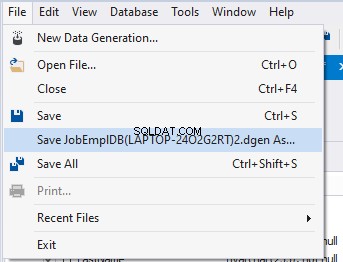
Also, you can save the data generation project as dgen-file consisting of:
We can save all these settings:it is enough to keep the project’s file and work with the database further, using that file:
There is also the possibility to both save the new generators from scratch and save the custom settings in a new generator:
Thus, we’ve configured the synthetic data generation settings used for the jobs’ history table [dbo].[JobHistory].
We have examined two approaches to filling the data in the database for testing and development:
We’ve defied the objects for each approach and each script implementation. These objects are here. We’ve also provided scripts for changing the data from the production database and synthetic data generation. An example is the database of recruitment services. In the end, we’ve examined popular data generation tools and explored one of these tools in detail.
SQL SERVER – How to Disable and Enable All Constraint for Table and Database 
import random
from System import DateTime

bd = DateTime.Parse(str(StartDate))

releaseDate = bd.AddDays(random.randint(1, 30))

releaseDate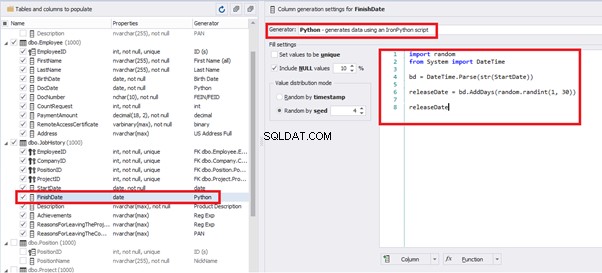


Wniosek
Referencje
Microsoft TechNet Wiki
Top 10 Best Test Data Generation Tools In 2020
SQL Server Documentation

