1 Wprowadzenie do samouczka MS Access 2010, 2013, 2016 i 2019
Witamy w samouczku MS Access. Ten samouczek ma na celu szybkie rozpoczęcie korzystania z MS Access (odtąd po prostu „Dostęp”). Przedstawiono cztery podstawowe moduły programu Access:tabele, formularze, raporty i zapytania. Najpierw omówiony jest przykład biznesowy, który stanowi tło do opracowania prostej bazy danych.
Zakłada się, że użytkownicy tego samouczka są biegli w pracy z Microsoft Windows XP/Vista/Win7/Win10 itp. oraz z MS Excel. Obejmuje to korzystanie z klawiatury i myszy. Samouczek jest oparty na Microsoft Access, który jest częścią pakietu Microsoft Office Professional, który zawiera również MS Excel, MS Word i MS Powerpoint.
Ten samouczek obejmuje MS Access 2007, 2010, 2013, 2016 i 2019, które mają wspólny interfejs ("pasek wstążki" u góry), który różni się od wcześniejszych wersji. Jeśli jesteś zainteresowany pracą z MS Access ’97 lub 2000, odwiedź stronę Microsoft Access Tutorial – Pokrycie MS Access ’97 i 2000.
Samouczek zaczyna się od krótkiego omówienia relacyjnych baz danych . Większość używanych obecnie systemów zarządzania bazami danych opiera się na tak zwanym modelu relacyjnej bazy danych. Access to system zarządzania relacyjnymi bazami danych. Następnie opisujemy przykład biznesowy i przedstawiamy zarys bazy danych i aplikacji, które chcemy rozwijać. W poniższych sekcjach podajemy instrukcje krok po kroku dotyczące tworzenia tabel, formularzy wprowadzania danych, raportów i zapytań dla aplikacji.
1.1 Docelowi odbiorcy
Ten samouczek jest przeznaczony dla studentów dopiero rozpoczynających pracę z systemem zarządzania bazą danych MS Access.
1.2 Wymagana wiedza
Ten samouczek zakłada, że uczestnik kursu jest zaznajomiony z podstawową obsługą komputera osobistego oraz systemu Windows 2000, Windows XP, Windows Vista lub Windows 7. Konkretne umiejętności wymagane do tego samouczka to:
- Korzystanie z myszy i klawiatury
- Na przykład otwieranie i zapisywanie plików na dysku twardym i w pamięci USB (pamięci kciuka)
- Ogólne zarządzanie plikami, w tym różnica między literami dysków, dyskiem twardym itp.
- Uruchamianie programów z menu Start systemu Windows
- Minimalizowanie, maksymalizowanie i zmiana rozmiaru okien
Uczeń powinien mieć dostępną pamięć USB (pamięć kciuka) lub inne przenośne urządzenie pamięci do przechowywania plików, które zostaną utworzone podczas tego samouczka.
1.3 Uruchamianie Microsoft Access na Apple Mac
Jednym z problemów, z którym mogą zetknąć się niektórzy studenci, jest fakt, że MS Access działa tylko w systemie operacyjnym Windows (takim jak Windows XP, Vista lub Windows 7). Jeśli masz MacBooka, iMaca lub inny system Apple z systemem MacOS i procesorem Intel, istnieje kilka możliwych alternatyw, które możesz wypróbować. Wiele nowoczesnych komputerów Apple z procesorem Intel może obsługiwać system operacyjny Windows. Pamiętaj, że będziesz potrzebować legalnie licencjonowanej kopii systemu operacyjnego Windows, aby to zrobić. Można to osiągnąć na dwa główne sposoby:
- Możesz skonfigurować komputer Mac do „podwójnego rozruchu” zarówno w systemie MacOS X, jak i Windows. Jednym z produktów, który może to umożliwić, jest oprogramowanie Apple BootCamp.
- Możesz uruchomić system operacyjny Windows „obok siebie” z systemem Mac OS X przy użyciu „wirtualnego” komputera, takiego jak VirtualBox
Spis treści
- 1 Wprowadzenie do samouczka MS Access
- 1.1 Docelowi odbiorcy
- 1.2 Wstępnie wymagana wiedza
- 1.3 Uruchamianie Microsoft Access na Apple Mac
- 2 Krótki przegląd relacyjnych baz danych i aplikacji baz danych
- 3 Przykład biznesowy
- 4 Uruchamianie programu Microsoft Access
- 4.1 Przegląd uruchamiania programu Microsoft Access
- 5 Tworzenie i przeglądanie tabel
- 5.1 Tworzenie tabeli za pomocą widoku projektu
- 5.2 Ćwiczenie:Tworzenie tabeli
- 5.3 Przeglądanie i dodawanie danych do tabeli
- 5.4 Ćwiczenie:Dodawanie danych do tabeli
- 5.5 Tworzenie relacji między tabelami
- 5.6 Przegląd tworzenia i przeglądania tabel
- 6 Tworzenie i uruchamianie zapytań
- 6.1 Zapytania dotyczące pojedynczych tabel
- 6.2 Ćwiczenie:Zapytania jednotabelowe
- 6.3 Zapytania dotyczące wielu tabel
- 6.4 Ćwiczenie:Wiele zapytań do tabeli
- 6.5 Przegląd tworzenia i uruchamiania zapytań
- 7 Tworzenie i uruchamianie formularzy wprowadzania danych
- 7.1 Tworzenie formularza z pojedynczą tabelą za pomocą kreatora
- 7.2 Ćwiczenie:Tworzenie formularza z pojedynczą tabelą
- 7.3 Przegląd tworzenia i uruchamiania formularza wprowadzania danych
- 8 Tworzenie i uruchamianie raportów
- 8.1 Tworzenie raportu z pojedynczą tabelą za pomocą kreatora
- 8.2 Ćwiczenie:Tworzenie raportu z pojedynczą tabelą
- 8.3 Przegląd tworzenia i uruchamiania raportu
- 9 Tworzenie i uruchamianie formularza wzorcowego/szczegółowego (formularz z podformularzem)
- 10 Tworzenie i uruchamianie centrali
- 11 Tworzenie i uruchamianie formularza nawigacyjnego
- 11.1 Ćwiczenie:Modyfikowanie formularza nawigacji
- 11.2 Ustawianie formularza nawigacji jako domyślnego
- 12 Podsumowanie samouczków i zaawansowane tematy
Następna strona zawiera krótkie wprowadzenie do relacyjnych baz danych.
2 Krótki przegląd relacyjnych baz danych i aplikacji bazodanowych
Pierwsze bazy danych wdrożone w latach 60. i 70. opierały się na płaskich plikach danych lub hierarchicznych lub sieciowych modelach danych. Te metody przechowywania danych były stosunkowo nieelastyczne ze względu na ich sztywną strukturę i duże uzależnienie od programów użytkowych do wykonywania nawet najbardziej rutynowego przetwarzania.
Pod koniec lat 70. relacyjny model bazy danych wywodzące się z akademickiego środowiska badawczego, stały się dostępne w komercyjnych wdrożeniach, takich jak IBM DB2 i Oracle. Relacyjny model danych określa dane przechowywane w relacjach które mają jakieś związki wśród nich (stąd nazwa relacyjne ).
W relacyjnych bazach danych, takich jak Sybase, MySQL, Oracle, IBM DB2, MS SQL Server i MS Access, dane są przechowywane w tabelach składa się z co najmniej jednej kolumny (Access nazywa kolumnę polem ). Dane przechowywane w każdej kolumnie muszą należeć do jednego typu danych takie jak znak (czasami nazywany „ciągiem”), liczba lub data. Zbiór wartości z każdej kolumny tabeli nazywa się rekordem lub wiersz w tabeli.
Różne tabele mogą mieć wspólną kolumnę. Ta funkcja służy do jawnego określania relacji między dwiema tabelami. Wartości pojawiające się w kolumnie A w jednej tabeli są współdzielone z inną tabelą.
Poniżej znajdują się dwa przykłady tabel w relacyjnej bazie danych dla banku lokalnego:
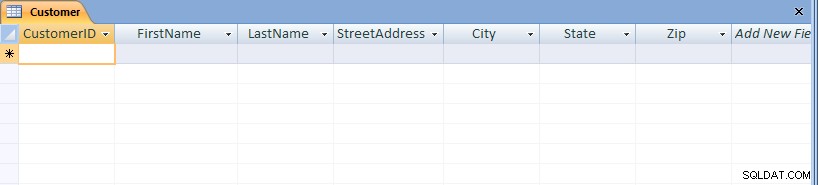
Tabela klienta
| Identyfikator klienta | Imię | Nazwisko | Ulica | Miasto | Stan | Zamek błyskawiczny |
|---|---|---|---|---|---|---|
| Numer | Znak | Znak | Znak | Znak | Znak | Znak |
| 1001 | Józef | Kowalski | 123 Lexington | Smithville | KJ | 91232 |
| 1002 | Alberta | Jones | Śr. Davisa 12 | Smithville | KJ | 91232 |
| 1003 | Nathanial | Topór | 443 szt. młynka | Broadville | GA | 81992 |
| 1004 | Paulina | Konstruktor | 661 Parker Rd. | Streetville | GA | 81990 |
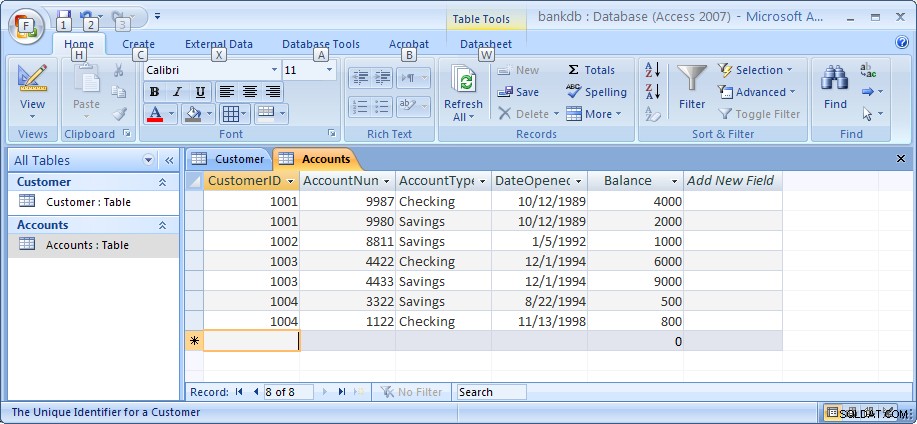
Tabela kont
| Identyfikator klienta | Numer konta | Rodzaj konta | Data otwarcia | Saldo |
|---|---|---|---|---|
| Numer | Numer | Znak | Data | Numer |
| 1001 | 9987 | Sprawdzanie | 12.10.1989 | 4000.00 |
| 1001 | 9980 | Oszczędności | 12.10.1989 | 2000.00 |
| 1002 | 8811 | Oszczędności | 01.05.1992 | 1000,00 |
| 1003 | 4422 | Sprawdzanie | 12.01.2094 | 6000,00 |
| 1003 | 4433 | Oszczędności | 12.01.2094 | 9000,00 |
| 1004 | 3322 | Oszczędności | 22.08.1994 | 500,00 |
| 1004 | 1122 | Sprawdzanie | 11.11.1988 | 800.00 |
Tabela Customer zawiera 7 kolumn (ID klienta, imię, nazwisko, adres, miejscowość, stan i kod pocztowy) oraz 4 wiersze (lub rekordy) danych. Tabela Accounts ma 5 kolumn (CustomerID, AccountNumber, AccountType, DateOpened i Balance) z 7 wierszami danych.
Każda z kolumn jest zgodna z jednym z trzech podstawowych typów danych :Znak, Numer lub Data. Typ danych dla kolumny wskazuje typ wartości danych, które mogą być przechowywane w tej kolumnie.
- Liczba – może przechowywać tylko liczby, ewentualnie z kropką dziesiętną. Może być pozytywny lub negatywny.
- Znak – może przechowywać cyfry, litery i znaki interpunkcyjne. Access wywołuje ten typ danych Tekst .
- Data – może przechowywać tylko dane o dacie i godzinie.
W niektórych implementacjach baz danych istnieją inne typy danych, takie jak obrazy (dla obrazów lub innych danych). Jednak powyższe trzy typy danych są najczęściej używane.
Zauważ, że dwie tabele współdzielą kolumnę CustomerID i że wartości kolumny CustomerID w tabeli Customer są takie same jak wartości w kolumnie CustomerID w tabeli Accounts. Ten związek pozwala nam określić, że Klient Topór Nathanial ma zarówno konto czekowe, jak i konto oszczędnościowe, które zostały otwarte tego samego dnia:1 grudnia 1994 roku.
Inna nazwa nadana takiej relacji to Master/Detail . W relacji główny/szczegółowy pojedynczy rekord główny (taki jak Customer 1003, Nathanial Axe) może mieć wiele powiązanych rekordów szczegółowych (dwa konta).
W relacji Główny/Szczegółowy rekord główny może istnieć bez żadnych szczegółów. Jednak niemożliwe jest posiadanie rekordu szczegółowego bez pasującego rekordu głównego. Na przykład Klient może w ogóle nie posiadać żadnych informacji o koncie. Jednak wszelkie informacje o koncie muszą być powiązany z jednym Klientem.
Każda tabela musi mieć również specjalną kolumnę o nazwie Klucz który służy do jednoznacznej identyfikacji wierszy lub rekordów w tabeli. Wartości w kluczowej kolumnie (lub kolumnach) nigdy nie mogą być duplikowane. W powyższych tabelach CustomerID jest kluczem dla tabeli Customer, podczas gdy AccountNumber jest kluczem dla tabeli Accounts.
3 Przykład biznesowy
W tej sekcji przedstawimy przykład biznesowy, który zostanie wykorzystany jako podstawa przykładów w tym samouczku. W organizacjach zadanie analizy biznesu i określenia odpowiedniej struktury bazy danych (tabele i kolumny) jest zwykle wykonywane przez Analityków systemowych . Analityk systemowy zbierze informacje o sposobie działania firmy i utworzy model wymagań dotyczących przechowywania danych. Na podstawie tego modelu programista baz danych utworzy tabele bazy danych, a następnie będzie współpracować z twórcami aplikacji, aby opracować pozostałą część aplikacji bazy danych.
W tym samouczku rozważymy prosty biznes bankowy. Bank ma wielu klientów, którzy otwierają i prowadzą jedno lub więcej rachunków. Dla każdego Klienta prowadzimy rejestr jego nazwy i adresu. Przypisujemy im również unikalny CustomerID. Ten unikalny identyfikator przypisujemy zarówno dla wygody, jak i dokładności. Znacznie łatwiej jest zidentyfikować pojedynczego klienta przy użyciu jego identyfikatora klienta, niż sprawdzać jego pełne imię i nazwisko oraz adres. Dodatkowo bank może mieć dwóch klientów o tej samej nazwie (np. Bill Smith). W takich przypadkach do odróżnienia ich zawsze można użyć unikalnego identyfikatora klienta.
W podobny sposób wszystkim rachunkom przypisywany jest unikalny numer konta. Konto może być kontem czekowym lub kontem oszczędnościowym. Konta oszczędnościowe są oprocentowane, ale jedyne dozwolone transakcje to wpłaty i wypłaty. Rachunki czekowe nie są oprocentowane. Przechowujemy datę otwarcia konta. Pomaga nam to śledzić naszych klientów i może być przydatne do celów marketingowych. Na koniec utrzymujemy bieżące saldo konta.
W poprzedniej sekcji podaliśmy strukturę i kilka przykładowych danych dla tabeli Customer oraz tabeli Accounts. Będą one używane do obsługi części przechowywania danych w naszej aplikacji bankowej.
Aplikacje bazodanowe
W każdej aplikacji bazodanowej każda z tabel wymaga środków do pobierania do nich danych oraz do późniejszego pobierania i modyfikowania danych. Podstawowym sposobem wprowadzania danych do tabel jest użycie formularzy wprowadzania danych. Podstawowymi sposobami odzyskiwania danych z tabel lub wyświetlania danych w tabelach są zapytania lub raporty. W kompletnej aplikacji bazy danych wszystkie formularze i raporty są połączone ze sobą w formularzu nawigacyjnym – pojedynczej stronie, która będzie zawierała łącza do każdej części aplikacji. Duża aplikacja bazy danych może mieć dziesiątki formularzy do wprowadzania danych i raportów.
W tym samouczku utworzymy formularz wprowadzania danych dla każdej tabeli, zapytanie dla każdej tabeli i raport dla każdej tabeli.
W kolejnych sekcjach najpierw przedstawimy, jak uruchomić program Access i jak utworzyć nową bazę danych.
4 Uruchamianie programu Microsoft Access
Podobnie jak w przypadku większości programów Windows, Access można uruchomić, przechodząc do menu Start w lewym dolnym rogu pulpitu Windows.
Aby uruchomić program Access, kliknij przycisk Start, następnie menu Programy, następnie przejdź do menu Microsoft Office i na koniec kliknij pozycję menu Microsoft Access. Menu MS Office Professional pokazano poniżej.
Pamiętaj, że ten układ menu może się różnić w zależności od tego, jak MS Office został zainstalowany na używanym komputerze.
Po uruchomieniu programu Access zostanie wyświetlony ekran początkowy:
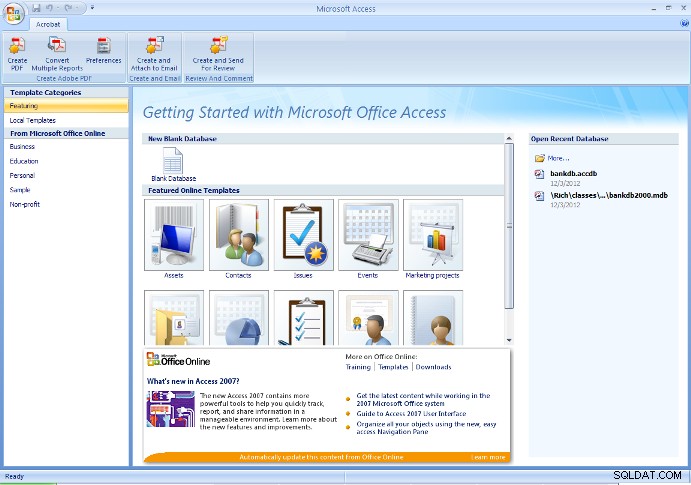
Na tym ekranie początkowym użytkownik może utworzyć nową bazę danych (pustą lub z tabelami utworzonymi za pomocą kreatora bazy danych) lub otworzyć istniejącą bazę danych.
Ogólnie rzecz biorąc, przy pierwszym rozpoczynaniu projektu należy utworzyć nową, pustą bazę danych. Następnie użyj Otwórz istniejącą bazę danych opcja ponownego otwarcia utworzonej wcześniej bazy danych.
Ostrzeżenie – Jeśli wcześniej utworzyłeś bazę danych, a następnie utworzyłeś ją ponownie, używając tej samej nazwy, nadpiszesz wszelką wykonaną pracę.
Na potrzeby tego samouczka, jeśli wykonujesz te kroki po raz pierwszy, wybierz opcję utworzenia nowej, pustej bazy danych, jak pokazano na powyższym rysunku.
W programie Access 2007 kliknij okrągły przycisk pakietu Office w lewym górnym rogu i wybierz Nowy z menu rozwijanego. Wpisz Nazwę pliku jako bankdb.accdb i kliknij przycisk Utwórz, aby utworzyć bazę danych, jak na poniższym rysunku.
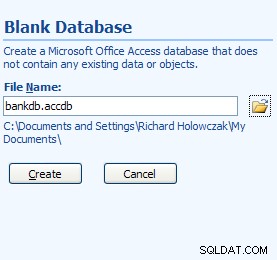
Ekran Nowa baza danych w programie Access 2007
W powyższej nazwie pliku bankdb to nazwa wybrana dla tej konkretnej bazy danych, a accdb to rozszerzenie nazwy pliku podane dla Microsoft DataBase 2007, Pliki 2010 i 2013.
Wskazane jest, aby nazwa bazy danych (w powyższym przykładzie bankdb) była stosunkowo krótka i nie używaj spacji ani innych znaków interpunkcyjnych w nazwie bazy danych. Ponadto nazwa bazy danych powinna odzwierciedlać zawartość bazy danych.
Po utworzeniu nowej bazy danych pojawi się następujący ekran główny Dostęp:
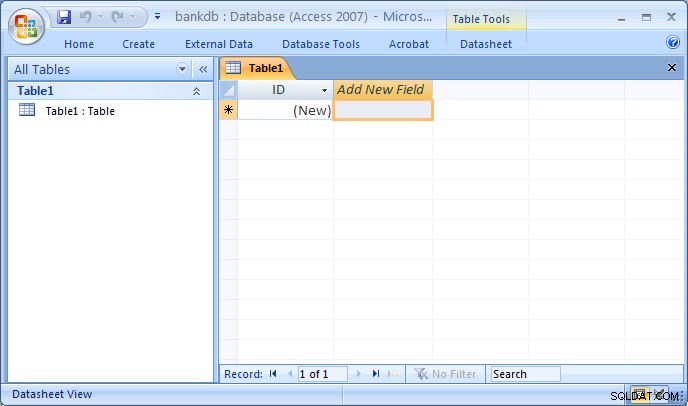
Układ ekranu MS Access 2007 znacznie różni się od poprzednich wersji. Większość zakładek u góry ekranu została zmieniona. Ponadto domyślny ekran główny po utworzeniu nowej bazy danych automatycznie przełącza się na widok Projekt, aby utworzyć nową tabelę.
U góry ekranu pojawią się następujące zakładki:
- Karta Strona główna – Sterowanie zmianą czcionek, wykonywaniem zapytań, kopiowaniem/wklejaniem/wycinaniem danych itp.
- Utwórz kartę – Kontrolki do tworzenia tabel, formularzy, raportów itp.
- Karta Dane zewnętrzne – Kontrola ładowania danych z innych źródeł danych do MS Access.
- Karta Narzędzia bazy danych – Kontrolki do zarządzania bazami danych (bezpieczeństwo, centrala itp.)
- Karta Projekt – Pojawi się podczas projektowania nowej tabeli, formularza, raportu itp.
Zwróć uwagę, że interfejsy programów Access 2007, 2010 i 2013 są podobne, chociaż używana wersja może wyglądać nieco inaczej niż na obrazach zawartych w tym samouczku.
4.1 Przegląd uruchamiania programu Microsoft Access
Aby uruchomić Microsoft Access:
- Użyj przycisku Start na pasku zadań, aby otworzyć:Programy -> MS Office -> Microsoft Access
- Aby utworzyć nową bazę danych, wybierz Pustą bazę danych i określ nową nazwę pliku dla bazy danych. Upewnij się, że nowa baza danych ma opisową nazwę. Kliknij przycisk OK, aby utworzyć nową bazę danych.
- Aby otworzyć istniejącą bazę danych, wybierz Otwórz istniejącą bazę danych , zaznacz Więcej plików… i kliknij przycisk OK. Następnie przejdź do napędu, podświetl istniejący plik bazy danych na dysku twardym lub dysku USB i ponownie kliknij przycisk OK, aby otworzyć bazę danych.
Aby wyjść z programu Access, rozwiń menu Plik (lub menu Office) i wybierz pozycję menu Exit.
5 Tworzenie i przeglądanie tabel
Tabele to główne jednostki przechowywania danych w programie Access. Przypomnij sobie, że tabela składa się z co najmniej jednej kolumny (lub pola ) oraz że dana kolumna może pojawić się w więcej niż jednej tabeli w celu wskazania relacji między tabelami.
Z omówionego wcześniej przykładu biznesowego doszliśmy do wniosku, że dwie tabele wystarczą do przechowywania danych o Klientach i ich Konta bankowe . Podajemy teraz instrukcje krok po kroku dotyczące tworzenia tych dwóch tabel w programie Access.
Istnieje kilka sposobów tworzenia tabeli w programie Access. Access zapewnia kreatory które prowadzą użytkownika przez tworzenie tabeli, sugerując nazwy tabel i kolumn. Innym głównym sposobem tworzenia tabeli jest użycie Widoku projektu aby ręcznie zdefiniować kolumny (pola) i ich typy danych.
Chociaż korzystanie z kreatorów jest szybkim sposobem tworzenia tabel, użytkownik ma mniejszą kontrolę nad nazwami kolumn (pól) i typami danych. W tym samouczku opiszemy, jak utworzyć tabelę przy użyciu Widoku projektu . Zachęcamy uczniów do samodzielnego eksperymentowania z użyciem kreatora tworzenia tabeli.
5.1 Tworzenie tabeli za pomocą widoku projektu
Aby utworzyć tabelę w programie Access za pomocą widoku projektu, wykonaj następujące czynności:
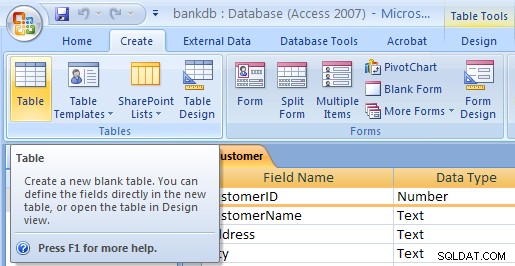
- W programie Access 2007, 2010 i 2013 karta Utwórz nową tabelę powinna być już podświetlona i utworzona nowa tabela o nazwie table1. Jeśli tak nie jest, kliknij Utwórz i kliknij Tabelę Ikona. Następnie rozwiń Widok menu i wybierz Widok projektu .

- Pojawi się widok projektu tabeli. Wpisz Nazwę pola , Typ danych i Opis dla każdej kolumny/pola w tabeli. Pole CustomerID jest wypełniane poniżej:
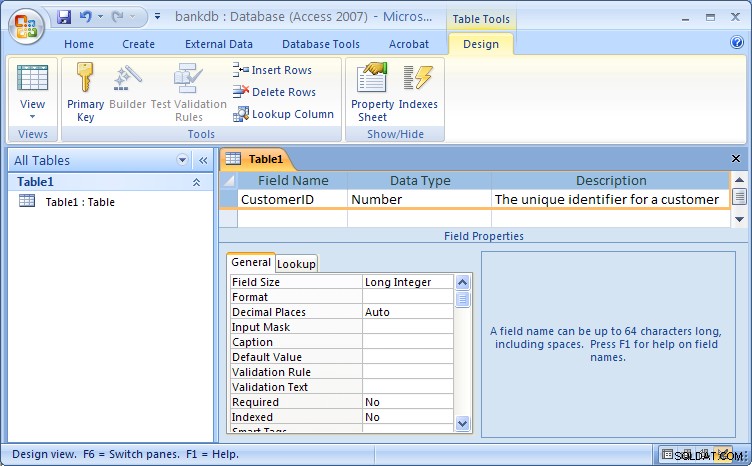
Widok projektu tabeli dla programu Access 2007Zauważ, że domyślna nazwa nadana dla tabeli to Tabela1 . W późniejszym kroku przypiszemy odpowiednią nazwę tej tabeli.
Uzupełnij informacje w polach w następujący sposób:
Nazwa pola Typ danych Opis Identyfikator klienta Numer Unikalny identyfikator klienta Imię Tekst Imię klienta Nazwisko Tekst Nazwisko klienta Adres ulicy Tekst Ulica klienta Miasto Tekst Miasto klienta Stan Tekst Stan macierzysty klienta Komputer Tekst Kod pocztowy klienta Rysunek przedstawiający widok projektu z wypełnioną nową definicją tabeli znajduje się poniżej:

Następnym krokiem jest zdefiniowanie klucza dla tabeli i zapisanie tabeli.
- Teraz, gdy wszystkie pola dla tabeli zostały zdefiniowane, należy zdefiniować klucz podstawowy. Przypomnijmy, że klucz podstawowy będzie używany do jednoznacznej identyfikacji rekordu w tabeli (w tym przypadku Klienta). Zaznacz Identyfikator klienta i kliknij przycisk Klucz główny na pasku przycisków
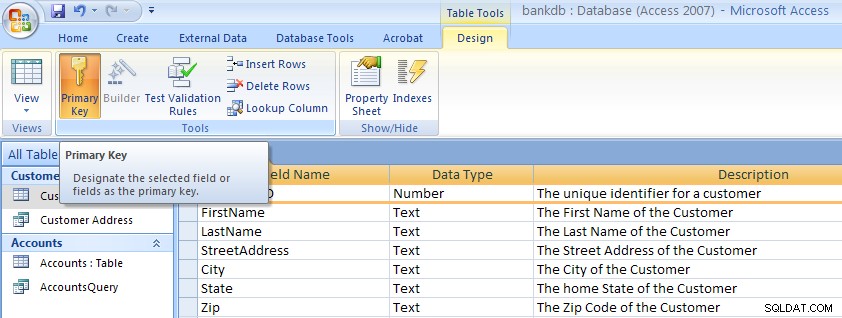 Zwróć uwagę, że obok nazwy pola po lewej stronie pojawia się mały klucz.Uwaga:Aby usunąć klucz podstawowy , po prostu powtórz tę procedurę, aby wyłączyć klucz podstawowy.
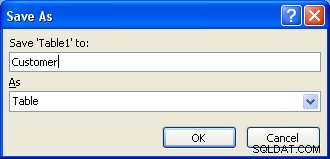
- Na koniec należy zapisać tabelę. Rozwiń menu Office i wybierz opcję Zapisz jako. Pojawi się okno dialogowe, w którym należy określić nazwę nowej tabeli. Pamiętaj, że program Access podaje domyślną nazwę, taką jak Tabela1 lub Tabela2 . Po prostu wpisz tę domyślną nazwę wraz z nazwą tabeli.W tym przykładzie nazwij tabelę:Klient Następnie kliknij przycisk OK.
W tym momencie została utworzona i zapisana nowa tabela Customer.
Uwaga na temat nazewnictwa pól (kolumn) w MS Access
Podczas definiowania pól (kolumn) dla tabeli ważne jest, aby używać nazw pól, które dają jasne zrozumienie zawartości danych w kolumnie. Na przykład, czy pole CNO wskazuje numer klienta czy numer kontenera?
Nazwy pól w programie Access mogą mieć do 64 znaków i mogą zawierać spacje. Jednak nie zaleca się używania spacji w nazwach pól i nazwach tabel . Jeśli chcesz, aby nazwy pól były łatwiejsze do odczytania, rozważ użycie znaku podkreślenia do oddzielania słów. Należy jednak upewnić się, że żadne spacje nie pojawiają się przed ani po podkreśleniu.
Poniższa tabela podsumowuje kilka różnych sposobów nadawania nazw polom:
| Opis | Zły | Dobra |
|---|---|---|
| Unikalny identyfikator klienta | CID | ID klienta lub ID_klienta |
| Opis produktu | PDESC | Opis produktu |
| Numer telefonu domowego pracownika | Pracownik_domowy_numer_telefonu | Telefon domowy |
| Numer konta bankowego | BA# | Numer Konta |
5.2 Ćwiczenie:Tworzenie tabeli
Utwórz Konta tabeli, wykonując te same kroki, które zostały użyte do utworzenia tabeli Customer.
- Kliknij kartę Utwórz, a następnie kliknij Tabelę przycisk.
- Rozwiń menu Widok i wybierz Projekt. Pojawi się widok projektu tabeli. Wpisz Nazwę pola , Typ danych i Opis dla każdej kolumny/pola w tabeli Konta.
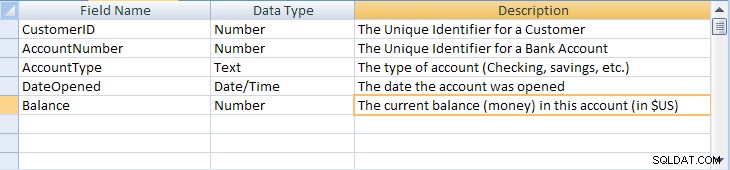
Nazwa pola Typ danych Opis Identyfikator klienta Numer Unikalny identyfikator klienta Numer Konta Numer Unikalny identyfikator konta bankowego Rodzaj konta Tekst Typ konta (czekowe, oszczędnościowe itp.) Data otwarcia Data Data otwarcia konta Saldo Numer Aktualne saldo (pieniądze) na tym koncie (w USD) Rysunek przedstawiający widok projektu z wypełnioną nową definicją tabeli znajduje się poniżej:
- Zdefiniuj klucz podstawowy dla tabeli Konta. Kliknij Numer konta pole z prawą przycisk myszy i wybierz Klucz główny z menu podręcznego.
- Zapisz nową tabelę Konta, rozwijając menu Plik i wybierając opcję Zapisz. Wpisz nazwę tabeli:Konta Następnie kliknij przycisk OK.
Należy pamiętać, że istnieje wiele dodatkowych kroków, które można wykonać, aby ulepszyć i upiększyć tabele w MS Access, w tym określanie wartości domyślnych, tworzenie wartości wyszukiwania i maskowanie danych wejściowych zgodnie z określonym wzorcem. Szczegóły nie są ważne w tym samouczku, ale jeśli jesteś zainteresowany, sprawdź stronę Zaawansowane projektowanie tabel MS Access, do której link znajduje się tutaj.
5.3 Przeglądanie i dodawanie danych do tabeli
Dane można dodawać, usuwać lub modyfikować w tabelach za pomocą prostego wyświetlacza przypominającego arkusz kalkulacyjny. Aby wyświetlić ten widok danych pojedynczej tabeli, zaznacz nazwę tabeli, a następnie kliknij dwukrotnie nazwę tabeli.
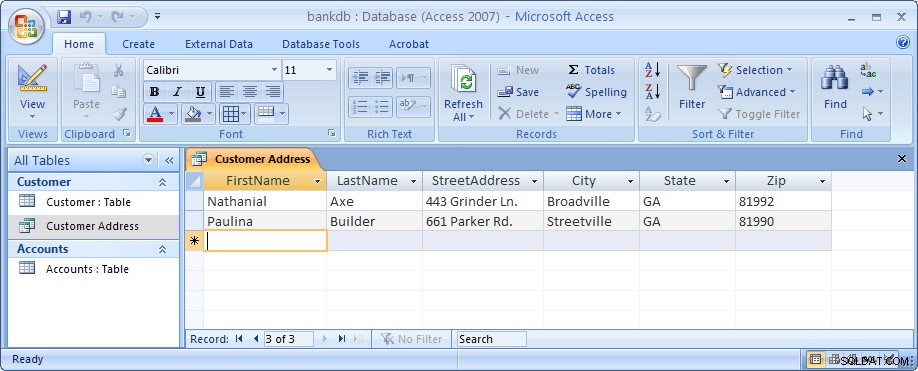
W tym widoku tabeli Customer, pokazanym na poniższym rysunku, pola (kolumny) pojawiają się w górnej części okna, a wiersze lub rekordy pojawiają się poniżej. Ten widok jest podobny do tego, w jaki sposób zostałby zaprojektowany arkusz kalkulacyjny.
Uwaga na dole okna wyświetlana jest liczba rekordów. W tym przypadku, ponieważ tabela została właśnie utworzona, pojawia się tylko jeden pusty rekord.
Aby dodać dane do tabeli, wystarczy wpisać wartości dla każdego z pól (kolumn). Naciskaj klawisz Tab, aby przechodzić między polami w rekordzie. Użyj klawiszy strzałek w górę iw dół, aby poruszać się między rekordami. Wprowadź dane, jak podano poniżej:
| Identyfikator klienta | Imię | Nazwisko | Adres ulicy | Miasto | Stan | Zamek błyskawiczny |
|---|---|---|---|---|---|---|
| 1001 | Józef | Kowalski | 123 Lexington | Smithville | KJ | 91232 |
| 1002 | Alberta | Jones | Śr. Davisa 12 | Smithville | KJ | 91232 |
| 1003 | Nathanial | Topór | 443 szt. młynka | Broadville | GA | 81992 |
| 1004 | Paulina | Konstruktor | 661 Parker Rd. | Streetville | GA | 81990 |

Aby zapisać nowe dane, rozwiń menu Office i wybierz Zapisz.
Aby przejść do innych rekordów w tabeli, użyj paska nawigacyjnego na dole ekranu:
Aby zmodyfikować istniejące dane, po prostu przejdź do interesującego Cię rekordu i przejdź do odpowiedniego pola. Użyj klawiszy strzałek i klawiszy usuwania lub klawisza Backspace, aby zmienić istniejące dane.
Aby usunąć rekord, najpierw przejdź do interesującego Cię rekordu. Następnie rozwiń menu Edycja i wybierz pozycję menu Usuń.
Aby zamknąć tabelę i powrócić do głównego ekranu programu Access, rozwiń menu Plik i wybierz opcję Zamknij.
5.4 Ćwiczenie:Dodawanie danych do tabeli
W tym ćwiczeniu otwórz tabelę Konta i dodaj dane dla siedmiu kont pokazanych w sekcji 2. Pamiętaj, aby wprowadzić dane dokładnie tak, jak pokazano, w tym wielkość liter w danych w polu Typ Konta. np. wpisz Oszczędności zamiast oszczędności lub OSZCZĘDNOŚCI.
Pamiętaj, że wprowadzając daty, wpisz pełne cztery cyfry roku. Domyślnie program Access wyświetla wszystkie 4 cyfry roku (starsza wersja programu Access wyświetlała tylko dwie cyfry).
Pamiętaj, aby zapisać dane, gdy skończysz. Poniższy rysunek przedstawia tabelę kont i dane tak, jak powinny wyglądać po zakończeniu tego ćwiczenia.
Na tym etapie samouczka utworzyliśmy dwie tabele, Klienci i Konta, i do każdej z nich dodaliśmy dane. W kolejnych sekcjach omówimy, jak wyszukiwać i raportować dane w tabelach oraz jak utworzyć przyjazny dla użytkownika formularz wprowadzania danych za pomocą kreatorów dostępu.
Uwaga:Mój samouczek dotyczący zaawansowanego projektowania tabel MS Access można znaleźć pod tym linkiem. Możesz to sprawdzić po ukończeniu reszty tego samouczka.
5.5 Tworzenie relacji między tabelami
Przypomnijmy, że jedną z głównych cech relacyjnych baz danych jest fakt, że wszystkie tabele są ze sobą powiązane. W dotychczasowej bazie Banku tabela Klienci powiązana jest z tabelą Rachunki poprzez występujące w obu tabelach pole CustomerID. W programie Access istnieje sposób, aby uczynić tę relację jawną za pomocą ekranu Relacje. Program Access wykorzystuje te informacje podczas projektowania raportów, formularzy i zapytań, które wymagają wyświetlenia więcej niż jednej tabeli.
Aby rozpocząć, upewnij się, że tabela Konta i tabela Klient są zamknięte. Program Access zatrzyma tworzenie wszelkich relacji, jeśli tabela jest aktualnie otwarta. Aby zamknąć tabelę, kliknij prawym przyciskiem myszy nazwę tabeli na karcie nad tabelą i wybierz element menu zamykania lub kliknij mały X po prawej stronie nad tabelą.

Następnie wyświetl ekran Relacje, klikając kartę Narzędzia bazy danych, a następnie kliknij przycisk Relacje, jak pokazano poniżej. 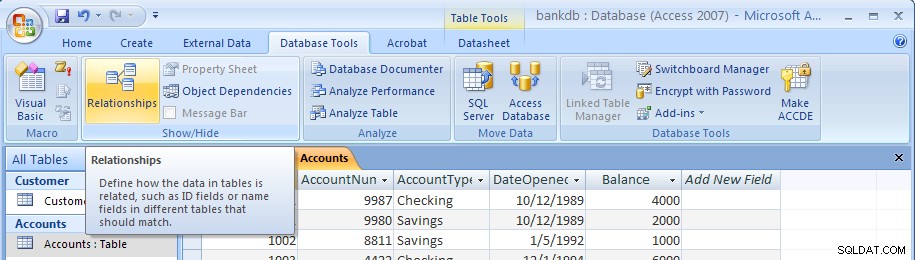
Pusty ekran relacji pojawi się w następujący sposób:
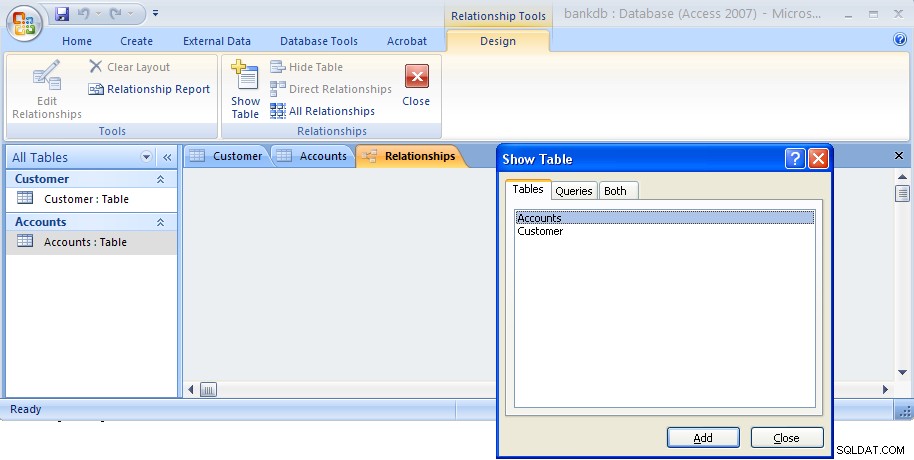
Okno dialogowe Pokaż tabelę pojawi się domyślnie. Zaznacz zarówno tabelę Klienci, jak i tabelę Konta, jak pokazano poniżej, a następnie kliknij przycisk Dodaj.

Następnie kliknij przycisk Zamknij, aby zamknąć to okno dialogowe. Ekran Relacje pojawi się teraz ponownie z dwiema tabelami wyświetlonymi jak poniżej:
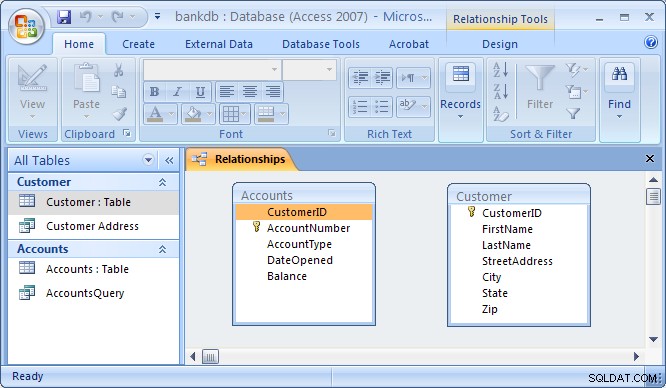
Aby połączyć tabelę Klienci z tabelą Konta w celu utworzenia relacji, kliknij pole IDKlienta w tabeli Klienci i przeciągnij je nad pole IDKlienta w tabeli Konta. Po zwolnieniu przycisku myszy pojawi się okno dialogowe Edytuj relacje, jak poniżej:
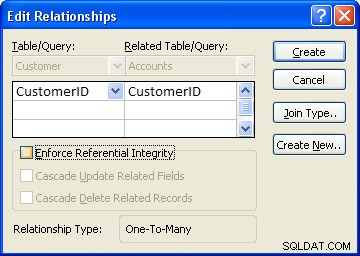
Program Access dołoży wszelkich starań, aby określić typ relacji (prawie zawsze wybierze opcję Jeden do wielu ). For this example, Access knows that CustomerID is a key of the Customer table so it chooses this field as the “One” side. This makes the Accounts table the “Many” side as One customer may have Many accounts.
One additional step to be taken is the check off the box labeled “Enforce Referential Integrity”. This option puts constraints into effect such that an Accounts record can not be created without a valid Customer record, and Access will also prevent a user from deleting a Customer record if a related Accounts record exists. At this point, click on the Create button to create the relationship. The Relationships screen should reappear with the new relationship in place as follows:
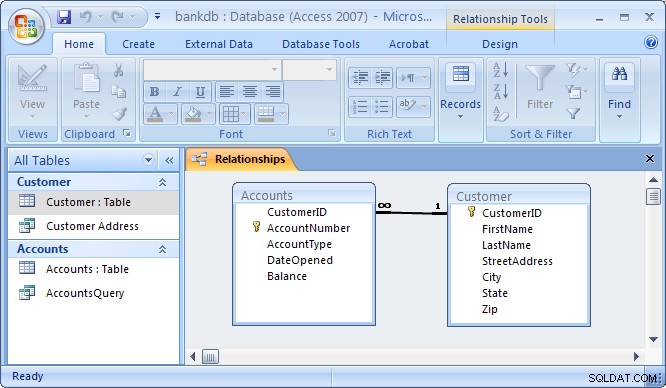
Note the symbols “1” (indicating the “One” side) and the infinity symbol (indicating the “Many” side) on the relationship. Close the relationships screen and select Yes to save the changes to the Relationships layout.
If the relationship does not appear in the above fashion, highlight it and press the delete key to delete it. Then go back to the table design view and make certain that the CustomerID field is designated as the key of the Customers table. Then go back to the Relationships screen and try to recreate the relationship.
5.6 Review of Creating and Viewing Tables
Creating a new table requires the following steps:
- Click on the Tables tab on the Access main screen
- Click on the New button.
- Choose the Design View and click the OK button.
- Fill in the name, data type and description of each of the fields in the table.
- Designate a primary key by clicking on one of the fields with the right mouse button and then choose Primary Key from the pop-up menu.
- Save the table by pulling down the File menu and choosing Save.
- Close the new table by pulling down the File menu and choosing Close.
To change the design of an existing table (e.g., to add, change or delete a field):
- Click on the Tables tab on the Access main screen
- Highlight the name of the table to be modified and click on the Design button.
- Make the necessary changes.
- Save the table by pulling down the File menu and choosing Save.
- Close the table by pulling down the File menu and choosing Close.
To add, delete or change data in an existing table:
- Click on the Tables tab on the Access main screen
- Highlight the name of the table to be modified and click on the Open button.
- Make the necessary changes to the data.
- Save the table data by pulling down the File menu and choosing Save.
- Close the table by pulling down the File menu and choosing Close.
To create or edit relationships between tables:
- Pull down the Tools menu and select the Relationships menu item.
- To display tables, right click and choose Add Tables
- To create new relationships, drag a key field from one table and drop it on the associated field in another table
- To edit an existing relationship, double click on the relationship line.
- To delete an existing relationship, click on the relationship line and press the delete key.
6 Creating and Running Queries
Queries are a fundamental means of accessing and displaying data from tables. Queries can access a single table or multiple tables. Examples of queries for our bank database might include:
- Which Customers live in Georgia ?
- Which Accounts have less than a $500 balance ?
- What is the total amount of money deposited by each Cusomter?
- Which Checking account has the largest balance?
Queries can be used to carry out other tasks such as for creating formatted reports and data entry forms, and for exporting subsets of data to Excel or another software program.
In this section, we show how to use the Access Wizards to create queries for a single table and for multiple tables.
6.1 Single Table Queries
In this section, we demonstrate how to query a single table. Single table queries are useful to gain a view of the data in a table that:
- only displays certain fields (columns) in the output
- sorts the records in a particular order
- performs some statistics on the records such as calculating the sum of data values in a column or counting the number of records, or
- filters the records by showing only those records that match some criteria. For example, show only those bank customers living in GA.
Creating a query can be accomplished by using either the query design view or the Query wizard. In the following example, we will use the query wizard to create a query.
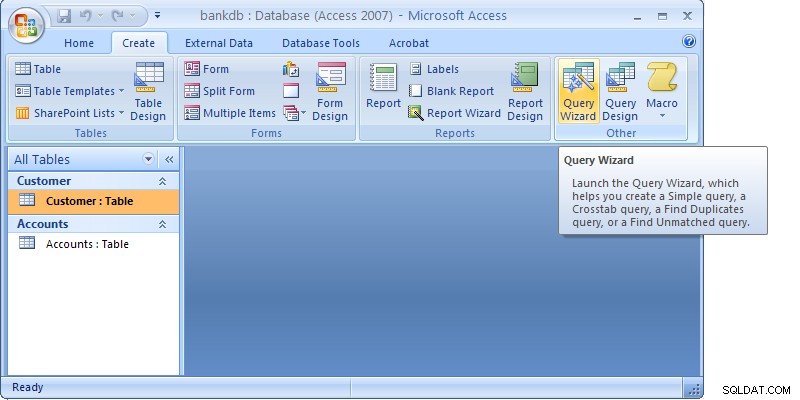
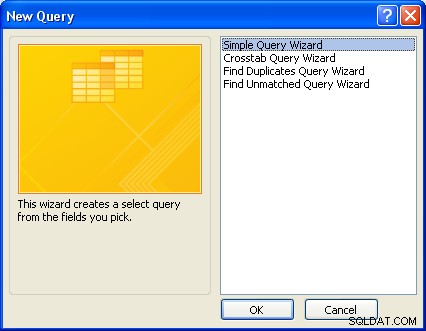
To create a new query, click on the Create tab. Then click on the Query wizard button.
When the Query wizard appears, highlight the Simple Query Wizard selection and click on the OK button.
The first step in the Simple Query wizard is to specify the table for the query and which fields (columns) should be displayed in the query output. Three main sections of this step are:
- Tables/Queries – A pick list of tables or queries you have created.
- Available Fields – Those fields from the table that can be displayed.
- Selected Fields – Those fields from the table that will be displayed.
For this example, pull down the Tables/Queries list and choose the Customer table. Notice that the available fields change to list only those fields in the Customer table. This step is shown below:

From the list of Available fields on the left, move the FirstName, LastName, StreetAddress, City and State fields over to the Selected Fields area on the right. Highlight one of the fields and then click on the right arrow button  in the center between the two areas. Repeat this for each of the four fields to be displayed. When done with this step, the wizard should appear as below:
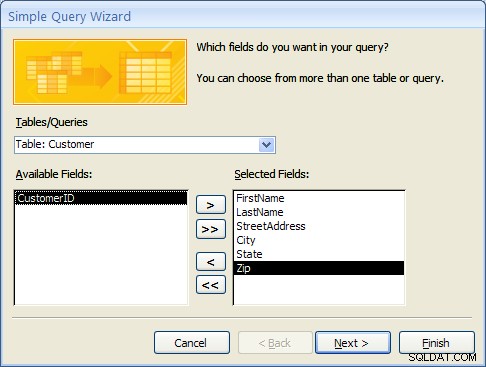
Click on the Next button to move to the next and final step in the Simple Query wizard.
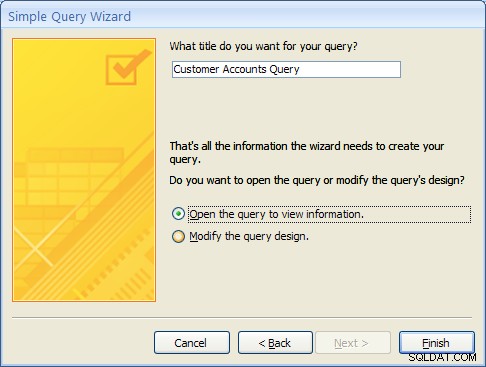
In the final step, give your new query a name. For this example, name the query:Customer Address
At this point, the wizard will create the new query with the option to either:
- Open the query to view information – that is, the wizard will execute the query and show the data.
- Modify the query design – the wizard will switch to the Design View to allow further modification of the query.
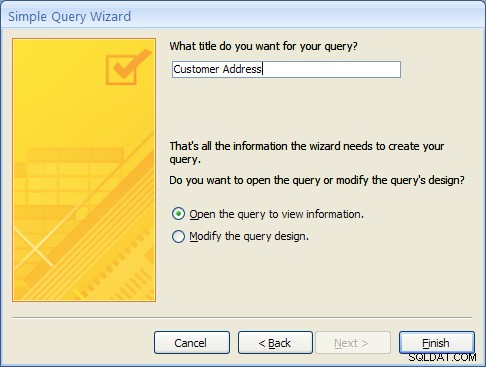
For this example, choose Open the query to view information and click on the Finish button. When this query executes, only the customer’s name, address, city and state fields appear, however, all of the rows appear as shown in the figure below:

Close this query by clicking on the X in the upper right corner of the query results as shown in the figure below:
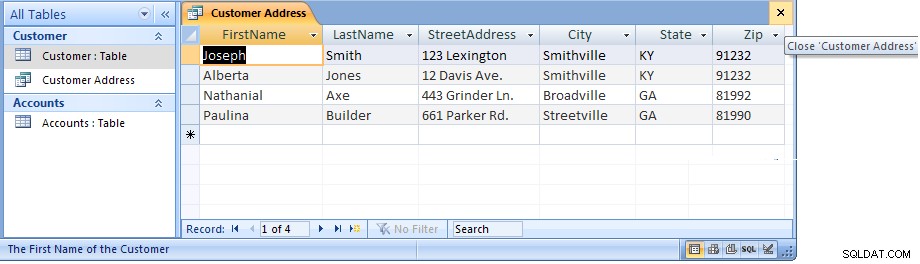
The Access main screen showing the Queries tab should appear. Note the new query Customer Address appears under the Customers table.
6.1 Single Table Queries (Continued)
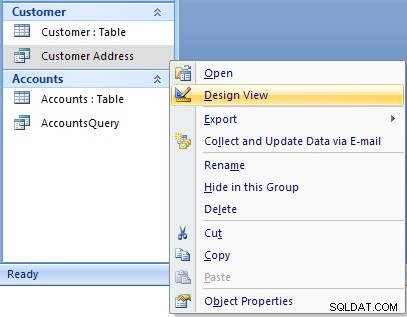
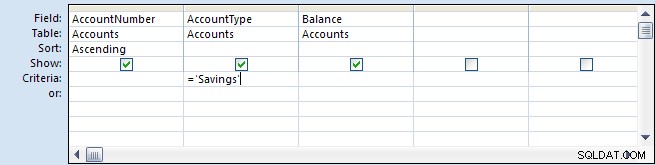
In the following example, we will modify the Customer Address query to only display customers in a certain state. To accomplish this, we will make use of the Query Design View.
Open up the Customer Address query in the design view by right-clicking on the name of the query. Then select the Design View menu item as shown below.
The design view will appear as in the figure below:
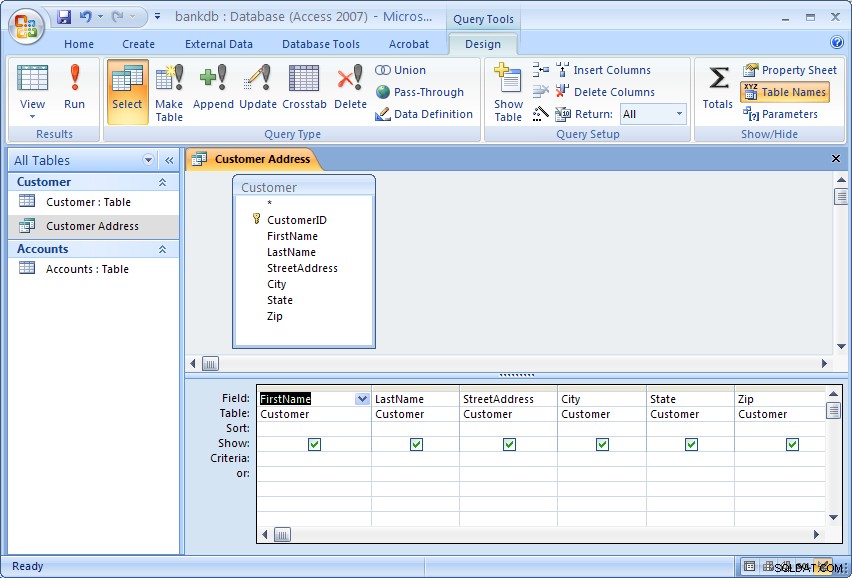
The Query Design view has two major sections. In the top section, the table(s) used for the query are displayed along with the available fields. In the bottom section, those fields that have been selected for use in the query are displayed.
Each field has several options associated with it:
- Field – The name of the field from the table
- Table – The table the field comes from
- Sort – The order in which to sort on this field (Ascending, Descending or Not Sorted)
- Show – Whether or not to display this field in the query output
- Criteria – Indicates how to filter the records in the query output.
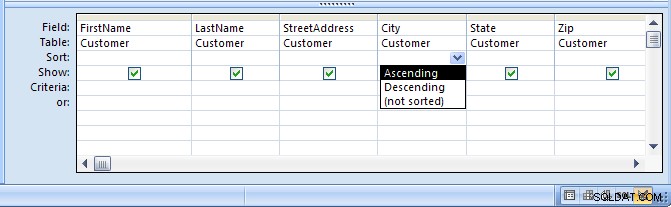
For this example, we will filter the records to only display those customers living in the State of Georgia (GA). We will also sort the records on the City field.
To sort the records on the City field, click in the Sort area beneath the City pole. Choose Ascending from the list as shown in the figure below:
To filter the output to only display Customers in Georgia, click in the Criteria area beneath the State field and type the following statement: ='GA'
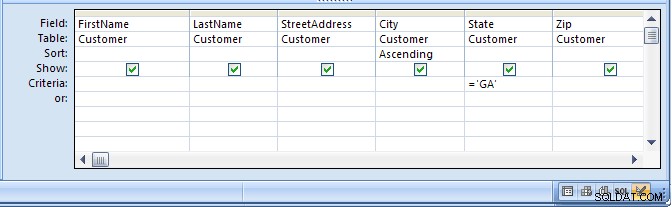
The ='GA' statement tells Access to only show those records where the value of the State field is equal to ‘GA’. Note the use of single quotes to surround the characters.
Run the query by clicking on the Run button (with the large red exclamation point). The output is shown in the figure below:
Finally, save and close this query to return to the Access main screen.
6.2 Exercise:Single Table Queries
For this exercise, use the Simple Query wizard to create a query on the Accounts table showing just the AccountNumber, AccountType and Balance fields.
- From the Access main screen, click on the Create tab. Then click on the Query Wizard button.
- Choose the Simple Query wizard option and click on the OK button.
- Under Table/Queries:choose the Accounts table. Then move the AccountNumber, AccountType and Balance fields over to the Selected fields area. Then click the Next button.
- In the next panel, you will be asked to choose between a detail or summary query. Choose detailed query and click on the Next button.
- Name the new Query :AccountsQuery and click on the Finish button.
The output is shown below:

Close this query by pulling down the Office menu and choosing Close.
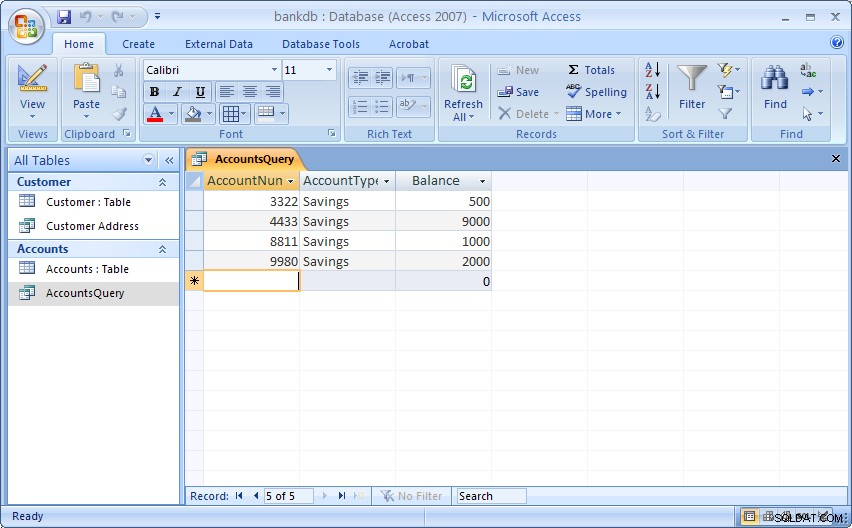
In the next part of the exercise, we will modify the query to sort the output on the account number and only display the Savings accounts.
- From the Queries tab on the Access main screen, highlight the AccountsQuery and click on the Design button.
- Change the Sort order for the AccountNumber field to Ascending.Add the following statement to the Criteria:are under the AccountType field:=‘Savings’
- Run the query by double-clicking on the AccountsQuery name. The output is shown below:
- Finally, save and close the query to return to the Access main screen.
6.3 Multiple Table Queries
Up to this point, queries involving only one table have been demonstrated. It is almost a given that queries will need to involve more than one table. For this example, assume that a manager would like to see a list of all of the customers and the type of account(s) that each one maintains at the bank. Such a query requires data from both the Customers table as well as the Accounts table. In such queries, Access will rely on the Relationships established between tables to guide how the data will be assembled to satisfy the query.
Before proceeding with these next instructions, make certain the One-to-Many relationship between the Customers and Accounts table has been created (see section 5.5 Creating Relationships for a review of this process).
To start the process of creating a multiple table query, highlight the Create tab and click on the Query Wizard button to create a new query. Select the “Simple Query Wizard” option as was done previously.
When the simple query wizard appears, select the CustomerID and LastName fields from the Customers table, then switch the Tables/Queries selection to the Accounts table and select the CustomerID, AccountType and Balance fields from the Accounts table. The result from this step is down below:
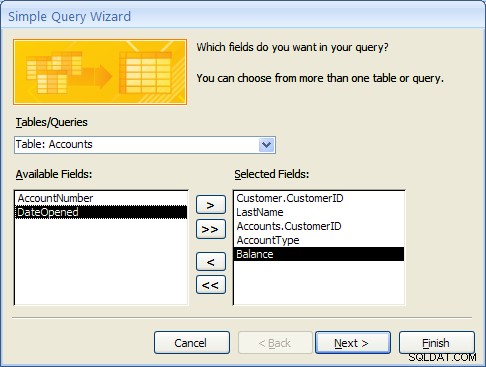
Click the Next button to continue. In the next step of the wizard, an option will appear to provide some level of Summary. For this example, leave the default at “Detail …” as shown below and then click on the Next button.
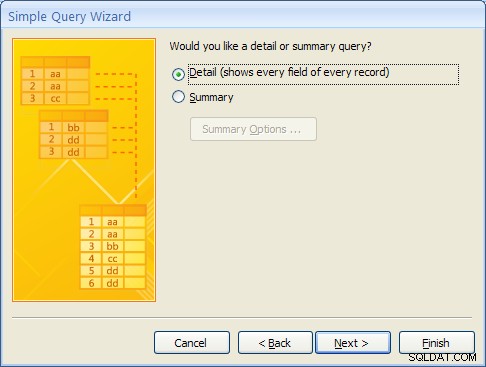
In the final step of the wizard, name the query “Customer Accounts Query” and click on the Finish button. The multiple table query results should appear as follows:
MS Access knows how to line up (or “join”) the accounts table to the Customer table for this query due to the relationship that was created when the tables were first defined.
As with single table queries demonstrated previously, one can change the query definition in design view by adding filters (e.g., show account information for all customers in ‘GA’).
6.4 Exercise:Multiple Table Queries
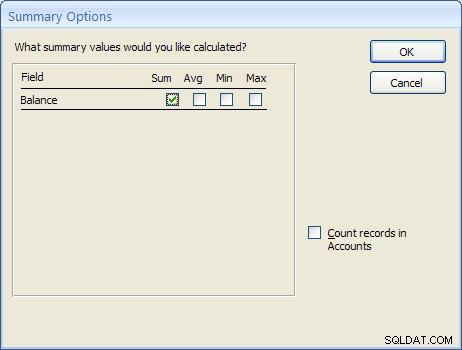
For this exercise, create a new query called “Accounts Summary Query” that joins the Customers table (include the CustomerID and LastName fields) with the Accounts table (include the Balance field only). In the second step of the wizard, click on the Summary choice (instead of Details) and then click on the Summary Options… button. Check off all of the Summary option boxes such as Sum , AVG , Min and Max as shown in the figure below:
The resulting query should appear as follows:
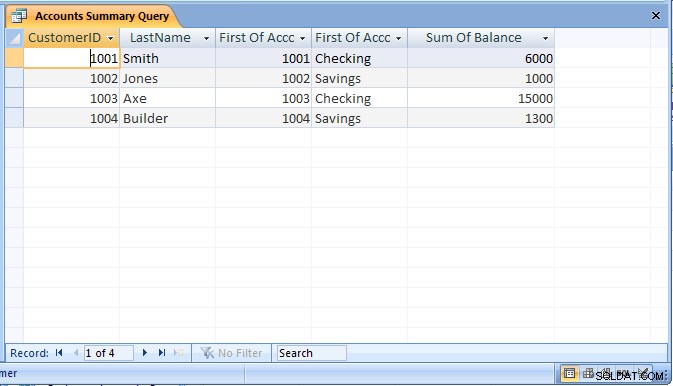
Be sure to save the query as “Accounts Summary Query”.
6.5 Review of Creating and Running Queries
In this section, the basic steps for creating and running queries were introduced. The query wizard can be used to create simple queries that access a single table. It is also possible to then modify the query to sort or filter the records.
Creating a query using the query wizard:
- From the Access main screen, click on the Queries tab. Then click on the New button.
- From the Queries tab on the main Access screen, click on the New button and choose the Simple Query wizard option.
- Under Table/Queries:choose the appropriate table for the query and then indicate which fields in the table will appear in the query output.If querying more than one table, change the Table/Queries:selection to display additional tables and select the necessary fields.
- If the table contains numeric fields, either detailed or summary information may be specified for the query.
- Finally, name the new query and click on the Finish button.
As a final note, Forms and Reports can be created based on existing queries.
7 Creating and Running a Data Entry Form
Data entry forms are the primary means of entering data into tables in the database. In a previous section, we described how to add data to a table using a spreadsheet-like view of the data. Data entry forms offer a more user-friendly interface by adding labels for each field and other helpful information.
Access provides several different ways of creating data entry forms. These include:
- Creating the forms by hand using a Design View
- Creating a default form based on all of the fields available in a table or a query
- Creating a form based on a number of different wizards that walk the user through the forms creation process.
As with queries, a data entry form can be based on a single table or it can work on multiple tables at the same time.
In this section, we cover the basic steps for using a wizard to create a data entry form based on a single table. After this exercise, a multiple-table form is demonstrated.
7.1 Creating a Single Table Form using the Wizard
In this example, we will create a simple data entry form for the Customer table. To begin the process, click on the Create tab on the Access main screen. As with the other components in Access, there are buttons for creating a New form, Open an existing form and Design an existing form. For this example, click on the New button to create a new form.
Several buttons for creating a new form will appear. For this tutorial, choose the Form wizard.
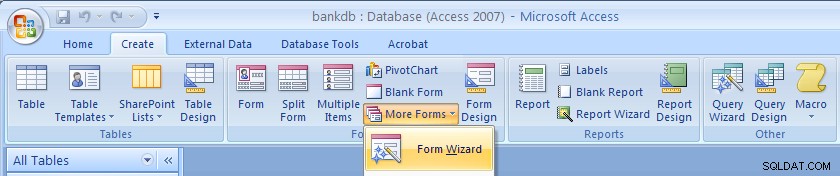
In the first step of the Form wizard, we need to specify the fields from the Customer table that will appear on the form. In this case, we want all of the fields to appear. Move each of the fields from the Available Fields side over to the Selected Fields side as in the following figure. Then click on the Next button.

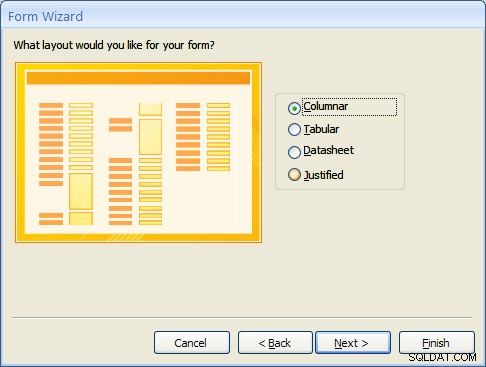
Forms can have several different layouts or arrangement of the labels and fields on the screen.
- Columnar – Places the labels to the left of each field. This is similar to a paper form. This layout is suitable for viewing data one record at a time.
- Tabular – Places the field labels at the top of the screen and the records are displayed below. This is similar to how a spreadsheet would display the data and is suitable for displaying multiple records of data at a time.
- Datasheet – The data appears in the same fashion as when viewing or adding data to a table.
- Justified – Places the labels above each field with the fields spread out on the form. This is suitable for viewing a single record at a time as with the columnar layout.
For this example, choose the columnar layout as shown in the figure below and click on the Next button.
At this point, MS Access 2007 and 2010/2013 versions are a bit different. Access 2007 will show several sample display styles that determine how the form will appear, including elements such as fonts, colors and the background used in the form. Access 2010 and 2013 skips this step in this wizard and provides styles that can be applied to the form in Design mode. For this example, for MS Access 2007, select the Office style as shown below and click on the Next button.

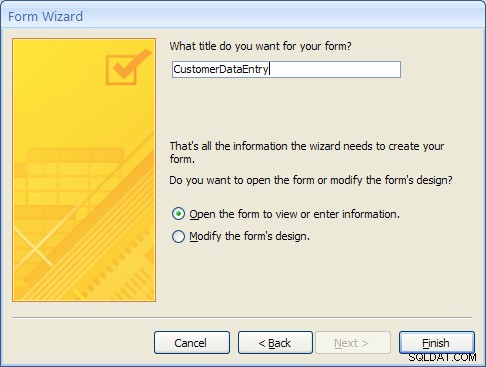
As a final step, give this new form the name:CustomerDataEntry and then click on the Finish button as shown below:
The new form will be created by the wizard and then opened. It should appear as in the figure below:
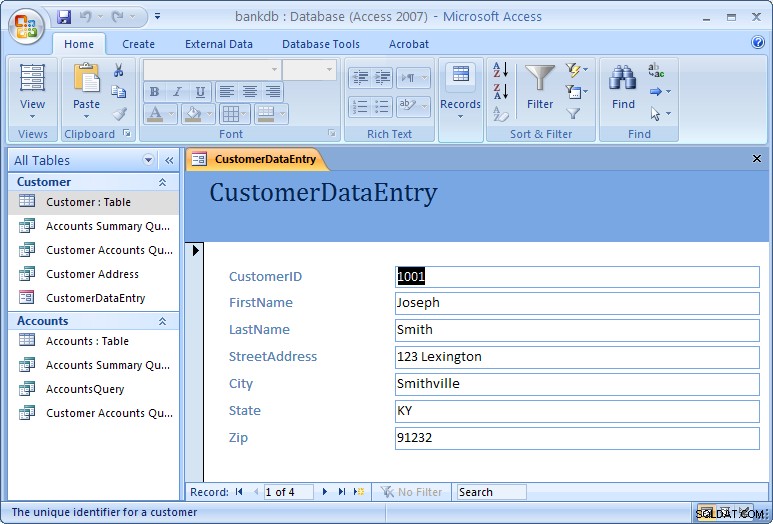
Use the tab key to navigate between fields in the form. To move to the next or previous record, use the record navigation bar at the bottom of the form:
The buttons on the navigation bar perform the following functions:
 | Go to the first record. |
 | Go to the previous record. |
 | Go to the next record. |
 | Go to the last record.  Go past the last record to add a new record. Go past the last record to add a new record. |
To close the form and return to the Access main screen, pull down the File menu and choose Close.
To open the form at any time, highlight the form name under the Forms tab on the Access main screen and click on the Open button.
One quick final note on forms. When the form is created, MS Access looks at how the table is designed and creates the form based on the properties of the table. If you make any changes to the table, you will need to re-create the form again in order to see those table changes reflected in the form. One example where this might happen is is if you change a column in your table from a text box to a combo box, or if you add or remove any columns from your table.
7.2 Exercise:Creating a Single Table Form
For this exercise, we will create a data entry form for the Accounts table created in a previous exercise.
- Click on the Create tab on the Access main screen and then click on the More Forms… button and the “Forms Wizard” to create a new form.
- Select the Accounts table and all of the available fields and click on the Next button.
- Choose a Tabular layout and click on the Next button.
- For Access 2007 choose the Office style and click on the Next button.
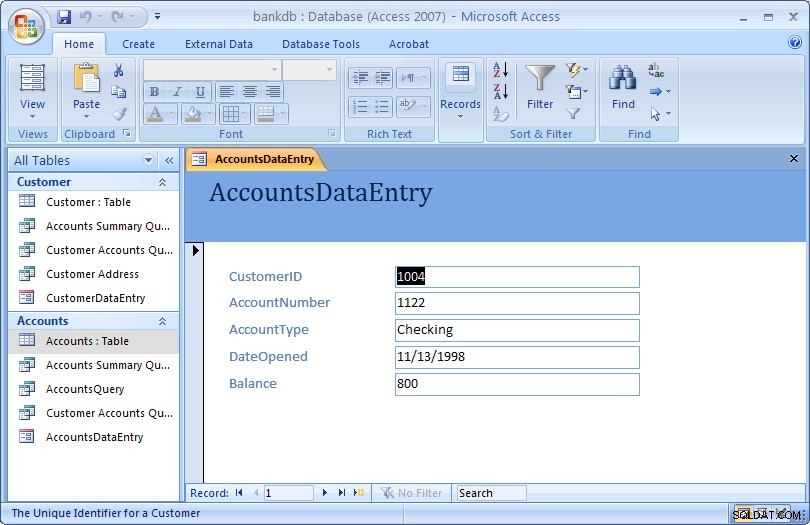
- Name the form:AccountsDataEntry Then click on the Finish button to create, save and view the new form.
The new form is shown in the figure below:
Close the form and return to the Access main screen, by pulling down the File (or Office) menu and choosing Close.
7.3 Review of Creating and Running a Data Entry Form
The basic steps for creating a simple data entry form are:
- Choose a table and a form wizard
- Specify the fields (columns) that will appear in the form
- Specify the layout for the form
- Specify the style (fonts/colors, etc.) for the form
- Save, create and run the new form
In this section we covered the basic steps required to create and run a data entry form. Access provides wizards which are adept at building simple forms with a minimal amount of work. More advanced work on forms would concentrate on using the Design View to change a form’s appearance and to add or remove fields and labels once a form is created. A more advanced tutorial on MS Access Forms Design is linked here.
8 Creating and Running a Report
Reports are similar to queries in that they retrieve data from one or more tables and display the records. Unlike queries, however, reports add formatting to the output including fonts, colors, backgrounds and other features. Reports are often printed out on paper rather than just viewed on the screen. They can also be attached to e-mail and exported and posted as web pages.
As with data entry forms, there are a number of ways to create reports in MS Access:
- A report can be created “by hand” in Design view
- A default report can be created automatically based on all of the firleds for a given table.
- A report can be created using the Create Report wizard.
In this section, we cover how to create simple reports using the Report wizard.
8.1 Creating a Single Table Report using the Wizard
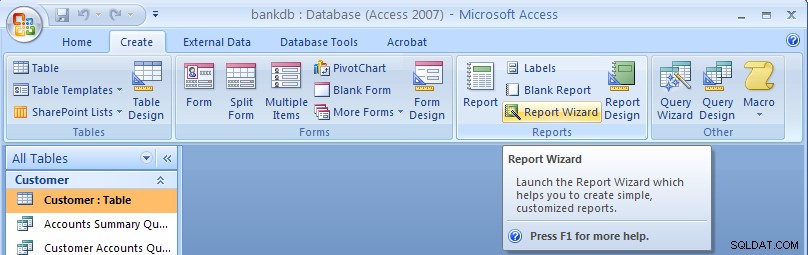
In this example, we will create a simple report for a single table using the Report wizard. As with the Queries and Forms, we begin by selecting the Create tab from the Access main screen.
To create a new report, click on the Report Wizard button.
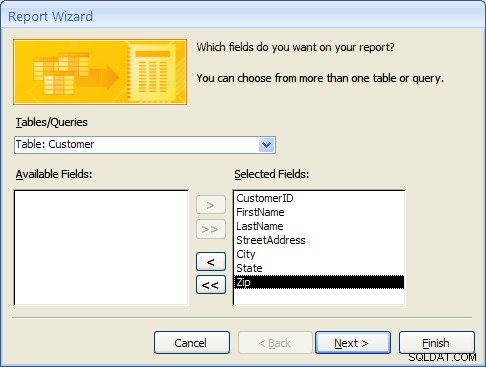
In the next step of the Report wizard, is used to specify the fields from the Customer table that will appear on the report. In this case, we want all of the fields to appear. Move each of the fields from the Available Fields side over to the Selected Fields side as in the following figure. Then click on the Next button.
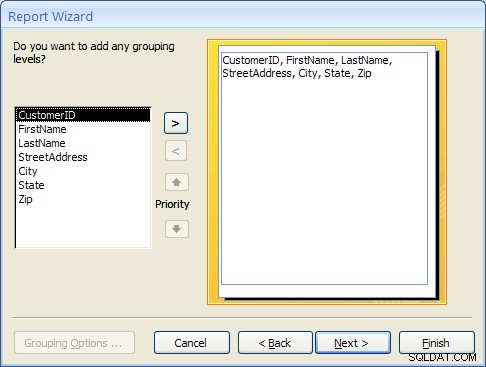
In the next step, we have the opportunity to add Grouping Levels to the report. A grouping level is where several records have the same value for a given field and we only display the value for the first records. In this case, we will not use any grouping levels so simply click on the Next button as shown below.
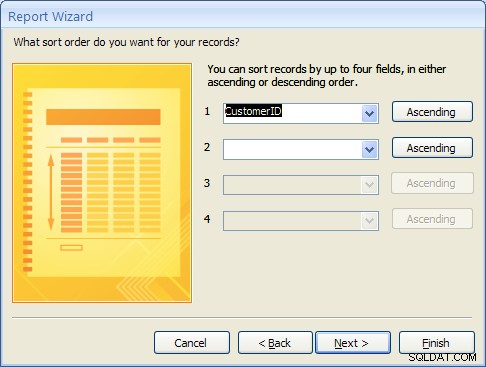
In the next step, the sorting order of the report can be specified. For this example, we will sort the records on the CustomerID field. To achieve this, pull down the list box next to the number 1:and choose the CustomerID field as shown in the figure below. Then click on the Next button.
8.1 Creating a Single Table Report using the Wizard (Continued)
The next step is to specify the layout of the report. The three options are:
- Columnar – Places the labels to the left of each field. This is similar to a paper form.
- Tabular – Places the field labels at the top of the report page and the records are displayed below. This is similar to how a spreadsheet would display the data.
- Justified – Places the labels above each field with the fields spread out on the report page.
Generally, reports use the tabular layout. For this example, choose Tabular layout and set the page Orientation to Landscape so that all of the fields will fit across one page. This is shown in the figure below. Click on the Next button to continue.

In the next step, the style of the report can be selected. For this example, choose the Office style and click on the Next button to continue.

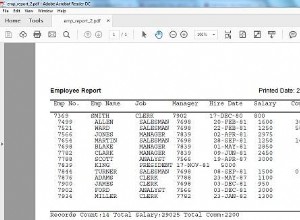
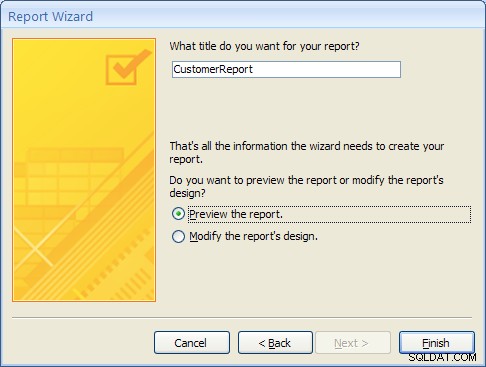
Finally, give a name for the new report:CustomerReport and then click on the Finish button to create, save and display the new report.
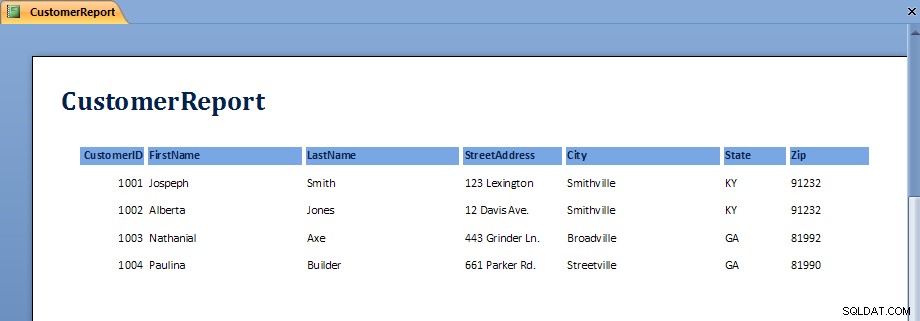
The output from the report is shown in the figure below. Note that on some screens, the last field, Zip, may not display without scrolling over to the right.
Once the report is displayed, it can be viewed, printed or transferred into Microsoft Word or Microsoft Excel. The button bar across the top of the screen has the following functions:
 | Print the report |
 | Zoom into a region of the report |
 | Display the report as one, two or multiple pages |
 | Zoom into or out of the report |
 | Transfer the report into MS Word |
 | Close the report |
To close the report and return to the Access main screen, click on the Close button.
8.2 Exercise:Creating a Single Table Report
For this exercise, we will create a report showing all of the Accounts information.
- From the Access main screen, click on the Create tab and Click on the Report wizard.
- Select all of the fields in the Accounts table by moving them all over to the Selected Fields side and then click Next
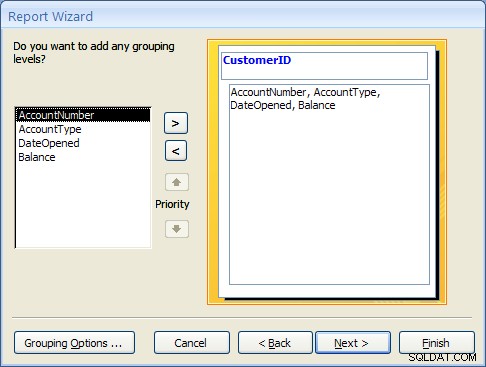
- Group the report by CustomerID by clicking on the CustomerID field and then clicking on the right arrow button. This is shown in the following figure:
Click on the Next button to continue. - Choose to sort the report on the AccountNumber pole. Note that a new button will appear called Summary Options.
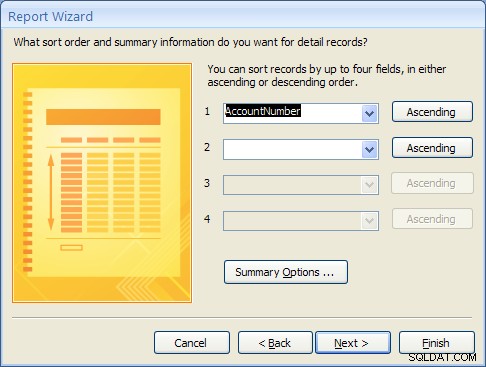
Click on the Summary Options button. Choose the Balance field and select the Sum option. Choose the option to show both Detail and Summary data. Then click on the OK button.

Click on the Next button. - Choose a Block layout and click on the Next button.
- Choose the Corporate style and the click on the Next button.
- Finally, name the report:AccountsReport and click on the Finish button to create, save and run the report.
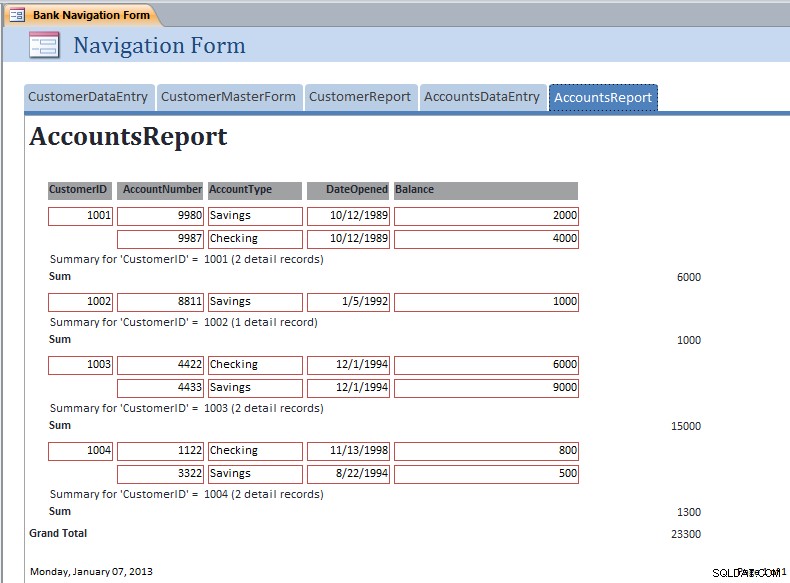
The output from the AccountsReport is shown below:
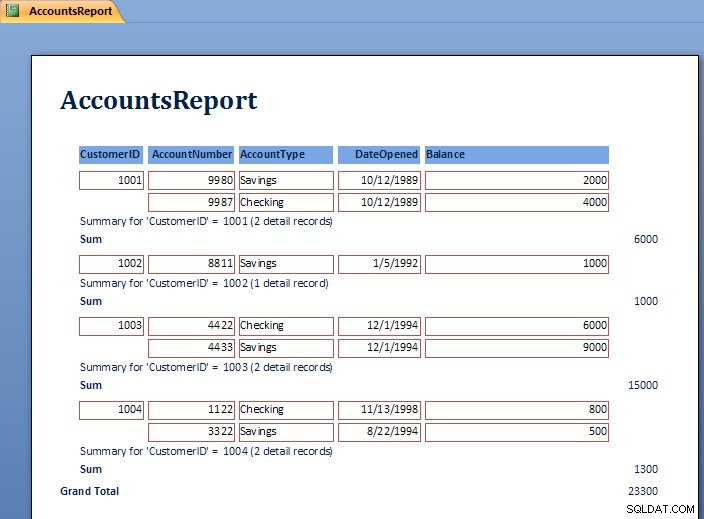
Note the Grouping at the level of the CustomerID and the Sum for each customer’s balances.
To close the report and return to the Access main screen, pull down the File menu and choose Close.
8.3 Review of Creating and Running a Report
As can be seen in the report exercise, there are many ways to create reports to show summation, sorting and layout of the data. Further study of Reports will show how to modify the layout using the Design View. Students are encouraged to work with the Report wizards to create different styles and types of reports.
9 Creating and Running a Master/Detail Form
Master/Detail forms are used to display data from two tables at the same time. MS Access calls the “details” a “subform”. The forms are linked according to the relationship between the tables. Recall that in the example database, the CustomerID is used to link the Customer table (Master) to the Accounts table (Detail). In this section a master / detail form for the Customer and Accounts tables will be created.
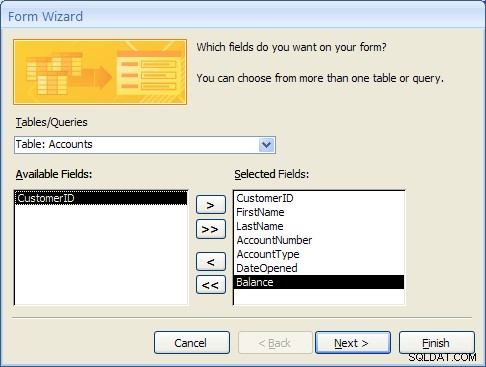
- From the Access main screen, click on the Create tab and Click on the “More Forms…” section and finally the “Forms Wizard”.Select the Customer table first and move the CustomerID, FirstName and LastName fields to the Selected Fields list.Next, select the Accounts table and move the AccountNumber, AccountType, DateOpened and Balance fields to the Selected Fields list as shown below.
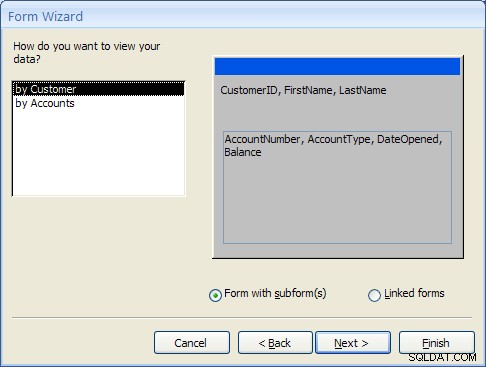
Click the Next… button to move to the next step. - At this point MS Access detects that this form will involve data from two different tables. The first prompt asks how the form should be organized at the top or “Master” level. The “by Customer” selection should be highlighted.The second prompt asks how the forms should be created. For this example, select “Form with Subform(s)” as shown below and click the Next… button to move to the next step.
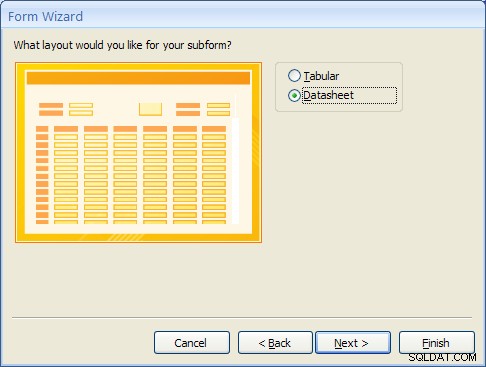
- The Subform is the form that will display the detailed data from the Accounts table. Selecting the “Datasheet” layout will make it easy for the user to view the multiple accounts a Customer may have. Select “Datasheet” and click the Next… button to move to the next step.
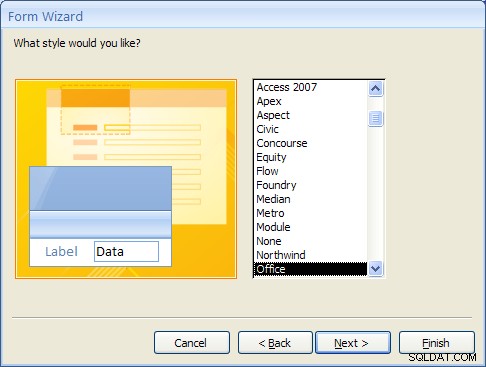
- For Access 2007, select the Office style and click the Next… button to move to the next step. (This step will not appear in MS Access 2010 or 2013).
- Finally, give the main form the name “CustomerMasterForm” and the Subform the name “Accounts Subform”.
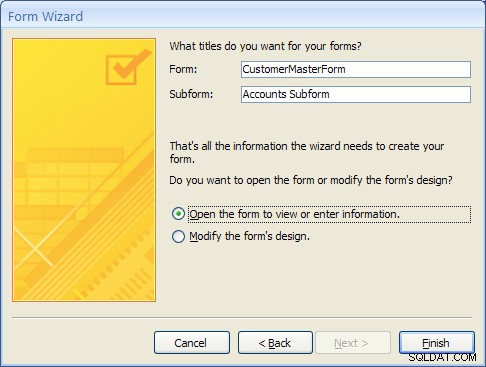
- After clicking on the Finish button the new Master/Detail form will appear as shown below.
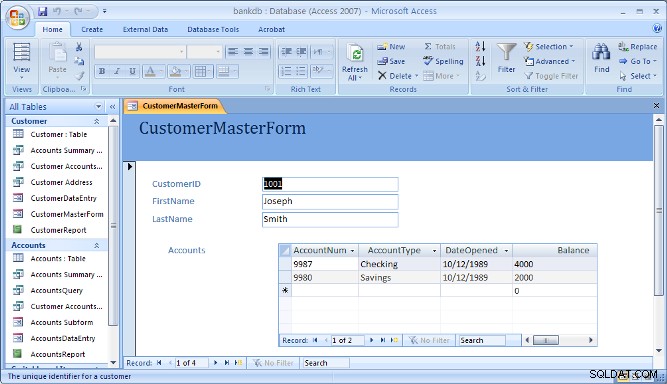
Note that the navigation bar at the bottom of the form is used to navigate through the records in the Master (or top) part of the form.
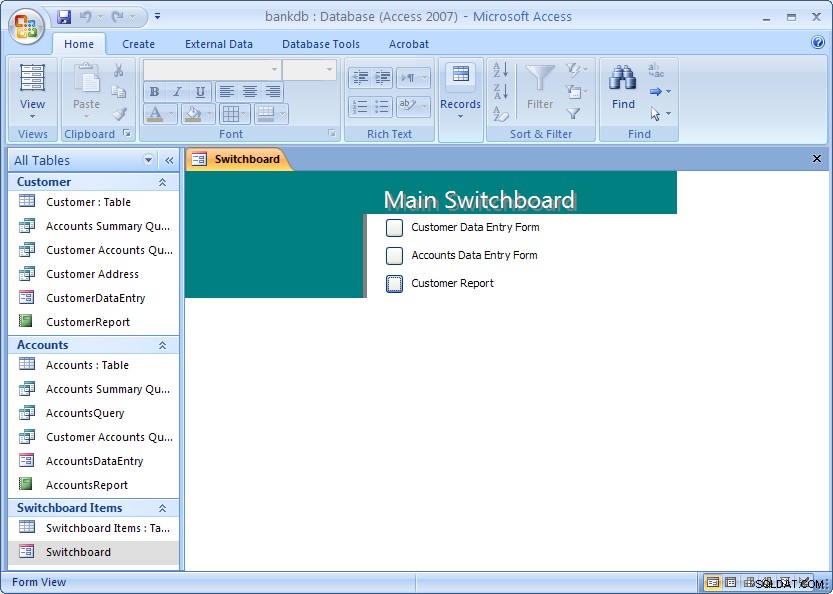
10 Creating and Running a Switchboard
A Switchboard is a type of form that displays a menu of items that a user can click on to launch data entry forms, reports, queries and other actions in the database. A switchboard is typically created after all of the forms and reports for a database application have been completed. It can be used to guide the user to an appropriate set of forms and reports.
Note that starting with Access 2010, Switchboards are not available by default (you will need to add this to the ribbon bar manually using the Options). Access 2010 and 2013 make use of the Navigation Forms.
In this section, a default switchboard will be created.
- From the Access main screen, click on the Database Tools tab and Click on the Switchboard Manager as shown in the figure below.

If this is the first switchboard made for this database, you will be prompted to create a new one as shown below. Click the Yes button.

- The Switchboard manager will appear as shown below:
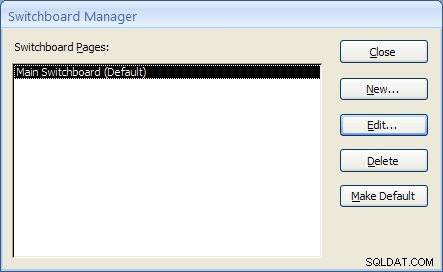
- Click on the Edit menu to edit the “Main Switchboard”. The Edit Switchboard Page will appear as shown below:
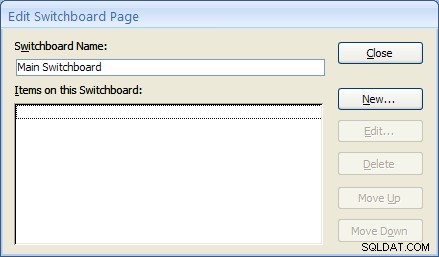
- Add a new switchboard item by clicking on the New… button. The Edit Switchboard Item form will appear as shown below. Fill in the fields as follows:
Text: Customer Data Entry Form Command: Select Open Form in Edit Mode from the drop down list. Form: Select the “CustomerDataEntry” form from the drop down list. 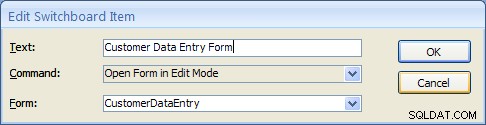
Click on the OK button to save this new Switchboard item.
- Repeat the above step two more times to add Switchboard items for the Accounts DataEntry form and the Customer Report.
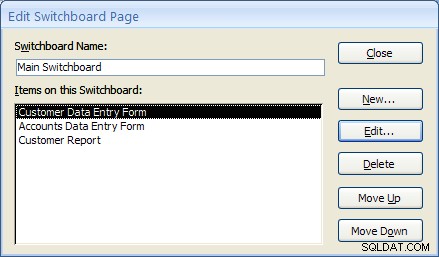
Once completed, click the Close button. Then click the Close button once more to close the Switchboard manager. - From the main MS Access screen look for a new section labeled Switchboard items. To view the switchboard, double-click on name “Switchboard”.
The next section covers creating a Navigation Form which is the recommended navigation screen for MS Access 2007, 2010 and newer versions.
11 Creating and Running a Navigation Form
MS Access 2010 introduced a new form called a Navigation Form. Navigation forms take the place of Switchboards but provide much the same functionality. Namely, they are designed to give the user the ability to run forms and reports without having to hunt through all of the different menus and lists objects. Typically a database application will have one main Navigation form that will appear when the database is opened.
In this section, the basic steps for creating and running a Navigation Form in MS Access 2010 will be demonstrated.
A Navigation Form is another type of form in MS Access 2010 and 2013
- To get started, click on the Create tab on the Access 2010 or 2013 ribbon bar. Under the section for Forms look for the item labeled Navigation Form. Note that this may be located on the button labeled Other Forms.
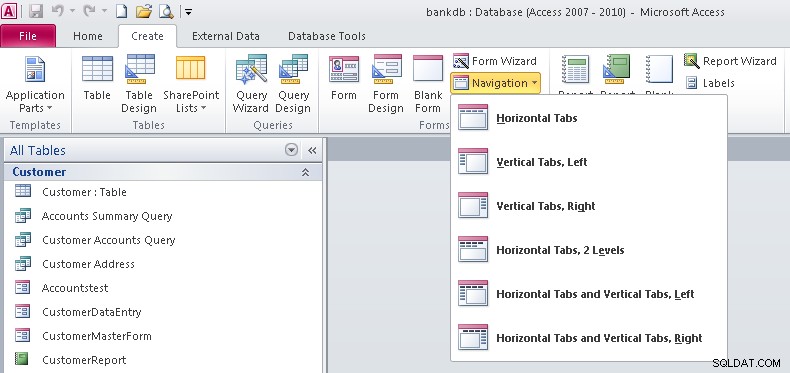
- Note that there are 6 different default styles of Navigation Forms. Each one places the buttons in a different configuration on the screem. Buttons can be aligned across the top, either side or some combination.For this tutorial select the Horizontal Tabs configuration which appears as the first item on the list.
- At this point a new Navigation Form will be created with a row of tabs across the top. The first tab will be labeled [Add New]
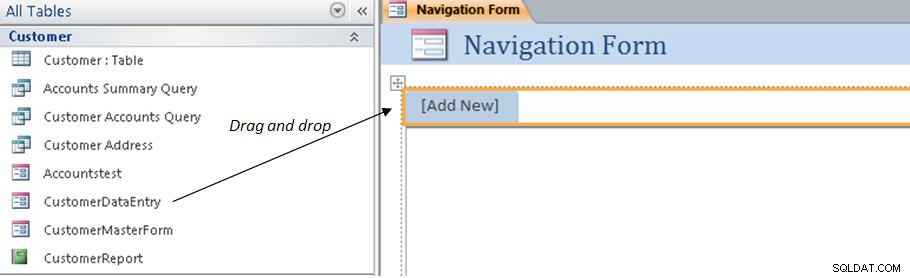
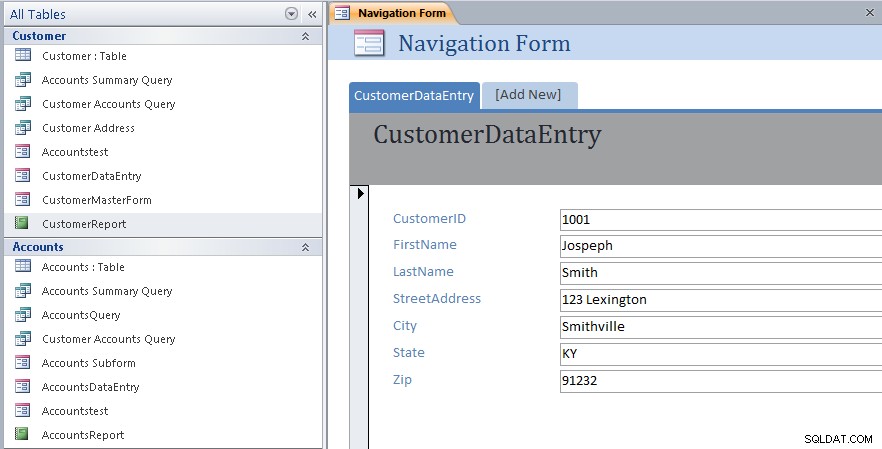
- To add items to the Navigation form, drag the items from the list on the left over to the spot on the Navigation Form labeled [Add New]. This is shown by the arrow in the above figure. For example, drag over the CustomerDataEntry form to the Navigation Form. The result is shown below.
- Next drag and drop the CustomerMasterForm as shown below.

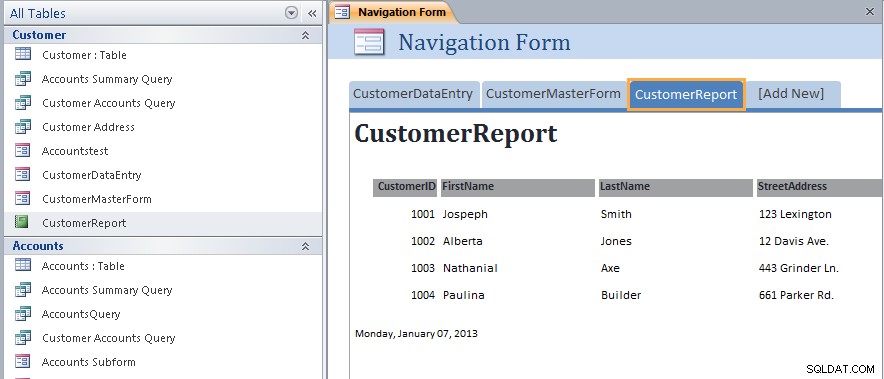
- Next drag and drop the CustomerReport as shown below.
- At this point we have created a new navigation Form and added three items along the top of the page. Save the Navigation Form by right-clicking on the name of the form and choosing Save as shown below:
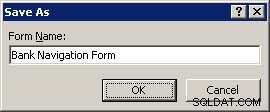
- Name the Navigation Form:Bank Navigation Form and click the OK button.
- Close up the Navigation Form by right-clicking again on the name of the form and choosing Close menu item.At this point the new Navigation Form has been created and saved. The next step will be to view the Navigation Form and navigate the different forms and reports linked to it.
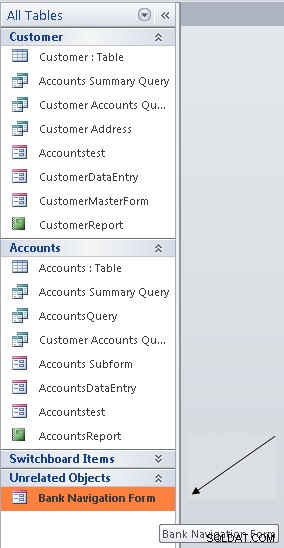
- To view the Navigation Form, look for the Unrelated Objects group on the left side of the screen. Double click on the Bank Navigation Form item as shown below:
The Navigation Form will appear: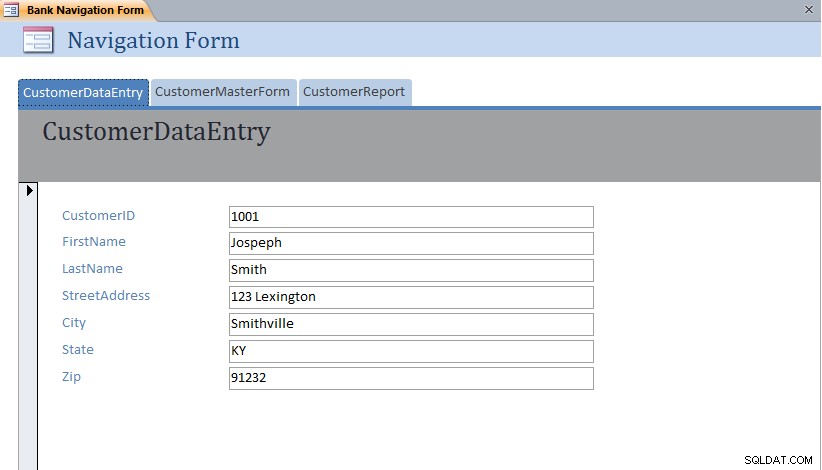 Note that each form or report can be displayed simply by clicking on the different tabs across the top of the Navigation Form.
11.1 Exercise:Modifying a Navigation Form
For this exercise, edit the Bank Navigation Form in Layout View and add the following new items to the Navigation Form:
- AccountsDataEntry
- AccountsReport
The resulting Navigation Form should appear as below with the AccountsReport opened:
11.2 Setting the Navigation Form as the Default
MS Access 2007 and 2010 (as well as earlier versions) have the ability to set a default form that will open up automatically once the MS Access data file is opened. This is especially useful for end users so that they always see the same form when they open up the database.
To set the Default Form, pull down the File menu and select the Options menu item.

The Database Options form will appear. Click on the Current Database item on the left hand side.
Under the Application Options heading, look for the Display Form:prompt and set this to the Bank Navigation Form as shown below:
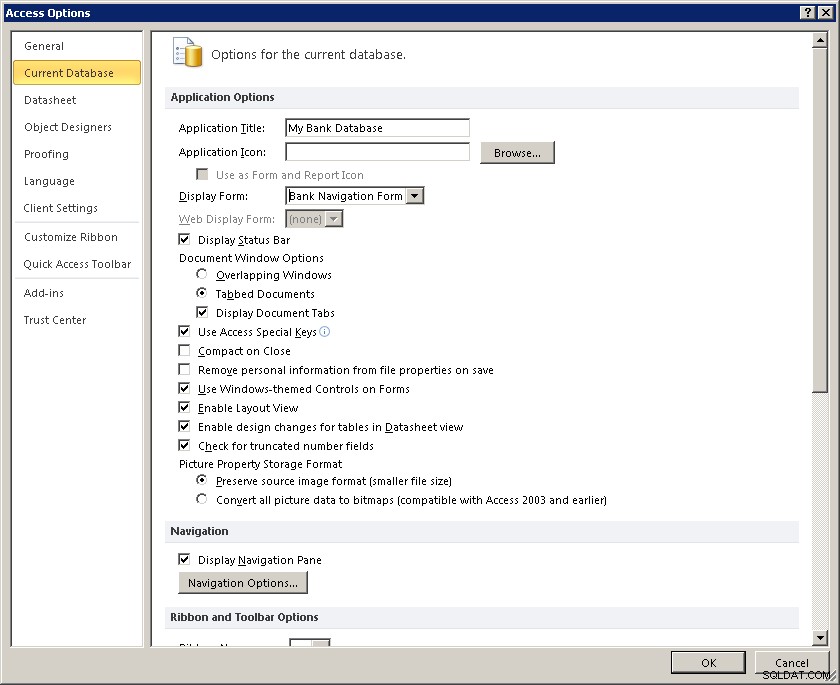
Click on the OK button to close up the Database Options screen.
The next time this database (bankdb.accdb) is opened, the Bank Navigation Form will open up.
12 Tutorial Summary
In this tutorial, we have covered the basics for creating an Access database including tables with data, queries to retrieve data, forms to enter data and reports to display and summarize data.
Students are encouraged to further their Access knowledge and skills by working through more advanced tutorials such as Advanced Access Database Table Design and Advanced Access Forms Design, and by reading the on-line help and Access documentation.
You may also be interested in this tutorial that covers up-sizing the Access database to Microsoft SQL Server using the Microsoft SQL Server Migration Assistant.